Strategy One
Validating a Workflow
Validating a workflow is an important step in creating a workflow. Although validating a workflow does not guarantee that every process will be completed successfully when deploying a workflow, it helps to limit the possibility for errors during the deployment.
While you are creating a workflow, you can use System Manager to validate the workflow. This validation process performs the following checks on the workflow:
- The workflow contains at least one entry process. This is required so that the workflow has at least one process to use as the first step in the workflow.
- All processes have values for all required properties. For example, if you are creating a DSN, you must supply a name for the DSN, the machine that stores the data source, the port number, and other required values for the data source type.
The validation checks only that values exist for all required properties, not whether the values are valid for the process.
To use System Manager to validate a workflow, from the Workflow menu, select Validate Workflow. One of the following messages is displayed:
- The workflow is valid: This message is displayed if it passes all the checks listed above. Click OK to close the message.
- Incomplete workflow: This message is displayed if parts of the workflow are not valid. Click Details to display the invalid portions of the workflow. Continue to fix the workflow and perform the validation until you see the message, "The workflow is valid." Click OK to close the message.
Additional validations that can be done manually on a workflow are described in Manually Validating a Workflow below.
Manually Validating a Workflow
As part of validating your workflow, you should manually validate additional aspects of the workflow. These additional validations help reduce the potential for issues to develop when deploying a workflow. This includes the following validations:
-
Each process has either one continue connector or one success connector and one failure connector leading from it. This ensures that each process continues on to another step in the workflow regardless of whether the process is successful or unsuccessful. For more information on correctly supplying connectors for a workflow, see Using Connectors to Create the Logical Order of a Workflow.
-
The workflow has at least one exit process. Exit processes verify that a workflow deployment has completed. For more information on how you can use exit processes in a workflow, see Using Exit Processes to End a Workflow.
-
Step through the logical order of the workflow and double-check that all the possible paths make sense with the purpose of the workflow. You can also use this as an opportunity to check for parts of the workflow that could become cyclical. For example, in the workflow shown in the image below, a potential cyclical path is highlighted with purple, dashed arrows.
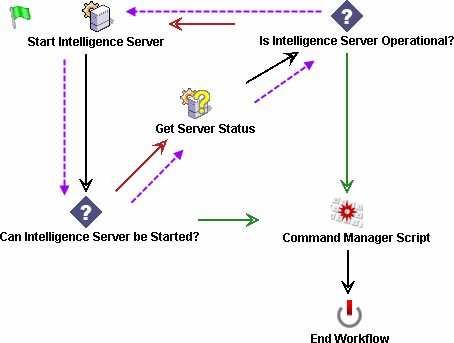
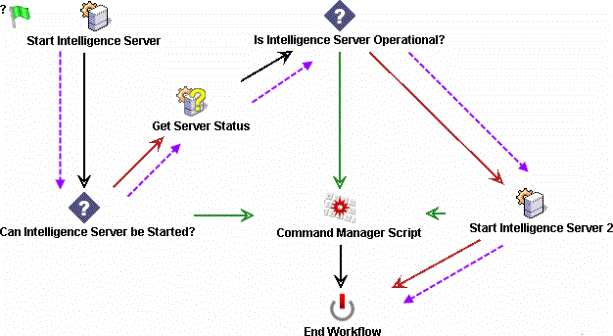
Although this cyclical path would let the workflow attempt to start Intelligence Server multiple times, if Intelligence Server cannot be started successfully, the workflow could continue to execute until it was manually ended. An alternative would be to modify the logical order of the workflow to attempt to start Intelligence Server a second time, but end the workflow if the second attempt also fails. This new path is shown in the image below.
As an alternative to modifying a workflow to avoid loops, you can also use the Update Parameters configuration (see Performing System Processes). This configuration lets you update a parameter, including incrementally, which allows you to end a loop in a workflow after a specified number of attempts (see Supporting Loops in a Workflow to Attempt Configurations Multiple Times below).