Strategy ONE
Repository Administration
- Windows
- Linux
The following database administration tasks are performed by the Database Administration Tool:
- Backup at a specified frequency or on-demand
- Restore a particular database from previously taken backup files
- Restore all databases from previously taken backup files
Configuration File
DBAdminConfig.yaml is a configuration file is used to set up the database connection, the backup location, and database administration tasks frequency.
The default location of DBAdminConfig.yaml is:
C:\Program Files (x86)\Common Files\MicroStrategy\Repository\repository-administration\conf
---
pgHost: localhost
pgDbNames:
  - platform_analytics_wh
  - mstr_collab
pgUser: mstr
pgPasswd: sest+9y+e6OdXIXTHjgPoC7osqE0rGMzgjR1zA==,kc7GbAQ8pv5yt32L
pgPort: 5432
pgSSLcert: ~
pgSSLkey: ~
pgSSLrootcert: ~
pgSSLmode: prefer
pgBackupLocation: C:\Program Files (x86)\Common Files\MicroStrategy\Repository\pgsql\PGDATA
pgMaxAllowedBackupCount: 5
scheduledConfiguration:
   startDate: 1993-11-12
   backupFrequencyInDays: 2
   localTimeOfExecution: 23:00
   localTimeOfStatsCollection: 00:30
The following files should be accessible:
- pg_dump
- pg_restore
Database Administration Tool
To launch the Database Administration Tool:
-
Open the command prompt and navigate to the repository-administration bin folder:
C:\Program Files (x86)\Common Files\MicroStrategy\Repository\repository-administration\bin
-
Run the file mstr-repo-ondemand-dba-operations.bat.
This will open the DBAOperations utility:
Copy****** DBA Tools ******
Enter choice
1) Backup
2) Restore
3) Vacuum
0) Exit
The utility exits after every operation.
To Backup
Selecting the Backup option (1) will list all the databases from the DBAdminConfig.yaml file along with the options to backup all databases and exit the utility.
User selected: 1 (backup)
Select the database you want to backup.
1) platform_analytics_wh
2) mstr_collab
3) Backup all databases.
0) ExitDatabases will be backed up in the default backup directory, inside their individual folders:
- ..\Repository\pgsql\PGDATA\platform_analytics_wh
- ..\Repository\pgsql\PGDATA\mstr_collab
The utility will compute the following:
- Database size
- Estimated backup size
- Available free space on disk
(platform_analytics_wh) Database Size: 44.9 MiB
(platform_analytics_wh) Estimated backup size: 4.0 MiB
(platform_analytics_wh) Available Free Space : 12.3 GiB
Backing up database: platform_analytics_wh(platform_analytics_wh) Backup File Created: backup_platform_analytics_wh_20191010.sql
(platform_analytics_wh) Backup File Size: 1.5 MiB
*** Finished backup operation on database: platform_analytics_wh ***If the backup was already done on the given day’s timestamp, the utility will ask the user whether he wants to overwrite the existing backup.
(platform_analytics_wh) Database Size: 44.9 MiB
(platform_analytics_wh) Estimated backup size: 4.0 MiB
(platform_analytics_wh) Available Free Space : 12.3 GiB
(platform_analytics_wh) Backup already done today. Date : 20190930
Overwrite File ? (y/n)
y
(platform_analytics_wh) Overwriting existing backup: backup_platform_analytics_wh_20190930.sql
Backing up database: platform_analytics_wh(platform_analytics_wh) Backup File Created: backup_platform_analytics_wh_20191010.sql
(platform_analytics_wh) Backup File Size: 1.5 MiB
*** Finished backup operation on database: platform_analytics_wh ***To Restore
Ensure that all applications connected to the database you want to restore are stopped. For example, if you want to restore platform_analytics_wh, you must stop the Platform Analytics Consumer before selecting and performing the steps in Restore.
Selecting the Restore option (2) on the main menu will show a warning that the operation will overwrite the existing data. However, the utility will take a backup just before restoring to ensure no data is lost.
****** DBA Tools ******
Enter choice
1) Backup
2) Restore
3) Vacuum
0) Exit
2
User selected: 2 (restore)
*** This operation WILL DELETE ALL EXISTING DATA and overwrite the database with backup data. Changes CAN NOT be undone later. ***
Do you want to continue? (y/n)Selecting yes, will move the utility forward and list all the databases that can be restored as well as an option to restore everything. If Restore all is selected, it will restore all the databases with the latest backup file.
*** This operation WILL DELETE ALL EXISTING DATA and overwrite the database with backup data. Changes CAN NOT be undone later. ***
Do you want to continue? (y/n)
y
Select the database you want to restore.
1) platform_analytics_wh
2) mstr_collab
3) Restore all databases.
0) Exit
Selecting a given database will move the utility forward and display the restore options. The first option will backup the selected database with its latest backup file. The second option allows for selection of a custom backup.
If Restore from Latest Backup is selected, the utility will find the latest backup file in the default directory, print the name of the file, restore the database, and create a pre-restore backup in the directory to ensure data is not lost.
Select restore file
1) Restore from Latest Backup
2) Restore from Custom Backup
0) Exit
1
Restoring latest backup
Searching for backup files in C:\Program Files (x86)\Common
Files\MicroStrategy\Repository\pgsql\PGDATA\platform_analytics_wh
Latest backup file found: backup_platform_analytics_wh_20190930.sql
Starting restore process
*** Restoring database : platform_analytics_wh
If Restore from Custom Backup is selected, the utility will print the path to the default backup location and ask the user if they want to search for backups in that path. The user can then select that path or enter a custom path. After the file path is entered, the user needs to enter the restore file name. The utility will search for the file and begin restoring if the file is found.
Select restore file
1) Restore from Latest Backup
2) Restore from Custom Backup
0) Exit
2
Restoring custom backup
Default backup path : C:\Program Files (x86)\Common Files\MicroStrategy\Repository\pgsql\PGDATA\platform_analytics_wh
Use default backup path ? (y/n)
y
Enter file name to restore. Press x to cancel.
backup_platform_analytics_wh_20190930
File 'backup_platform_analytics_wh_20190930.sql' found.
Restoring file backup_platform_analytics_wh_20190930.sql.
*** Restoring database : platform_analytics_wh
To Vacuum
Whenever rows in a PostgreSQL table are updated or deleted, dead rows are left behind. Vacuum gets rid of them so that space can be reused. If a table doesn’t get vacuumed, it will get bloated, which wastes disk space and slows down sequential table scans.
If the Vacuum option (3) is selected, the utility computes bloat for all databases and generates a report to the user.
Table Name                                        | Bloat Percent        | Wasted KBs
lu_minute                                         | 2.0                  | 65536
etl_lu_status_category                            | 1.0                  | 24576
etl_rel_action_tran_type                          | 1.3                  | 8192
lu_action_type                                    | 2.0                  | 8192
lu_date                                           | 1.1                  | 8192
lu_privilege                                      | 1.5                  | 8192
lu_session_source                                 | 1.0                  | 0
lu_sql_pass_type                                  | 1.0                  | 0
lu_week                                           | 1.0                  | 0
rel_date_timeperiod                               | 1.0                  | 0
rel_date_weektime_window                          | 0.0                  | 0
etl_rel_source_sub_type_object_type               | 1.0                  | 0
lu_db_type                                        | 1.0                  | 0
lu_db_version                                     | 1.0                  | 0
lu_object_type                                    | 1.0                  | 0
lu_product                                        | 1.0                  | 0
** Bloat report for database: mstr_collab **
Table Name                                        | Bloat Percent        | Wasted KBs
Select the database you want to vacuum.
1) platform_analytics_wh
2) mstr_collab
3) vacuum all databases
4) Full vacuum all databases.
0) Exit
You can choose to vacuum an individual database, vacuum all databases, or full vacuum all databases.
When performing vacuum, the dead space is reclaimed and made available for reuse by the same object, table, etc.
Full vacuum all databases writes the entire content of the table into a new disk file and releases the wasted space back to the OS. This causes a table-level lock on the table and slows speeds. Full vacuum all databases should be avoided on a high load system. You must stop the Platform Analytics Consumer before performing full vacuum all databases.
*** Vacuum ***
Select vacuum type
1) Vacuum Bloated Tables
2) Vacuum All Tables
3) Full Vacuum (Blocks DB)
0) Exit
1
Starting Vacuum on tables in list
Vacuuming table : lu_minute with 65536 wasted space
Vacuuming table : etl_lu_status_category with 24576 wasted space
Vacuuming table : etl_rel_action_tran_type with 8192 wasted space
Vacuuming table : lu_action_type with 8192 wasted space
Vacuuming table : lu_date with 8192 wasted space
Vacuuming table : lu_privilege with 8192 wasted space
Vacuuming table : lu_session_source with 0 wasted space
Vacuuming table : lu_sql_pass_type with 0 wasted space
Vacuuming table : lu_week with 0 wasted space
Vacuuming table : rel_date_timeperiod with 0 wasted space
Vacuuming table : rel_date_weektime_window with 0 wasted space
Vacuuming table : etl_rel_source_sub_type_object_type with 0 wasted space
Vacuuming table : lu_db_type with 0 wasted space
Vacuuming table : lu_db_version with 0 wasted space
Vacuuming table : lu_object_type with 0 wasted space
Vacuuming table : lu_product with 0 wasted space
Database Capacity Planning
Strategy One also includes a tool to monitor the Strategy Repository. For configuration settings, please refer to the Configuration File section above.
Trigger statistics collection
Capacity planning statistics collection is turned on by default after installation. The service is controlled with a batch file which accepts start | stop | restart | status as parameters.
-
From the command prompt, go to:
C:\Program Files (x86)\Common Files\MicroStrategy\Repository\repository-administration\bin
-
Call the following batch file with the applicable parameter:
.\mstr-repo-dba-operations.bat start | stop | restart | status
To change the time of statistics collection, see KB483944.
Monitoring Database Status
The Platform Analytics project includes the Database Capacity Planning dashboard to monitor the status of MicroStratey Repository.
-
Overview page:
The overview will give some basic info about the database, including database names, IP, and database versions as well as the trend of database size growth.

-
Transactions page:
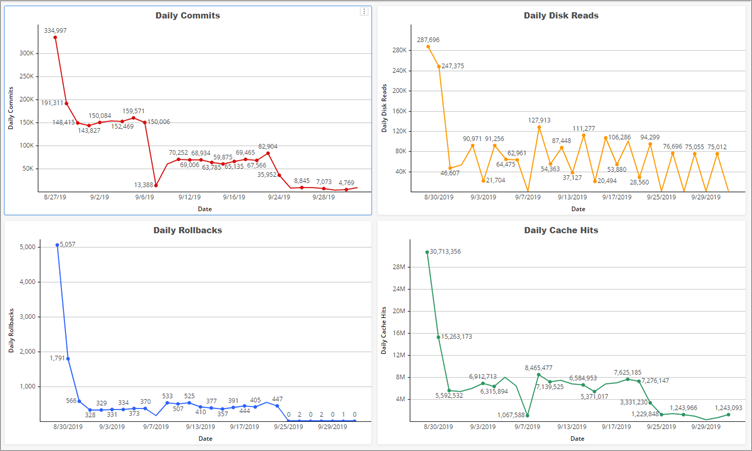
Transactions will give the daily trend if the database commits, rollbacks, disk reads, cache hits.

-
Table Overview page:
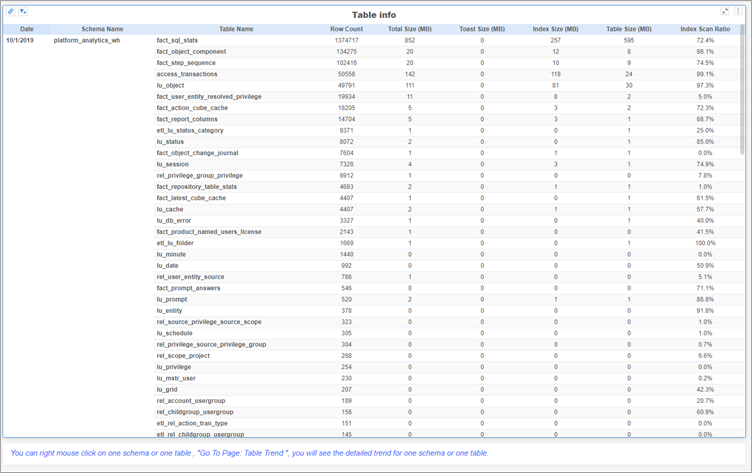
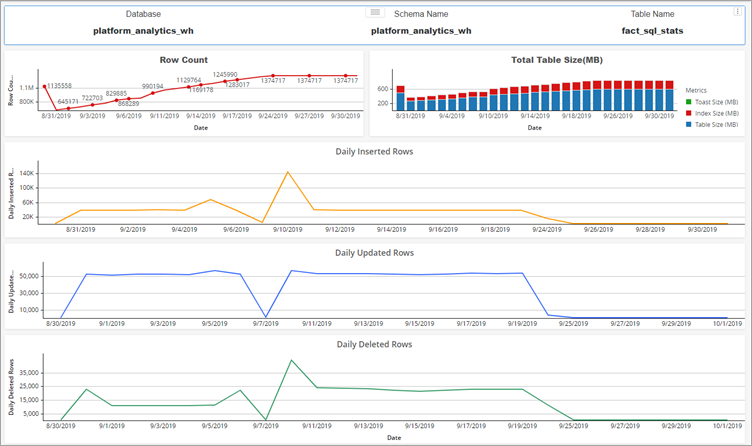
For the table-level information, table overview will show stats about each table in the selected database. Right-click on a listed schema or table, and click Go To Page: Table Trend to get the detailed data of this table or schema.

-
Table Trend page:

The following database administration tasks are performed by the Database Administration Tool:
- Backup at a specified frequency or on-demand
- Restore a particular database from previously taken backup files
- Restore all databases from previously taken backup files
DBAdminConfig.yaml is a configuration file is used to set up the database connection, the backup location, and database administration tasks frequency.
The default location of DBAdminConfig.yaml is:
/opt/MicroStrategy/Repository/repository-administration/conf
---
pgHost: localhost
pgDbNames:
  - platform_analytics_wh
  - mstr_collab
pgUser: mstr
pgPasswd: sest+9y+e6OdXIXTHjgPoC7osqE0rGMzgjR1zA==,kc7GbAQ8pv5yt32L
pgPort: 5432
pgSSLcert: ~
pgSSLkey: ~
pgSSLrootcert: ~
pgSSLmode: prefer
pgBackupLocation: /opt/MicroStrategy/Repository/repository-administration/backups/
pgMaxAllowedBackupCount: 5
scheduledConfiguration:
   startDate: 1993-11-12
   backupFrequencyInDays: 2
   localTimeOfExecution: 23:00
   localTimeOfStatsCollection: 00:30
The following files should be accessible:
- pg_dump
- pg_restore
To change the time of statistics collection, see KB483944.
Database Administration Tool
To launch the Database Administration Tool:
-
Open a terminal window and navigate to the repository-administration/bin folder:
/opt/MicroStrategy/Repository/repository-administration/bin
-
Run ./mstr-repo-ondemand-dba-operations.sh.
This will open the DBAOperations utility:
Copy****** DBA Tools ******
Enter choice
1) Backup
2) Restore
3) Vacuum
0) Exit
The utility exits after every operation.
To Backup
Selecting the Backup option (1) will list all the databases from the DBAdminConfig.yaml file along with the option to backup all databases and exit the utility.
User selected: 1 (Backup)
Select the database you want to backup.
1) platform_analytics_wh2) mstr_collab
3) Backup all databases.
0) ExitDatabases will be backed up in the default backup directory, inside their individual folders:
- /opt/MicroStrategy/Repository/repository-administration/backups/platform_analytics_wh
- /opt/MicroStrategy/Repository/repository-administration/backups/mstr_collab
The utility will compute the following:
- Database size
- Estimated backup size
- Available free space on disk
(platform_analytics_wh) Database Size: 44.9 MiB
(platform_analytics_wh) Estimated backup size: 4.0 MiB
platform_analytics_wh) Available Free Space : 12.3 GiB
Backing up database: platform_analytics_wh
(platform_analytics_wh) Backup File Created: backupplatform_analytics_wh_20191010.sql
(platform_analytics_wh) Backup File Size: 1.5 MiB
*** Finished backup operation on database: platform_analytics_wh ***If the backup was already done on the given day’s timestamp, it will ask if you want to overwrite the existing backup.
(platform_analytics_wh) Database Size: 44.9 MiB
(platform_analytics_wh) Estimated backup size: 4.0 MiB
(platform_analytics_wh) Available Free Space : 12.3 GiB
(platform_analytics_wh) Backup already done today.
Date : 20190930
Overwrite File ? (y/n)
y
(platform_analytics_wh) Overwriting existing backup: backup_platform_analytics_wh_20190930.sql
Backing up database: platform_analytics_wh
(platform_analytics_wh) Backup File Created:
backup_platform_analytics_wh_20191010.sql
(platform_analytics_wh) Backup File Size: 1.5 MiB
*** Finished backup operation on database: platform_analytics_wh ***To Restore
Ensure that all applications connected to the database you want to restore are stopped. For example, if you want to restore platform_analytics_wh, you must stop the Platform Analytics Consumer before selecting and performing the steps in Restore.
Selecting the Restore option (2) on the main menu will show a warning that the operation will overwrite the existing data. However, the utility will take a backup just before restoring to ensure no data is lost.
User selected: 2 (restore)
Select the database you want to restore.
1) platform_analytics_wh
2) mstr_collab
3) Restoreall databases.
0) Exit
2
User selected: 2 (restore)
*** This operation WILL DELETE ALL EXISTING DATA and overwrite the database with backup data. Changes CAN NOT be undone later. ***
Do you want to continue? (y/n)Selecting yes will move the utility forward and list all the databases that can be restored along with the option to restore everything. Selecting restore all will restore all the databases with the latest backup file.
*** This operation WILL DELETE ALL EXISTING DATA and overwrite the database with backup data. Changes CAN NOT be undone later. ***
Do you want to continue? (y/n)
y
Select the database you want to restore.
1) platform_analytics_wh
2) mstr_collab
3) Restore all databases.
0) ExitSelecting a given database will move the utility forward and display the restore options. The first option lets you backup the selected database with its latest backup file. The second option allows you to select a custom backup.
If Restore from Latest Backup is selected the utility will find the latest backup file in the default directory, print the name of the file, restore the database, and create a pre-restore backup in the directory to ensure data is not lost.
Select restore file
1) Restore from Latest Backup
2) Restore from Custom Backup
0) Exit
1
Restoring latest backup
Searching for backup files in /opt/MicroStrategy/Repository/repository-administration/backups/platform_analytics_whStarting restore process
*** Restoring database : platform_analytics_whIf Restore from Custom Backup is selected, the utility will print the path to the default backup location and ask if you want to search for backups in that path. You can then select that path or enter a custom path. After the file path is entered, enter the restore file name. The utility will search for the file and begin restoring if the file is found.
Select restore file
1) Restore from Latest Backup
2) Restore from Custom Backup
0) Exit
2
Restoring custom backup
Default backup path : /opt/MicroStrategy/Repository/repository-administration/backups/platform_analytics_wh
Use default backup path ? (y/n)
y
Enter file name to restore. Press x to cancel.
backup_platform_analytics_wh_20190930
File 'backup_platform_analytics_wh_20190930.sql' found.
Restoring file backup_platform_analytics_wh_20190930.sql.
*** Restoring database : platform_analytics_whTo Vacuum
Whenever rows in a PostgreSQL table are updated or deleted, dead rows are left behind. Vacuum gets rid of them so that the space can be reused. If a table doesn’t get vacuumed, it will get bloated, which wastes disk space and slows down sequential table scans.
If the Vacuum option (3) is selected, the utility computes bloat for all databases and generates a report.
****** DBA Tools ******
Enter choice
1) Backup
2) Restore
3) Vacuum
0) Exit
3
User selected: 3 (vacuum)
*** BLOAT REPORT ***
** Bloat report for database: platform_analytics_wh **
Table Name | Bloat Percent | Wasted KBs
lu_minute | 2.0 | 65536
etl_lu_status_category | 1.0 | 24576
etl_rel_action_tran_type | 1.3 | 8192
lu_action_type | 2.0 | 8192
lu_date | 1.1 | 8192
lu_privilege | 1.5 | 8192
lu_session_source | 1.0 | 0
lu_sql_pass_type | 1.0 | 0
lu_week | 1.0 | 0
rel_date_timeperiod | 1.0 | 0
rel_date_weektime_window | 0.0 | 0
etl_rel_source_sub_type_object_type | 1.0 | 0
lu_db_type | 1.0 | 0
lu_db_version | 1.0 | 0
lu_object_type | 1.0 | 0
lu_product | 1.0 | 0
** Bloat report for database: mstr_collab **
Table Name |
Bloat Percent | Wasted KBs
Select the database you want to vacuum.
1) platform_analytics_wh
2) mstr_collab
3) vacuum all databases.
4) Full vacuum all databases.
0) ExitYou can choose to vacuum an individual database, vacuum all databases, or full vacuum all databases.
When performing vacuum, the dead space is reclaimed and made available for reuse by the same object, table, etc.
Full vacuum all databases writes the entire content of the table into a new disk file and releases the wasted space back to the OS. This causes a table-level lock on the table and slows speeds. Full vacuum all databases should be avoided on a high load system. You must stop the Platform Analytics Consumer before performing full vacuum all databases.
*** Vacuum ***
Select vacuum type
1) Vacuum Bloated Tables
2) Vacuum All Tables
3) Full Vacuum (Blocks DB)
0) Exit
1
Starting Vacuum on tables in list
Vacuuming table : lu_minute with 65536 wasted space
Vacuuming table : etl_lu_status_category with 24576 wasted space
Vacuuming table : etl_rel_action_tran_type with 8192 wasted space
Vacuuming table : lu_action_type with 8192 wasted space
Vacuuming table : lu_date with 8192 wasted space
Vacuuming table : lu_privilege with 8192 wasted space
Vacuuming table : lu_session_source with 0 wasted space
Vacuuming table : lu_sql_pass_type with 0 wasted space
Vacuuming table : lu_week with 0 wasted space
Vacuuming table : rel_date_timeperiod with 0 wasted space
Vacuuming table : rel_date_weektime_window with 0 wasted space
Vacuuming table : etl_rel_source_sub_type_object_type with 0 wasted space
Vacuuming table : lu_db_type with 0 wasted space
Vacuuming table : lu_db_version with 0 wasted space
Vacuuming table : lu_object_type with 0 wasted space
Vacuuming table : lu_product with 0 wasted space