Strategy ONE
Enabling Push Notifications for Library Mobile for Android
A push notification is a message that pops up on a mobile device. App publishers can send them at any time; users don't have to be in the app or using their devices to receive them. The push notification server for MicroStrategy Library Mobile is the Intelligence Server.
In line with Firebase's decision to deprecate the use of legacy FCM XMPP and HTTP APIs, MicroStrategy supports the new HTTP V1 APIs with the release of MicroStrategy ONE Update 12. These updates ensure that you can seamlessly stay connected and leverage Firebase Cloud Messaging for all your push notification requirements. If you have been using the legacy send APIs for your custom MicroStrategy Android apps, we strongly recommend transitioning to the HTTP v1 API and following the setup guide below.
- Workstation
- Developer
To enable push notifications for MicroStrategy Library Mobile for Android, you must:
Configure Intelligence Server Settings
-
Open MicroStrategy Workstation.
-
On the main Workstation window, click Environments in the Navigation pane.
-
Right-click the environment and choose Properties.
Choose Get Info if you are using a Mac.
-
Start by creating a new delivery device for the Mobile Client Android. If the left pane, click Subscription Delivery.
-
Click Delivery Device.
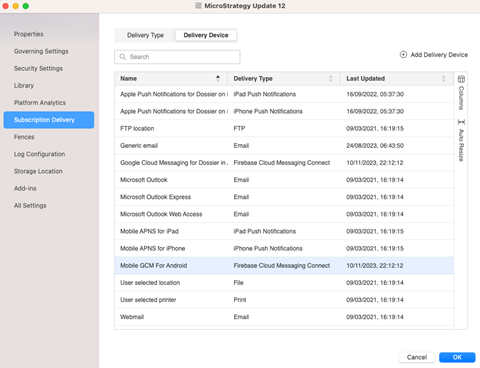
-
Select Firebase Cloud Messaging Connect as the Delivery Type.
-
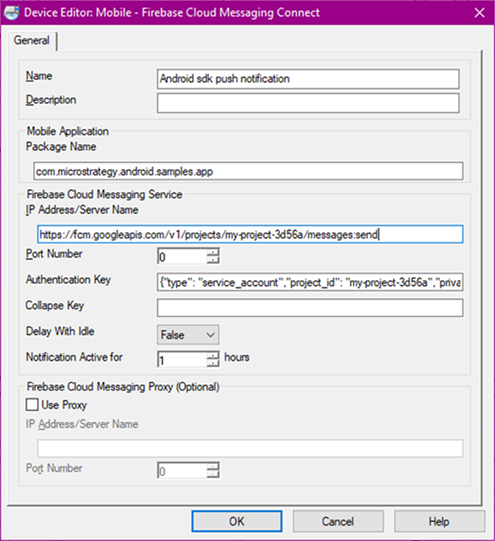
In the Device Editor, give your device a unique custom Name and optionally, a Description.
-
Under Mobile Application, set the Package Name to a value similar to "com.microstrategy.android.sample". This is the identity name of your app, and you can choose any value you prefer.
-
Under Firebase Cloud Messaging Service, set the Server URL to a value similar to the one shown below. The path in the URL contains your app's project ID, which can be found in the General project settings tab of the Firebase console.
Copyhttps://fcm.googleapis.com/v1/projects/ myproject-b5ae1/messages:send. -
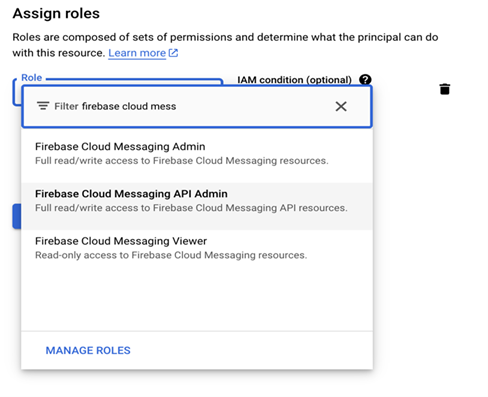
In Authorization Key (Manifest File), upload your manifest file to provide the authorization key for your custom application. This manifest file is a service account JSON file downloaded from your Firebase project. See Migrate from legacy FCM APIs to HTTP v1 on the Google Firebase site for detailed instructions on obtaining the manifest file. Make sure that you grant the service account the Firebase Cloud Messaging API Admin role.
-
If the Intelligence server cannot communicate directly with Google FCM (Firebase Cloud Messaging), then under Firebase Cloud Messaging Proxy, enable the Use Proxy switch and enter the Server URL for the proxy.

-
Click OK.
Configure App Settings in MicroStrategy Library Mobile SDK for Android
-
You need to update
google-services.json. Download it from the Firebase console. -
Open the file in a text editor.
-
Under client > client_info, add a new client_id attribute and set its value to be the value of the Application ID.
Copy"client_id":"android.com.microstrategy.android.samples.app" -
If you want to update
google-services.jsonin the MicroStrategy Library Mobile for Android SDK sample project, add the following line of code to\MicroStrategyMobile\app\build.gradle.Copyapply plugin: 'com.google.gms.google-services'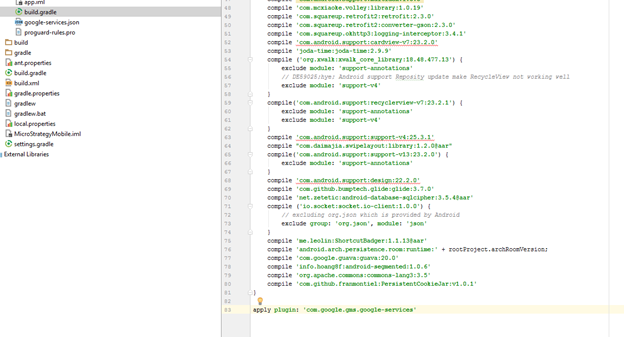
-
Save your changes.
To enable push notifications for MicroStrategy Library Mobile for Android, you must
-
Configure App Settings in MicroStrategy Library Mobile SDK for Android
-
Get the FCM (Firebase Cloud Messaging) Authentication Key (Optional)
Configure Intellgence Server Settings
- Open MicroStrategy Developer.
- Start by creating a new device for the Mobile Client Android device type.
- Expand the MicroStrategy analytics modules and navigate to Administration > Delivery Managers.
- Right-click Devices and choose New > Device.
- On the Select Device Type dialog, choose Mobile Client Android and click OK.
- In the Device Editor, give the device a custom Name and an optional Description.
-
Under Mobile Application, set the Package Name to a value similar the one shown below. This is the identity name of your app and you can choose any value you prefer.
Copycom.microstrategy.android.sample -
Under Firebase Cloud Messaging Service, set the Server URL to a value similar to the one shown below. The path in the URL contains your app's project ID, which can be found in the General project settings tab of the Firebase console.
Copyhttps://fcm.googleapis.com/v1/projects/ myproject-b5ae1/messages:send. -
Download the JSON file of Authentication Key, following the steps in follow the step from Migrate from legacy FCM APIs to HTTP v1 on the Google Firebase site. Copy and paste the content of the JSON file into Authentication Key.
-
If the Intelligence server cannot communicate directly with Google FCM (Firebase Cloud Messaging), then under Firebase Cloud Messaging Proxy, select Use Proxy and enter the IP Address/Server Name for the proxy.
-
Click OK.
Configure App Settings in MicroStrategy Library Mobile SDK for Android
-
You need to update
google-services.json. Download it from the Firebase console. -
Open the file in a text editor.
-
Under client > client_info, add a new client_id attribute and set its value to be the value of the Application ID.
Copy"client_id":"android.com.microstrategy.android.samples.app" -
If you want to update
google-services.jsonin the MicroStrategy Library Mobile for Android SDK sample project, add the following line of code to\MicroStrategyMobile\app\build.gradle.Copyapply plugin: 'com.google.gms.google-services'
-
Save your changes.
Get the FCM (Firebase Cloud Messaging) Authentication Key (Optional)
-
Open the following location and log in with your Google account.
Copyhttps://firebase.google.com/docs/cloud-messaging/auth-server -
Go to your personal console.
- Create a project.
- Add a new app and configure it with corresponding package name.
- Go to app settings and click the Cloud Messaging tab.
- Click Server Key to see the FCM authentication key.