Strategy One
Integrating Strategy with Teradata for Single Sign-On Using Okta
MicroStrategy ONE Update 10 introduces a feature that supports connection to Teradata through OAuth authentication in Workstation.
Configure Okta Identity Provider for Teradata Single Sign-On
Create an Okta Application
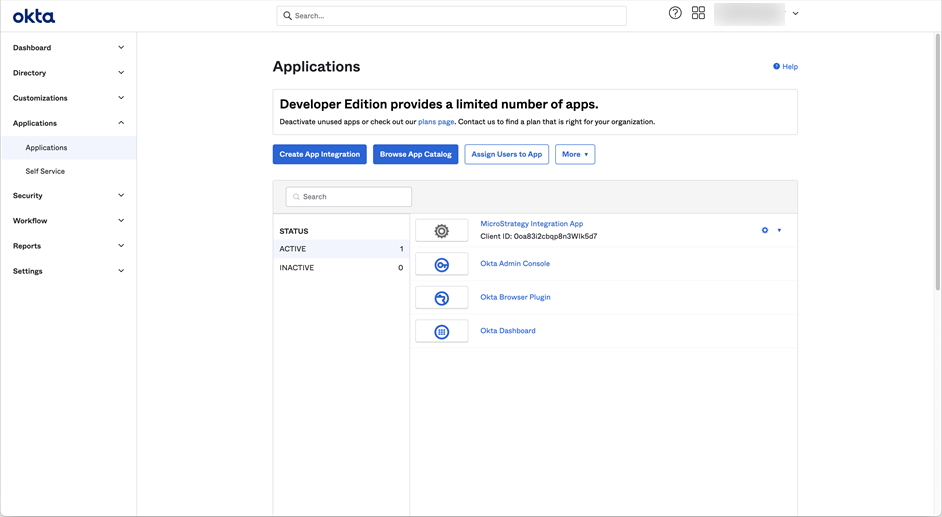
- Log in to Okta.
- In the Navigation pane, under Applications, click Applications.
- Click Create App Integration.
- Choose the OIDC - OpenID Connect sign-in method and the Native Application application type.
- Click Next.
- Enter a name for the application integration, and choose the Refresh Token and Token Exchange grant types.
- Add your sign-in redirect URIs for your environment. For example,
https://env-308750.customer.cloud.microstrategy.com/MicroStrategyLibrary/auth/oidc/login. - Choose the Allow everyone in your organization to access controlled access.
- Click Save.
Edit the OpenID Connect ID Token
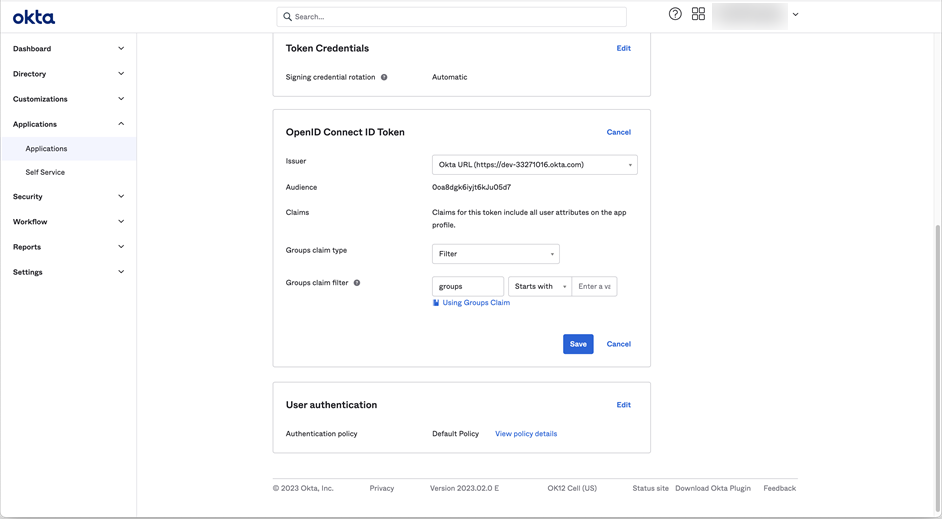
- Navigate to the Sign On tab of your newly created application.
- In OpenID Connect ID Token, click Edit.
- From the Issuer drop-down, select the Okta URL.
- Click Save.
Create an API
- In the Navigation pane, under Security, click API.
- Click Add Authorization Server.
- Enter a name and audience and click Save.
Update the API Issuer
- Navigate to the Settings tab of your newly created API.
- In Settings, click Edit.
- From the Issuer drop-down, select the Okta URL.
- Click Save.
Create an Access Policy and Rule
- Navigate to the Access Policies tab of your newly created API.
- Click Add Policy.
- Enter a name and description. Optionally customize Assign to.
- Click Create Policy.
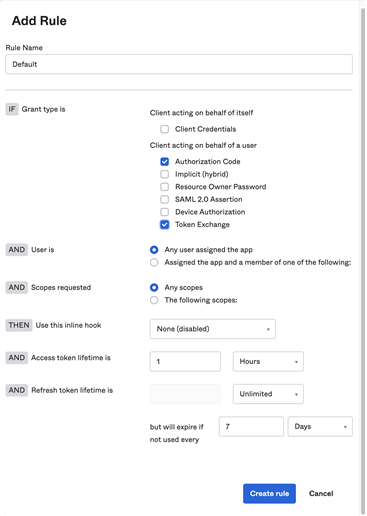
- Click Add rule.
- Enter your preferred rule options and click Create rule.
Enable the Okta Integration in Teradata
Refer to the following Teradata documentation to enable the Okta integration: https://docs.teradata.com/r/Teradata-VantageTM-Advanced-SQL-Engine-Security-Administration/July-2021/Configuring-Single-Sign-On.
Integrate Strategy with Okta OIDC for Teradata
The following data source connection leverages Strategy authentication so you don't have to log in multiple times to improve usability. This type of authentication is also known as single sign-on (SSO). The following steps require an Okta application and access to an Okta account. You must also include your environment URLs in the Okta redirect list, for example:
- https://env-308140.customer.cloud.microstrategy.com/MicroStrategyLibrary/auth/oidc/login
Create and Map a Strategy User to a Okta User
- Open the Workstation window.
- In the Navigation pane, click Environments.
- Log into your environment. You must have Administrator privileges.
- In the Navigation pane, click User and Groups.
- Click
 next to All Users.
 - In the left pane, click Privileges and add the following privileges:
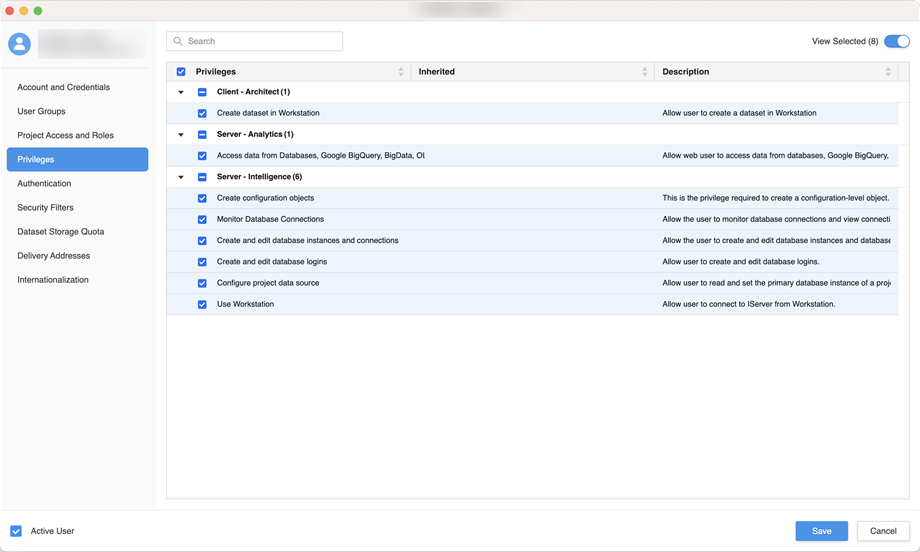
- Access data from Databases, Google BigQuery, BigData, OLAP, BI tools
- Create and edit database instances and connections
- Create and edit database logins
- Create configuration objects
- Create dataset in Workstation
- Configure project data source
- Monitor Database Connections
- Use Workstation
- In the left pane, click Authentication.
- Enter your Okta email address in Trusted Authenticated Request User ID.
- Click Save.
For more information on mapping existing users, see Mapping OIDC Users to MicroStrategy.
Integrate Strategy with Okta Using OIDC
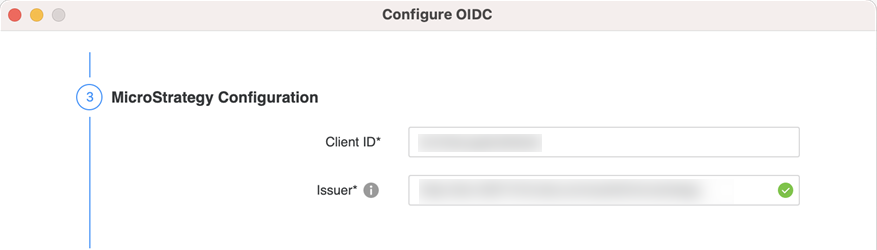
- Right-click your connected environment and choose Configure Enterprise Security > Configure OIDC.
- From the identity provider drop-down, select Okta.
- Enter the Client ID and Issuer.
- Click Save.
If you click Test Configuration, the test will not be successful.
Create a Database Role with OAuth Authentication
After you copy the ClientID, ClientSecret, Tenant ID, Authorization URL, and Token URL, you can connect to Teradata using OAuth.
Configure Authentication Service Using Enterprise Security
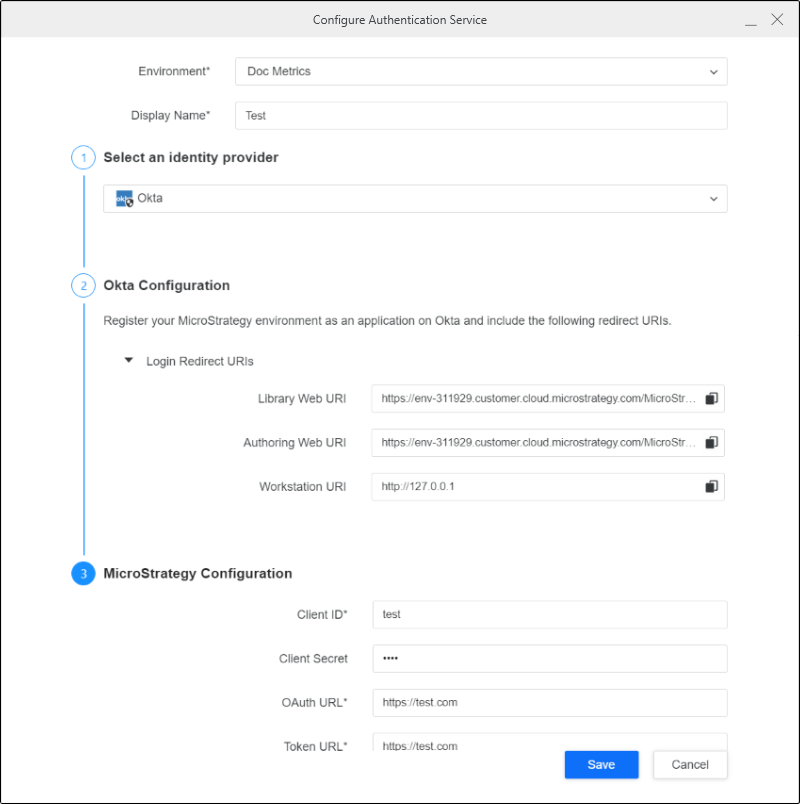
- Open the Workstation window with the Navigation pane in smart mode.
- In the Navigation pane, click , next to Enterprise Security.
- Enter a Display Name.
- Choose the Okta identity provider.
- Copy the login redirect URIs.
- In the Okta Admin Console, select the Teradata client application.
- Go to General Settings under General and click Edit.
- Click Add URI.
- Enter the URIs that you copied earlier.
- Click Save.
- In Workstation, enter the Client ID, Client Secret, OAuth URL, and Token URL.
- Click Save.
Create a Database Role Using Data Source
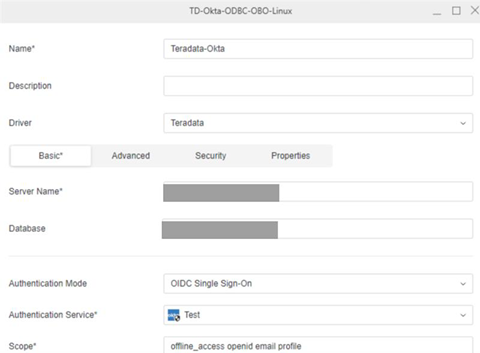
- Open the Workstation window.
- In the Navigation pane, click , next to Data Sources.
- Choose Teradata.
- Expand the Default Database Connection drop down and click Add a new database connection.
- Enter a Name and Server Name.
- In Authentication Mode, choose OIDC Single Sign-On.
- In the Authentication Service drop-down, choose the Azure authentication service you created.
- Enter a Scope.
- Click Save.
Connect to Teradata Database
- Open the Workstation window.
- Make sure the environment is using the Strategy OIDC authentication mode. In the Navigation pane, click Environments.
- Right-click the environment and choose Edit Environment Information.
- Verify that Authentication Mode is set to Default OIDC.
- Log in to your Strategy environment using your Okta user name and password.
- Test the data source in either Library or Workstation.
Test the Data Source in Library
-
Open Strategy Library and click Log in with OIDC.
-
In the toolbar, click
 and choose Dashboard.
 -
Click Blank Dashboard.
-
Click Create.
-
Click New Data and select the Teradata gateway.
-
Choose Select Tables and click Next.
-
Select the data source you created. The projects and datasets list appears.
Test the Data Source in Workstation
- In the Navigation pane, click , next to Datasets.
- Select the Teradata gateway.
- Select the data source you created. The dataset appears.