Strategy One
Teradata OAuth Connectivity with Okta and Entra ID (Formerly Azure AD)
Starting in Strategy ONE Update 10, Strategy supports connection to Teradata using OAuth authentication.
OAuth authentication is supported in Strategy Workstation server mode, Web, and Library with HTTPS enabled. OAuth authentication is not supported in Strategy Developer.
- Okta
- Entra ID
Prerequisites
Refer to Teradata's documentation for information on configuring Okta IdP.
Get the Init OAuth URL and Refresh Token URL
To get the required URLs, you need to edit the Teradata authorization server created in Okta:
- Go to the Okta Admin Console.
- In the Security menu, click API.
- Click the pencil icon next to your Teradata authorization server.
- Copy the Issuer value. The value should be in the following format:
https://dev-XXXXX.okta.com/oauth2/YYYYY. - To get the Init OAuth URL and Refresh Token URL, add the following values to the Issuer value:
- Init OAuth URL:
https://dev-XXXX.oktapreview.com/oauth2/YYYYY/v1/authorize - Refresh Token URL:
https://dev-XXXXX.oktapreview.com/oauth2/YYYYY/v1/token
Get the Client ID
- Go to the Okta Admin Console.
- In the Applications menu, click Applications.
- Select the Teradata's client application.
- In the General tab, copy the Client ID.
Create a Database Role with OAuth Authentication
After you copy the ClientID, ClientSecret, Tenant ID, Authorization URL, and Token URL, you can connect to Teradata using OAuth.
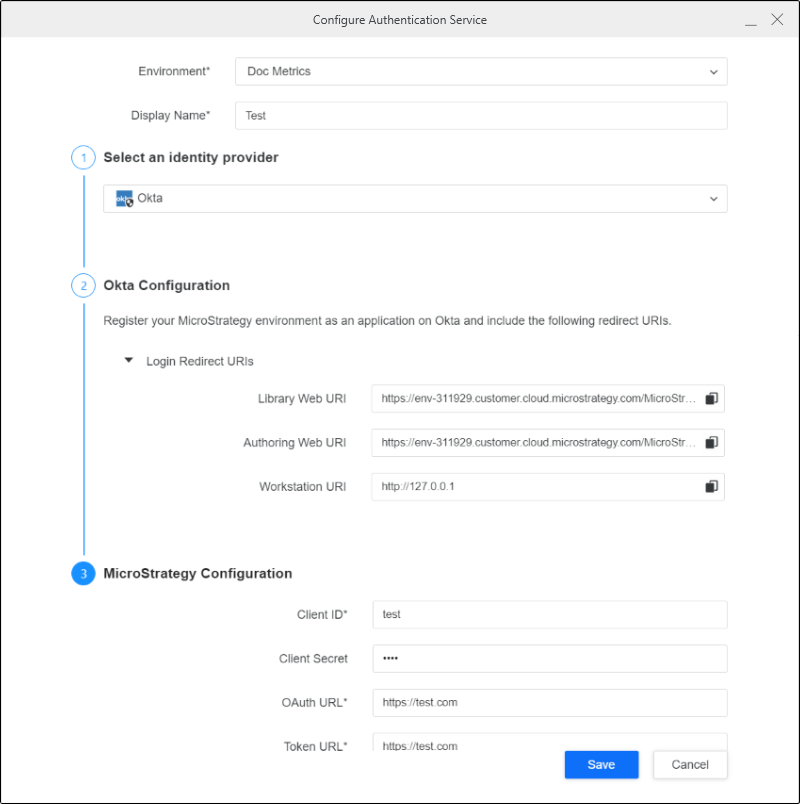
Configure Authentication Service Using Enterprise Security
- Open the Workstation window with the Navigation pane in smart mode.
- In the Navigation pane, click
 , next to Enterprise Security.
 - Enter a Display Name.
- Choose the Okta identity provider.
- Copy the login redirect URIs.
- In the Okta Admin Console, select the Teradata client application.
- Go to General Settings under General and click Edit.
- Click Add URI.
- Enter the URIs that you copied earlier.
- Click Save.
- In Workstation, enter the Client ID, OAuth URL, and Token URL.
- Click Save.
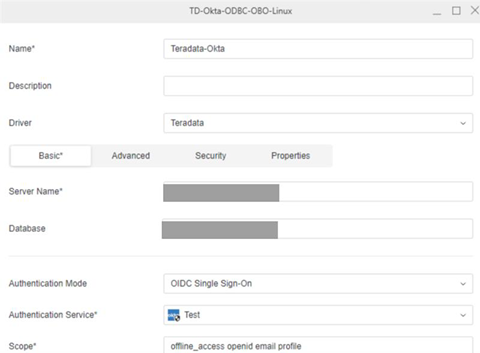
Create a Database Role Using Data Source
- Open the Workstation window with the Navigation pane in smart mode.
- In the Navigation pane, click , next to Data Sources.
- Choose Teradata.
- Expand the Default Database Connection drop down and click Add a new database connection.
- Enter a Name and Server Name.
- In Authentication Mode, choose OAuth.
- In the Authentication Service drop-down, choose the Okta authentication service you created.
- Enter a Scope.
- Click Save.
Connect to Teradata Database
- In Workstation, Web, or Library, go to Data Import and select Terdata database.
- Click Select Tables, Build a Query, or Type a Query.
- Click the database role and enter your Okta credentials.
- Click Sign In.
- Tables and columns visible by the Entra ID user are now available.
Prerequisites
The web server must support HTTPS protocol.
Refer to Teradata's documentation for information on configuring Entra ID IdP.
When you create your Teradata Azure application, add the UPN claim. Strategy uses UPN to map to user ID.
Get the Init OAuth URL and Refresh Token URL
- Go to the Microsoft Azure Portal and login.
- Go to the Azure Active Directory.
- Click App Registrations.
- Click the Teradata OAuth Resource that you created in Prerequisites.
- Go to the Endpoints section under Overview.
- Copy the OAuth 2.0 authorization endpoint (v2) and OAuth 2.0 token endpoint (v2) values.
Get the Client ID
- Go to the Microsoft Azure Portal and login.
- Go to the Azure Active Directory.
- Click App Registrations.
- Click the Teradata OAuth Resource that you created in Prerequisites.
- Click Overview.
- Go to the Essentials section and copy the Application (client) ID value.
Create a Client Secret
- In the navigation pane, click Certificates & secrets.
- Click New client secret.
- Enter a name and expiration date.
- Click Add.
- Copy the Client Secret value.
Create a Database Role with OAuth Authentication
After you copy the ClientID, ClientSecret, Tenant ID, Authorization URL, and Token URL, you can connect to Teradata using OAuth.
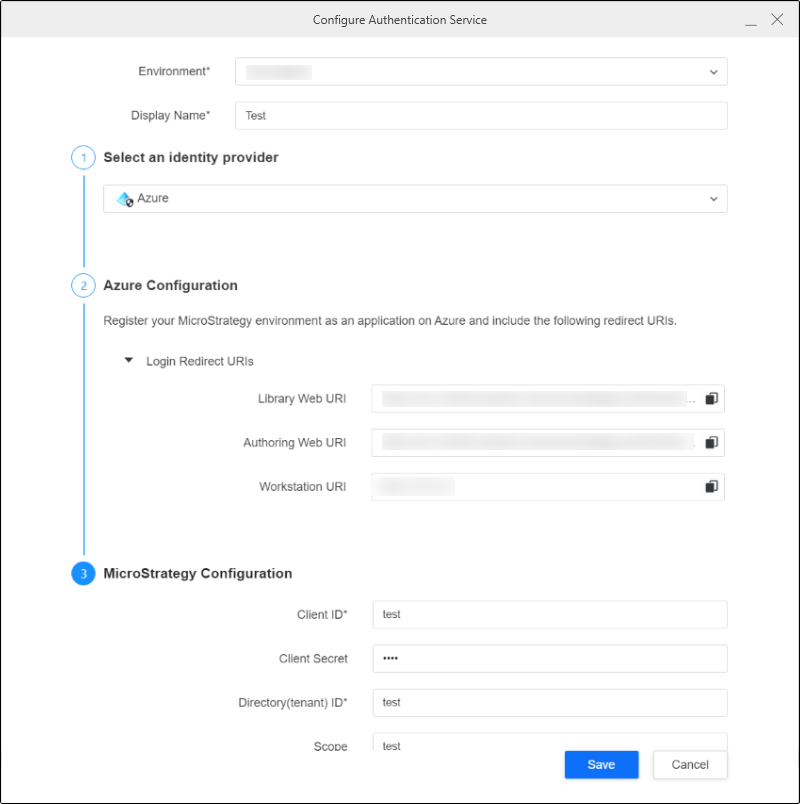
Configure Authentication Service Using Enterprise Security
- Open the Workstation window with the Navigation pane in smart mode.
- In the Navigation pane, click , next to Enterprise Security.
- Enter a Display Name.
- Choose the Azure identity provider.
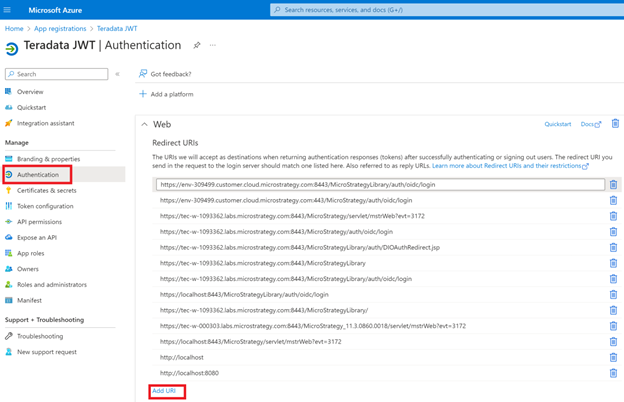
- Copy the login redirect URIs.
- In Entra ID, go to Authentication and click Add URI.
- Enter the URIs that you copied earlier.
- Click Save.
- In Workstation, enter the Client ID, Client Secret, OAuth URL, and Token URL.
- Click Save.
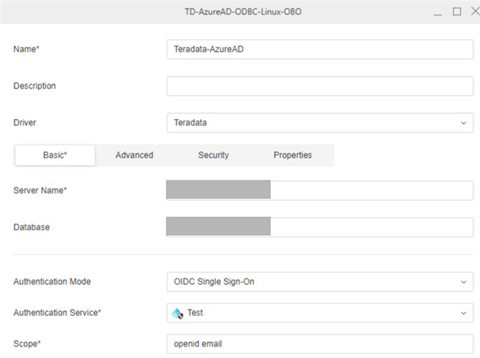
Create a Database Role Using Data Source
- Open the Workstation window with the Navigation pane in smart mode.
- In the Navigation pane, click , next to Data Sources.
- Choose Teradata.
- Expand the Default Database Connection drop down and click Add a new database connection.
- Enter a Name and Server Name.
- In Authentication Mode, choose OAuth.
- In the Authentication Service drop-down, choose the Azure authentication service you created.
- Enter a Scope.
- Click Save.
Connect to Teradata Database
- In Workstation, Web, or Library, go to Data Import and select Terdata database.
- Click Select Tables, Build a Query, or Type a Query.
- Click the database role and enter your Entra ID IdP credentials.
- Click Sign In.
- Tables and columns visible by the Entra ID user are now available.