Strategy One
Manage Security Filters
Starting in MicroStrategy ONE (December 2024), Administrators can assign security filters to users and user groups regardless of project access, ensuring security filters are in place if users gain access to the project at a later date.
You can manage security filters at the project or user level.
Data restrictions in security filters must be assigned to users or user groups for them to work. You can do this in the Security Filter Editor, project configuration, or the User/Group Editor. In the Security Filter Editor, the toolbar provides a way to see the assigned users or groups for a security filter. New users and groups can be assigned to the security filter or existing ones can be removed. To assign security to users and user groups, you must have the Assign Security Filters (under Server - Intelligence) privilege.
Manage Security Filters for a Project
The Project Configuration dialog provides a view of all security filters in the project and the assigned users. The dialog can be viewed from two perspectives: a list of all security filters, and the users/groups for each; or the users and groups, along with their directly assigned security filter. Independently, exporting this security filter assignment returns a list of users or groups with a directly assigned security filter, along with their corresponding IDs.
To assign a security filter to a user or group at the project level:
- Open the Workstation window with the Navigation pane in smart mode.
-
In the Navigation pane, click Projects.
-
Right-click the project to manage a security filter for and choose Properties.
- In the left pane, click Security Filters.
-
You can view security filters and how they are assigned to user and user groups from different perspectives: by security filter or by user.
 Click here to view details about the Security Filters tab.
This tab lists all the security filters in the project, along with the number of assigned users and user groups.
- Right-click a security filter to edit the filter definition, delete it, or view its properties.
- Select the security filter to manage. The panel on the right displays the users and groups associated with the selected security filter.
- To add more users and groups, click
 Add in the panel on the right. Select the users and groups, then click Add.
 - To remove a user or group, click
 next to it in the panel on the right.
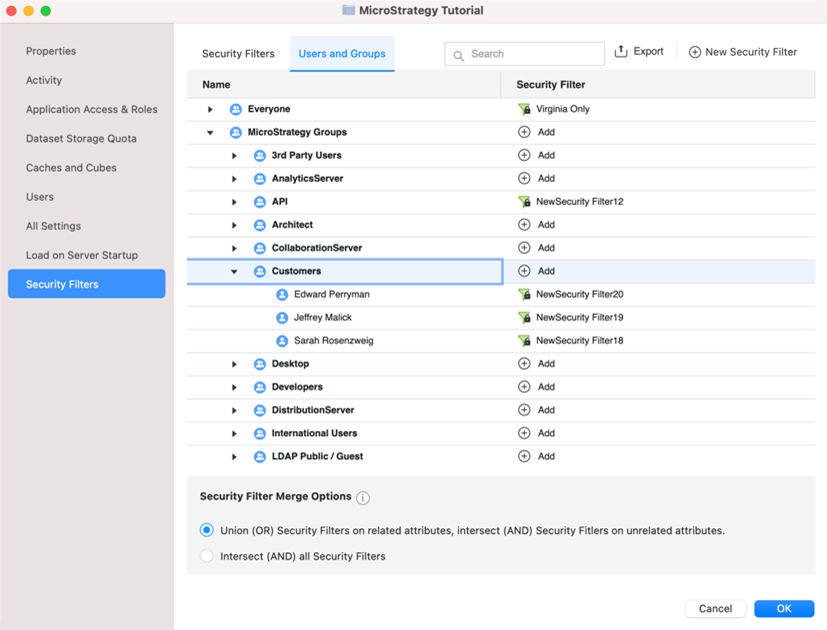 Click here to view details about the User and Groups tab.
This tab displays the full user hierarchy, along with the assigned security filter for every group or user in the project.
- To assign a security filter to a user or group that doesn't have one, click
 Add in its row. Select the security filter, then click Add.
 - If the user or group has a security filter that you want to remove, click the next to it.
- Use the search to locate a particular user or group by name.
-
To create a new security filter, click
New Security Filter in the top right. -
To export the current security filters and the users and groups associated with them into a .csv file, click
 Export.
 -
You can adjust the Security Filter Merge Options at the bottom of the window to control the query behavior when multiple security filters are applied to a specific user. Note that while only one security filter can be directly assigned to a user or group, these users can inherit security filters from parent or ancestor user groups. Users that inherit multiple security filters are merged according to this project-wide setting.
-
Click OK.
Manage Security Filters for a User
The User Editor also has a section for security filters. It provides an overview of all projects and the user’s directly assigned security filters. The User Editor also lists indirectly inherited security with information about which user group the security filter is inherited from.
- Open the Workstation window with the Navigation pane in smart mode.
-
In the Navigation pane, click User and Groups.
-
Right-click the user you want to manage a security filter for and choose Properties.
-
In the left pane, click Security Filters.
You can view all projects to which the user has access and the security filter assigned to this user for each project. Starting in MicroStrategy ONE (December 2024), you can view all projects and add security filters.
- If a project has a security filter assigned, you can edit or remove it.
- If a project does not have a security filter assigned, you can click Add to assign a filter for the user.
- Use the search at the top to locate a particular project by name.