Strategy One
Create an Alert Subscription for a Dashboard
Starting in Strategy One (September 2025), you can send the alert as a mobile push notification, ensuring your users receive alerts in their preferred format and on their preferred device.
Starting in Strategy One (March 2025), you can create threshold-based alerts for dashboards in Library. This means notifications are sent when a metric value on the dashboard meets the threshold conditions. Users stay informed about critical changes and events, promoting proactive decision-making and operational efficiency.
For example, a subscription to a weekly staffing dashboard runs every Saturday afternoon. The alert conditions check for staffing levels below a minimum requirement. If they do, the dashboard is sent to you. The alert conditions are based on a visualization that displays staffing numbers by department, so the staffing metric in the conditions calculates at the department level.
Create an Alert Subscription
-
Click the dashboard to subscribe to.
-
Navigate to the page containing the visualization to use for the alert conditions.
-
In presentation mode, hover over a visualization and click Context Menu
 .
.
-
Choose Alert. The Subscribe Alert window opens.
Alert is only available in presentation mode and not available in edit mode.
-
Name the new subscription.
-
Starting in Strategy One (September 2025), from the Send Through drop-down list, select whether to the alert via Email or a Mobile Notification.
-
If you select Mobile Notification, select the Target Device from the drop-down list. You can select multiple devices.
-
-
Format a metric in the subscription to highlight it. From the Highlighted Metric drop-down list, select the metric to highlight. This does not have to be the same metric that triggers the alert. Click the preview format box to the right. Select the Fill Color and Font Color.
-
Click Add Condition
 . The New Condition window opens.
 -
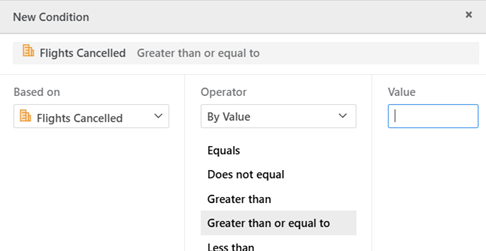
The Based On drop-down list displays the attributes and metrics in the visualization. Select the object to base the alert condition on.
-
Define the alert condition, such as Number of Flights Canceled Greater than 100:
-
For a metric, select By Value or By Rank from the Operator drop-down list. Click the operator (such as Greater than or Highest). Type the Value to compare the metric values to.
-
For an attribute, by default its values (the attribute elements) are compared to the attribute elements in a list. Choose In List or Not in List. Select the check boxes of the elements to compare to.

-
For an attribute, you can instead create an attribute form qualification, which compares a selected attribute form (such as ID or Description) to a specific value.
Click here to view steps.-
From the Choose Elements By drop-down list, select Qualification On.
-
Select the attribute form, such as ID or DESC.
-
Select the Operator (such as such as Begins With).
-
Type the Value to compare the attribute elements to.

-
-
-
Click OK.
-
You can define multiple conditions. To add another condition, click Add Condition
 and define the new condition.
-
If you add multiple conditions, you can change the operator that joins the conditions. By default, all conditions are joined with the AND operator, meaning that data must meet all conditions to trigger the alert subscription. To change the operator, click AND and select OR, AND NOT, or OR NOT.

-
If you add more than two conditions, you can group specific conditions. For example, your subscription needs to be sent when specific airlines fly out of IAD, BWI, or DCA airports and have an On-time Rate greater than 70%. Click Group
 between the two conditions to evaluate them together. In the image below, the On-time rate condition is joined with the AND operator to a group consisting of the Airline Name condition and Airport condition, also joined with the AND operator.
-
-
Select a Bookmark. You can select the current view of the dashboard or another bookmark to create the subscription.
Library subscriptions are based on bookmark views. If the current view is not saved as a bookmark, creating a subscription with the current view automatically adds a new bookmark to the Bookmarks panel. You can name the bookmark for the current view.
-
If this is an email alert, you can choose either Excel or PDF as the Format of the subscription.
-
If you select the Excel Format, you can Show Filters in the Excel file. From the Contents drop-down list, select whether to display the Entire Page on the Worksheet or Each Visualization Separately.
-
If you select the PDF Format, you can change PDF settings such as printing visualizations together on the same page or each on a separate page, setting the paper size, and whether to display page numbers. Click Attached PDF Settings to change them.
-
-
If this is an email alert, you can create an optional snapshot by selecting the Add to Snapshot check box.
Snapshots, new in Strategy One (March 2025), allow you to capture the dashboard at a specific point in time. Use snapshots for data change analysis or comparison.
-
If this is an email alert, select the Range to include, such as all of the dashboard or specific chapters or pages.
-
Select a Schedule. Schedules have already been created.
-
If this is an email alert, you can add an optional Note.
-
If this is a mobile notification, a default notification is sent to the device. The default notification reads, "Alert on [Dashboard Name]. Your alert [Alert Name] has been triggered." To customize the notification, enable Define Notification Content, then type the notification text in the box.
-
In the Deliver to field, review recipients of the subscription. To add users, start searching by their name.
By default, all Library end users can create subscriptions for their own user. To add others to the recipient list, make sure the user has the "Web subscribe others" privilege. If you can add more users, a new check box displays for Allow recipients to unsubscribe (optional). You can allow others to unsubscribe or not.
-
Optionally, you can select the Send preview now to all recipients check box.
-
Click Subscribe. The new subscription is created.
To manage subscriptions, including alerts, click Subscriptions in the sidebar menu of Library Home or the information window of the dashboard.
In the Subscriptions panel shown below, the new alert subscription for the Office Royale Sales dashboard is listed, along with the Human Resources Analysis dashboard's subscription and the Sales by Income Bracket report's History List subscription. You can run, edit, or unsubscribe from each subscription.

Emails are automatically sent to the subscription recipients. To include a link to the dashboard, use Workstation to configure email content for your application. By default, configuring the email includes links to open the content in a Web browser and in the Library Mobile application. For steps to configure and personalize the email, see Configure Notification Emails When Sharing Content in Library.