Strategy One
Create an ODBC Connection for Snowflake
Starting in Strategy One (June 2025), you can use key pair authentication to connect to Snowflake.
Starting in Strategy One (March 2025), you can connect to Snowflake using a ODBC connection.
- Workstation
- Library
Create a Data Source Using Standard Authentication
-
Open the Workstation window.
-
Connect to an environment.
-
In the Navigation pane, click
 next to Data Sources.
 -
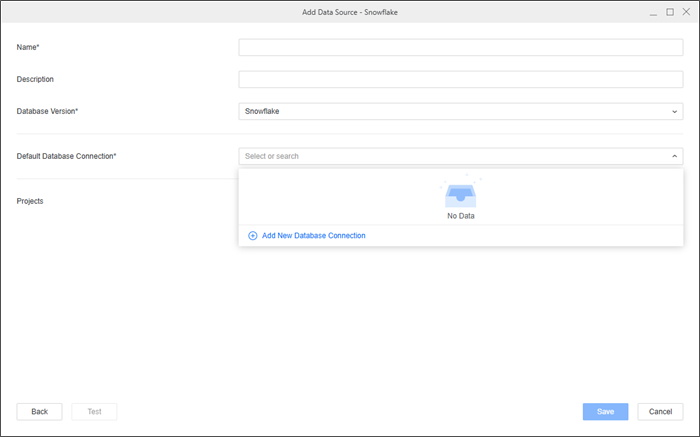
Search for and choose Snowflake from the data source list.
-
In the Default Database Connection drop-down list, click Add New Database Connection.
-
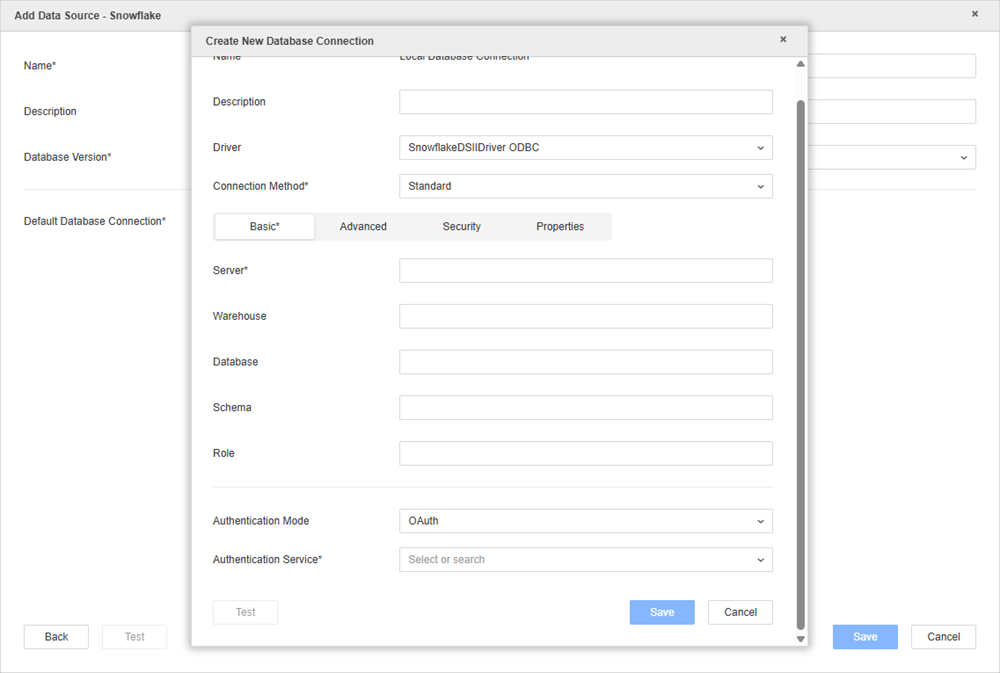
Type a Name for the new database connection.
-
In the Driver drop-down list, choose the Snowflake ODBC driver.

-
In the Connection Method drop-down list, choose Standard.
-
Click the Basic tab.
-
Type a Server Name.
Format the server name as the following:
account_identifier.snowflakecomputing.com -
Optionally type a Warehouse, Database, Schema, and Role.
-
In the Authentication Mode drop-down list, choose Standard.
-
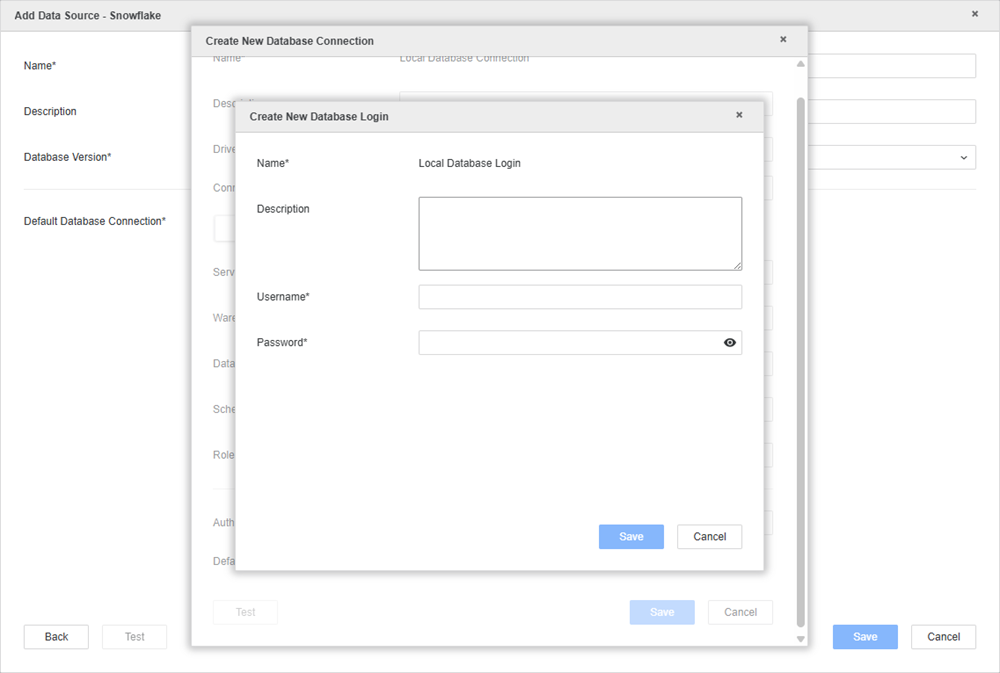
In the Default Database Login drop-down list, click Add New Database Login.
-
Type a Name, Username, and Password for the new database login.
-
Click Save.
-
Click Save.
-
In the Add Data Source dialog, enter a Name and Database Version for the new data source. Choose at least one Project for further data manipulation.
-
Click Save.
Create a Data Source Using OAuth Authentication
Strategy supports connecting to Snowflake via OAuth authentication using Azure AD, Okta, PingOne, and Generic as IDP.
Prerequisite
Complete all steps in Configure OAuth Parameters: Authorization Code Workflow.
Create a Data Source
-
Open the Workstation window.
-
Connect to an environment.
-
In the Navigation pane, click
next to Data Sources. -
Search for and choose Snowflake from the data source list.
-
In the Default Database Connection drop-down list, click Add New Database Connection.
-
Type a Name for the new database connection.
-
In the Driver drop-down list, choose the Snowflake ODBC driver.
-
In Connection Method, ensure Standard is selected.
-
Click the Basic tab.
-
Type a Server Name.
Format the server name as the following:
account_identifier.snowflakecomputing.com -
Optionally type a Warehouse, Database, Schema, and Role.
-
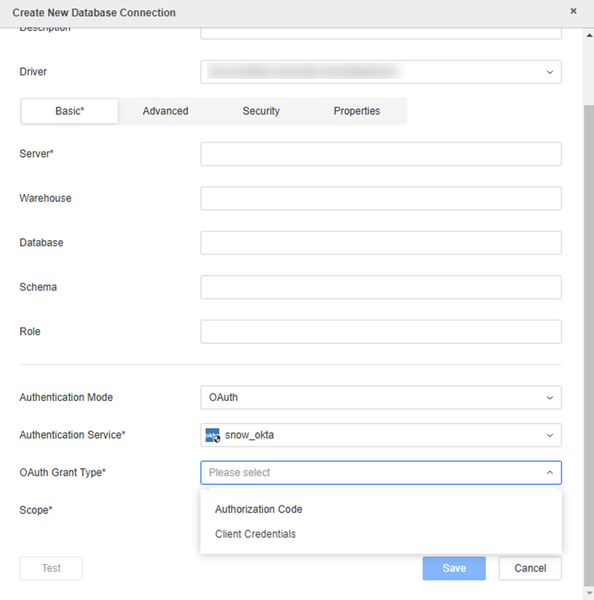
In the Authentication Mode drop-down list, choose OAuth.
-
In the Authentication Service drop-down list, choose an authentication service or click Add New Authentication Service.
For more information, see Manage OAuth Enterprise Security with Identity and Access Management (IAM) Objects.
Parameters including the Client ID, Client Secret, Directory (tenant) ID, and Scope can be collected in Configure OAuth Parameters: Authorization Code Workflow.
-
If you click Add New Authentication Service, type a Display Name and enter your Client ID, Directory (tenant) ID, and Scope.

-
If you choose Okta or Azure AD authentication service, choose an OAuth grant type (Authorization Code or Client Credential). If you choose PingOne or Generic, choose Authorization Code.
For more information on how to configure these methods, see Configure OAuth Parameters: Authorization Code Workflow or Configure OAuth Parameters: Client Credential OAuth Workflow.
-
Type your required values in Scope.
-
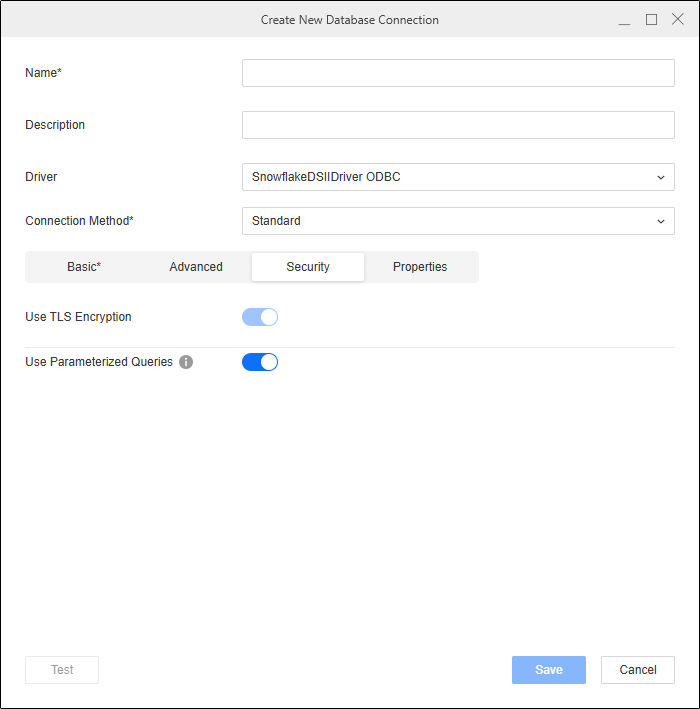
Optionally click the Security tab and ensure Use TLS Encryption is enabled by default.
-
Click Save.
-
In the Add Data Source dialog, enter a Name and Database Version. Choose at least one Project for further data manipulation.
-
Click Save.
Create a Data Source Using the Key Pair Method
Starting in Strategy One (June 2025), Strategy supports connecting to Snowflake using the Key Pair method. ODBC connections only support uploading a key from a local file.
Prerequisite
Complete all steps in Upload from a Local Client Machine.
Create a Data Source
-
Open the Workstation window.
-
Connect to an environment.
-
In the Navigation pane, click
next to Data Sources. -
Search for and choose Snowflake from the data source list.
-
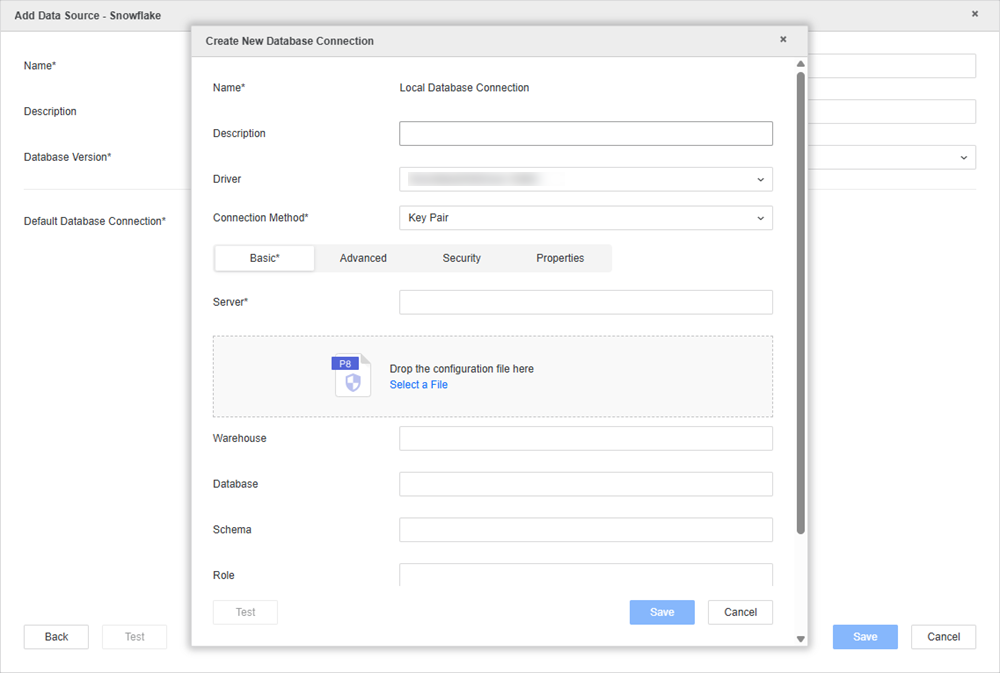
In the Default Database Connection drop-down list, click Add New Database Connection.
-
Type a Name for the new database connection.
-
In the Driver drop-down list, choose the Snowflake ODBC driver.
-
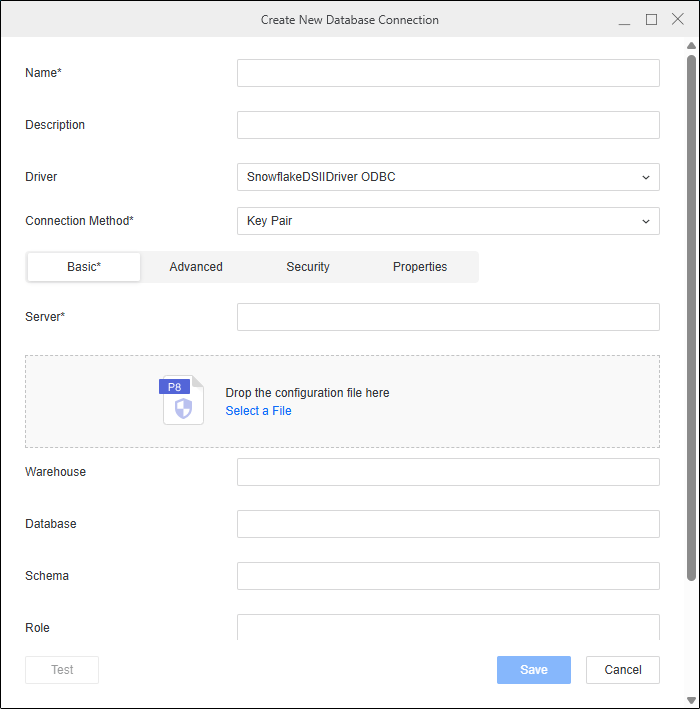
In the Connection Method drop-down list, choose Key Pair.
-
Type a Server Name.
Format the server name as the following:
account_identifier.snowflakecomputing.com -
In the configuration file dialog, click Select file and open the file you saved in Upload from a Local Client Machine
Only
.p8files are supported. -
Type a value in Private Key File Password depending on your configuration:
-
If your key is encrypted, type the private key file password.
-
If your key in non-encrypted, leave this field blank.
-
-
Optionally type a Warehouse, Database, Schema, and Role.
-
Expand the Default Database Login and click Add New Database Login.
-
Type a Name and a Username.
Leave Password empty.
-
Click Save.
-
Optionally click the Security tab and ensure Use TLS Encryption is enabled by default.
-
Click Save.
-
In the Add Data Source dialog, enter a Name and Database Version for the new data source. Choose at least one Project for further data manipulation.
-
Click Save.
Import Data Using Your Snowflake Data Source or Create a New Data Source
-
Open the Workstation window.
-
Connect to an environment.
-
In the Navigation pane, click
next to Datasets. -
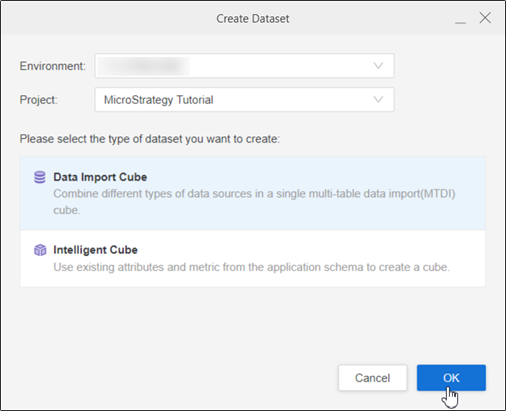
Choose a Project and select Data Import Cube.
-
Click OK.
-
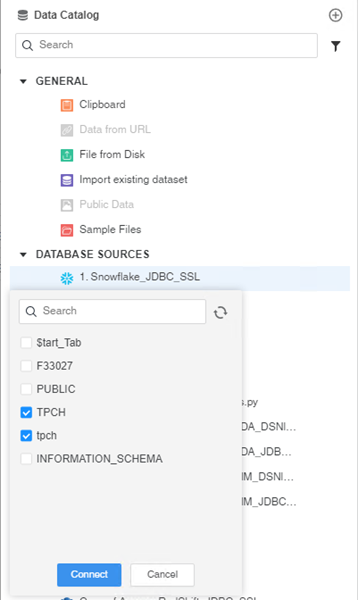
In Data Catalog, click the Snowflake data source you created, choose a namespace, and click Connect.
Or
In Data Catalog, click Create a new data source and depending on your method, use the steps above.
-
Expand the drop-down list next to the namespace and double-click or click and drag a table to add it to the right pane.
-
Click Preview Data to modify your data or click Save to publish the cube as a Connect Live or In-memory dataset.
-
In Library, choose Create New > Dashboard.
-
Choose a project from the Create Dashboard in drop-down list.
-
Click Blank Dashboard.
-
In the Datasets panel, click New Data.
-
Click
 next to Data Catalog.
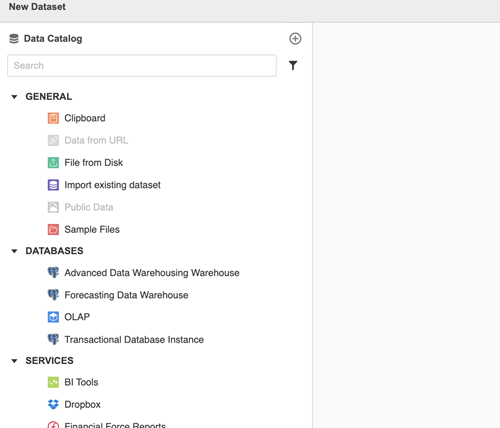
-
Search for and choose Snowflake from the data source list.
-
In Default Database Connection, click Add New Database Connection.
-
In the Driver drop-down list, choose the Snowflake ODBC driver.
-
Click the Basic tab.
-
Type a Server Name.
Format the server name as the following:
account_identifier.snowflakecomputing.com -
Optionally type a Warehouse, Database, Schema, and Role.
-
Strategy supports connecting to Snowflake using Standard, Key-pair, and OAuth authentication methods.
For Standard authentication, click here.-
In the Connection Method drop-down list, choose Standard.
-
Next to Default Database Login, click Add New Database Login.
-
Type your Username and Password.
-
Click Save.
For Key-pair authentication, click here.-
In the Connection Method drop-down list, choose Key Pair.
For more information on configuring snowflake key pair authentication, see Configure Key Pair Authentication.
-
In the configuration file dialog, click Select file and open the file you saved in Upload from a Local Client Machine
Only
.p8files are supported. -
Type a value in Private Key File Password depending on your configuration:
-
If your key is encrypted, type the private key file password.
-
If your key in non-encrypted, leave this field blank.
-
-
Click Add New Database Login.
-
Type a Name and a Username.
Leave Password empty.
-
Click Save.
For OAuth authentication, click here.Strategy supports connecting to Snowflake via OAuth authentication using Azure AD or Okta as an Identity Provider.
-
In the Connection Method drop-down list, choose Standard.
-
In Authentication Mode drop-down list, choose OAuth.
-
In the Authentication Service drop-down list, choose an authentication service or click Add New Authentication Service.
For more information, see Manage OAuth Enterprise Security with Identity and Access Management (IAM) Objects.
-
If you choose Okta or Azure AD authentication service, choose an OAuth grant type (Authorization Code or Client Credential) and enter your required values in Scope.
For more information on how to configure these methods, see Configure OAuth Parameters: Authorization Code Workflow.
-
-
Optionally click the Security tab and ensure Use TLS Encryption is enabled by default.
-
Click Save.
-
In the Add Data Source dialog, enter a Name and Database Version. Optionally, choose Projects for further data manipulation.
-
Click Save.
-
In Data Catalog, click the Snowflake data source you created, choose a namespace, and click Connect.
-
Expand the drop-down list next to the namespace and double-click or click and drag a table to add it to the right pane.
-
Click Prepare Data to modify your data or click Save to publish the cube as a Connect Live or In-memory dataset.