Strategy ONE
Customize Drop Zones in the Editor Panel
You can customize the drop zones of an HTML5 visualization built with the MicroStrategy JavaScript platform. With APIs provided in mstrmojo.vi.models.CustomVisDropZones , you can specify which zones to display and define the behavior when objects are added or removed.
To customize the drop zones of an HTML5 visualization:
-
Configure visualization.xml to add the JavaScript class that renders the drop zones.
Navigate to plugins\<your plug-in folder>\WEB-INF\xml\config\visualization.xml in your plug-in folder in the MicroStrategy Web installation directory. Open visualization.xml and add the code shown in bold text below:
Copy<visualizations>
<visualization-list name="ajax">
<visualization id="D3BubbleChart" desc="D3 Bubble Chart" scope="19" projects="" style-name="D3BubbleChart" is-mojo="true" attribute-minimum="2" metric-minimum="1" drop-zones="plugins.D3BubbleChart.D3BubbleChartDropZones" widget-type="7">
</visualization-list>
</visualizations>- drop-zones
Defines the namespace and class name of your drop zone file. You can change this to a name of your choosing. - widget-type
Specifies that this visualization uses a custom drop zone.
- drop-zones
-
Create the JavaScript template for your custom visualization.
Navigate to plugins/<your plug-in folder>/javascript/mojo/js/source/ in the MicroStrategy Web installation directory. Copy the following template to the file.
Copy(function () {
// Define this code as a plugin in the mstrmojo object
if (!mstrmojo.plugins.D3BubbleChart) {
mstrmojo.plugins.D3BubbleChart = {};
}
// Import the necessary library
mstrmojo.requiresCls(
"mstrmojo.vi.models.CustomVisDropZones"
) ;
/**
* <p>Simple drop zone model for visualization using D3 library</p>
* <p>Defined the drop zones displayed in drop zone panel.</p>
* @class mstrmojo.plugins.D3BubbleChart.D3BubbleChartDropZones
* @extends mstrmojo.vi.models.CustomVisDropZones
*/
// Declare the visualization drop zones model object
mstrmojo.plugins.D3BubbleChart.D3BubbleChartDropZones = mstrmojo.declare(
// Declare that this code extends CustomVisDropZones
mstrmojo.vi.models.CustomVisDropZones,
null,
{
// Define the JavaScript class that renders your visualization drop zones
scriptClass: 'mstrmojo.plugins.D3BubbleChart.D3BubbleChartDropZones',
getCustomDropZones: function getCustomDropZones() {
// Fill the zones’ definition here
},
shouldAllowObjectsInDropZone: function shouldAllowObjectsInDropZone(zone, dragObjects, idx, edge, context) {
},
getActionsForObjectsDropped: function getActionsForObjectsDropped(zone, droppedObjects, idx, replaceObject, extras) {
// Optional: Define the behavior after objects are dropped to a zone
},
getActionsForObjectsRemoved: function getActionsForObjectsRemoved(zone, Objects) {
// Optional: Define the behavior after objects are removed from a zone
},
getDropZoneContextMenuItems: function getDropZoneContextMenuItems(cfg, zone, Object, el) {
// Optional: Define the RMC context menu for an object
}
}
);
}());
//@ sourceURL=D3BubbleChartDropZones.js -
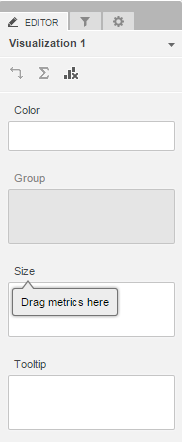
Define the zones (name, tooltip, max capacity, allowed object type, and condition to be disabled) that will be displayed in the drop zone panel.
You can define the zones you want to display in getCustomDropZones(). The function returns an array in the order of the zones you want to show from top to bottom. The name acts as an identifier and must be unique for each zone. The following code defines four zones and their name, title (tooltip), max capacity, allowed object type, and condition to be disabled.
CopygetCustomDropZones: function getCustomDropZones() {
var ENUM_ALLOW_DROP_TYPE = mstrmojo.vi.models.CustomVisDropZones.ENUM_ALLOW_DROP_TYPE;
return [
{
name: 'Color',
title: mstrmojo.desc(13828, 'Drag attributes here'),
maxCapacity: 1,
allowObjectType: ENUM_ALLOW_DROP_TYPE.ATTRIBUTE,
disabled: false
}, {
name: 'Group',
title: mstrmojo.desc(13828, 'Drag attributes here'),
allowObjectType: ENUM_ALLOW_DROP_TYPE.ATTRIBUTE,
disabled: this.getDropZoneObjectsByIndex(0).length === 0 // Group zone is enabled only if Color zone is not empty.
}, {
name: 'Size',
title: mstrmojo.desc(13827,'Drag metrics here'),
maxCapacity: 2,
allowObjectType: ENUM_ALLOW_DROP_TYPE.METRIC
}, {
name: 'Tooltip',
title: mstrmojo.desc(13827, 'Drag metrics here'),
allowObjectType: ENUM_ALLOW_DROP_TYPE.METRIC
}
];
},- To specify that the Group zone is enabled only if the Color zone is not empty, use "disabled: this.getDropZoneObjectsByIndex(0).length===0".
- To get objects already dropped in that zone, use "this.getDropZoneObjectsByIndex(0)", where the index is based on the order defined in this function.
You can also use getDropZoneObjectsByName() to achieve the same result as getDropZoneObjectsByIndex(). However, because getDropZoneObjectsByName() is based on getCustomDropZones() (since the name is defined here), calling it here will cause a recursive call.
You can access drop zones from the visualization JavaScript code base by calling the following: this.zonesModel.getDropZoneObjectsByName("Color").
Once you have added this code, you should be able to see the following drop zone panel for your custom visualization.
-
Define which objects are allowed to be dropped.
To define which objects can be dropped for a specific zone, you use shouldAllowObjectsInDropZone. You are responsible for filtering out the allowed objects from the dropped objects.
CopyshouldAllowObjectsInDropZone: function shouldAllowObjectsInDropZone(zone, dragObjects, idx, edge, context) {
var me = this;
return {
allowedItems: $ARR.filter(dragObjects, function (object) {
var isMetric = me.isMetric(object);
switch(zone.n) {
case 'Group':
return !me.isObjectInZone(object, 'Color'); // Can't have same unit in Color zone.
}
})
};
}, -
(Optional) Define the actions to be performed after objects are dropped on a drop zone.
You can define what to do after an object is dropped on a drop zone. For example, you may want to remove an object from the Group zone if the same object is dropped on the Color zone, or you may want to add the same object that is dropped on the Size zone to the Tooltip zone. These actions can be performed by the code below:
CopygetActionsForObjectsDropped: function getActionsForObjectsDropped(zone, droppedItems, idx, replaceItem, extras) {
var me = this, actions = [];
switch(this.getDropZoneName(zone)) {
case 'Color':
// If added to Color, remove it from Group
$ARR.forEach(droppedItems, function (item){
// Is this item in group zone?
if (me.isItemInZone(item, 'Group')) {
me.getRemoveDropZoneObjectsActions(actions, 'Group', item);
}
});
break;
case 'Size':
// If added to Size, also add the unit to Tooltip
this.getAddDropZoneObjectsActions(actions, 'Tooltip', droppedObjects, idx, extras);
break;
}
return actions;
}, -
(Optional) Define the actions to be performed after objects are removed from a drop zone.
You can define what to do after an object is removed from a drop zone. For example, you may want to remove the same item from all other drop zones. This action can be performed by the code below:
CopygetActionsForObjectsRemoved: function getActionsForObjectsRemoved (zone, items) {
var actions = [];
switch (this.getDropZoneName(zone)) {
case 'Size': //If removed from size dropzone also remove it from Tooltip dropzone
this.getRemoveDropZoneObjectsActions(actions, 'Tooltip', items);
break;
}
return actions;
}, -
(Optional) Customize the context menu.
There are a number of context menu options available out-of-the-box for both attributes and metrics, but you can add a new option for the threshold editor using getDropZoneContextMenuItems(). This action can be performed by the code below.
CopygetDropZoneContextMenuItems: function getDropZoneContextMenuItems(cfg, zone, item, el) {
// Add threshold menu option to size zone.
if (this.getDropZoneName(zone) === 'Size'){
cfg.addSeparator();
this.buildThresholdMenuOptions(cfg, {item: item}, true);
}
}In this release, only the threshold menu can be added to this context menu. Custom menus cannot be added at this time.
-
(Optional) Customize the drop zones when transitioning between visualizations
When you switch from one visualization to another with custom drop zones, a default rule is applied to move the values from the drop zones for the first visualization to the custom drop zones. By default, the attributes and metrics in the first visualization are moved, in order one by one, to the custom drop zones (respecting the allowed drop type and max capacity) until all the custom drop zones are full or all the attributes and metrics from the first visualization have been used.
You can customize this behavior and override the default actions. To define your own rules for transitions between drop zones, you use the following APIs:
- customDropZonesTransition(attributes,metrics)
Function that defines the rules for how objects in the first visualization will be moved to the custom drop zones. Override this method to use your own rules for transitioning between drop zones. Parameters:- attributes
The collection of attributes from the first visualization. Has a property called fromZone that tells you the name of the drop zone this object comes from. - metrics
The collection of metrics from the first visualization. Has a property called fromZone that tells you the name of the drop zone this object comes from.
- attributes
- transitionObjectsToZone(zoneName,objects)
Function that moves the objects from the first visualizaton to the custom drop zones. Should be called in customDropZonesTransition(attributes,metrics) to define a specific transition rule.
Parameters:- zoneName
Name of the custom drop zone you want to move an object to. The name must already be defined in getCustomDropZones(); otherwise, it will have no effec - objects
The object or collection of objects that you want to move to the custom drop zones.
- zoneName
The order of the attributes and metrics in the arrays passed in to customDropZonesTransition(attributes,metrics)must be determined before they are moved to the custom drop zones. This order is automatically prioritized for each out-of-the-box visualization based on the relative importance of the attributes and metrics in the visualization. For example, in a heat map visualization, the metrics in "Color By" have a greater impact than those in "Size By", and the metrics in "Size By" are more important than the metrics in "Tooltip". Based on this analysis, the metrics being moved from a heat map to custom drop zones would be reordered to have those from "Color By" first, then "Size By", and finally "Tooltip".
The following table lists the prioritized order for a number of out-of-the-box visualizations. When a transition is made from one of these visualizations to a visualization with custom drop zones, the attributes and metrics are passed in customDropZonesTransition(attributes,metrics) in the order shown below.
Out-of-the-Box Visualization Type Object Type Order Grid
Attribute Rows -> Columns Metric Metrics Heat Map
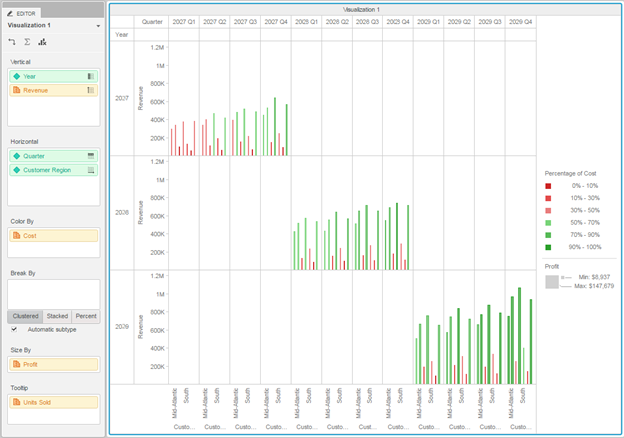
Attribute Group Metric Color By -> Size By -> Tooltip Graph Matrix (non-Pie) Attribute Vertical -> Color By -> Break By -> Horizontal Metric Horizontal -> Vertical -> Color By -> Size By -> Tooltip Graph Matrix (Pie) Attribute Color By -> Slice -> Vertical -> Break By -> Horizontal Metric Angle -> Horizontal -> Vertical -> Color By -> Size By -> Tooltip Map Attribute Geo Attribute -> Tooltip -> Latitude -> Longitude Metric Color By -> Size By -> Tooltip Network Attribute From Item -> To Item Metric Edge Color -> Edge Size -> Item Size Sample code is provided below to show you how to move objects from the bar chart shown below:
The objects are moved to the custom drop zones for the bullet chart shown below, using the following transition rules:
- All attributes should be moved to the custom "Category" drop zone in order.
- The first metric should be moved to the custom "Actual" drop zone.
- The second metric should be moved to the custom "Target" drop zone.
- All other metrics—except the metric from the original "Tooltips" drop zone—should be moved to the custom "KPI" drop zone.
- The metric from the original "Tooltips" drop zone should be moved to the custom "KPI" drop zone.
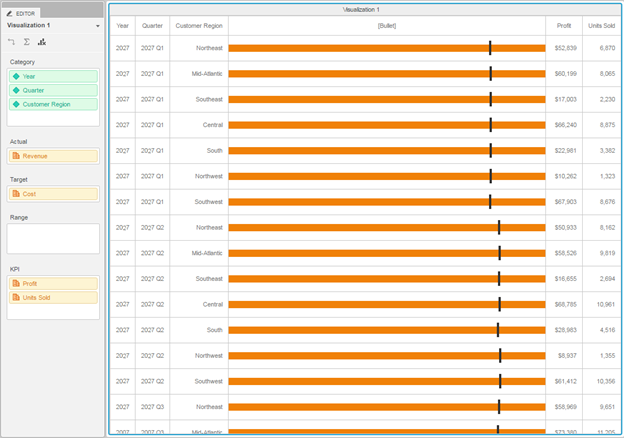
To enforce these rules, add the following code to your xxxDropZones.js file:
CopycustomDropZonesTransition: function customDropZonesTransition(attributes, metrics){
var noTooltipsArr,
tooltipsArr;
// Move all attributes to "Category"
this.transitionObjectsToZone('Category', attributes);
// Find all metrics not from "Tooltips" (In OOB it is called "AdditionalMetrics")
noTooltipsArr = metrics.filter(function(metric) {
return metric.fromZone !== 'Tooltips' && metric.fromZone !== 'AdditionalMetrics';
});
// Move first metric (not from "Tooltips") to "Actual"
this.transitionObjectsToZone('Actual', noTooltipsArr[0]);
// Move second metric (not from "Tooltips") to "Target"
this.transitionObjectsToZone('Target', noTooltipsArr[1]);
// Move all other metrics (not from "Tooltips") to "KPI"
this.transitionObjectsToZone('KPI', noTooltipsArr.slice(2));
// Find all metrics from "Tooltips"(In OOB it is called "AdditionalMetrics")
tooltipsArr = metrics.filter(function (metric) {
return metric.fromZone === 'Tooltips' || metric.fromZone === 'AdditionalMetrics';
});
// Move all metrics from "Tooltips" to "KPI"
this.transitionObjectsToZone('KPI', tooltipsArr);
} - customDropZonesTransition(attributes,metrics)
-
Use the data for your visualization.
The data format is just as described in Data Interface API, but it follows certain rules if custom drop zones are defined. The data is still returned as a grid and can be retrieved using getRawData() and other APIs provided in DataInterface.js. The attributes and metrics are added to the corresponding default drop zones regardless of the definition of the custom drop zones. However, the order in which the zones are arranged is based on:
- The order of the drop zone that it belongs to.
- The order of the objects in the same drop zone.
-
If an object appears in more than one drop zone, the first appearance is used for ordering.
For example, if you customized the drop zones as shown below and you dropped some objects in them:
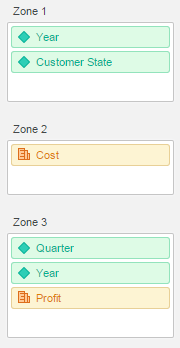
The data is returned as the following grid:
-
(Optional) Define the actions to be performed after you double click some object in datasets.
By default, every drop zone will be tried, in order, and the object will be inserted into the first allowed one. In addition, shouldAllowObjectsInDropZone will be called during the process to keep the behavior consistent with drag-and-drop. To further customize the actions of double-click, you can override the following API.
Function
getActionsForDoubleClick(obj): that defines the upper rules of what to do when you double click an object in datasets.
Parameters
obj: The object of double clicked
Return
(Array) actions
Example
CopygetActionsForDoubleClick: function (obj) {
var me = this;
// call the default method in parent class
// var actions = this._super(obj);
var actions = [];
var metricZones = ['Actual', 'Target', 'Range', 'KPI'];
if (this.isAttribute(obj)) {
this.getReplaceDropZoneObjectsActions(actions, 'Category', obj, 0);
} else {
var emptyZones = metricZones.filter(function (zoneName) {
return me.isZoneEmpty(zoneName);
});
if (emptyZones.length > 0) {
this.getAddDropZoneObjectsActions(actions, emptyZones[0], obj);
} else {
for (var i = 0; i < metricZones.length; i++) {
if (this.isObjectAllowedForDropZone(obj, metricZones[i])) {
this.getAddDropZoneObjectsActions(actions, metricZones[i], obj);
break;
}
}
}
}
return actions;
},This util method may help you to check if the object is allowed for the drop zone.
Method
isObjectAllowedForDropZone(obj, dropZone): The result depends on the method shouldAllowObjectsInDropZone and the configurations returned from getCustomDropZones.
Parameters
obj: The object of double clicked
dropZone: it can be the name or index of some drop zone
Return
(Boolean) object is allowed
-
Integrated util methods to get actions of manipulating the drop zone objects.
-
getAddDropZoneObjectsActions: Function that get actions of adding objects to some drop zone.
Parameters
actions: An array of commands that will be executed, and the result of this method will be pushed to this array.
zoneName: Name of the zone.
objects: Objects to be added, it can be the object itself or an array of them.
idx: (Optional) The index the item is being added at.
extras: (Optional) Extra parameters.
-
getRemoveDropZoneObjectsActions: Function that get actions of removing objects from some drop zone.
Parameters
actions: An array of commands that will be executed, and the result of this method will be pushed to this array.
zoneName: Name of the zone.
objects: Objects to be removed, it can be the object itself or an array of them.
-
getReplaceDropZoneObjectsActions: Function that get actions of replacing objects in some drop zone.
Parameters
actions: An array of commands that will be executed, and the result of this method will be pushed to this array.
zoneName: Name of the zone.
newObject: The new object which will replace the old one.
idx: Index of the old object.
-