Strategy One
This page applies to MicroStrategy 2021 Update 4 and newer versions.
SAML Customization for Strategy Library
Starting in MicroStrategy 2021 Update 4, the SAML framework spring-security-saml2-service-provider v5.3.3 and OpenSAML v4.1.0 technologies are used. This page illustrates the SAML workflow and beans you may leverage for customization.
SAML Login Workflow
The diagrams and workflows below illustrate how authentication-related requests are handled with different authentication configurations. The following are true for these workflow diagrams:
-
Double-line arrows represent HTTP requests and responses. Single-line arrows represent Java calls.
-
The object names correspond to the bean IDs in the configuration XML files. You must view the configuration files to identify which Java classes define those beans.
-
Only beans involved in request authentication are included. Filters that simply pass the request along the filter chain or perform actions not directly involved in request authentication are not included. As described in the Spring Security architecture, each request passes through multiple Spring Security filters.
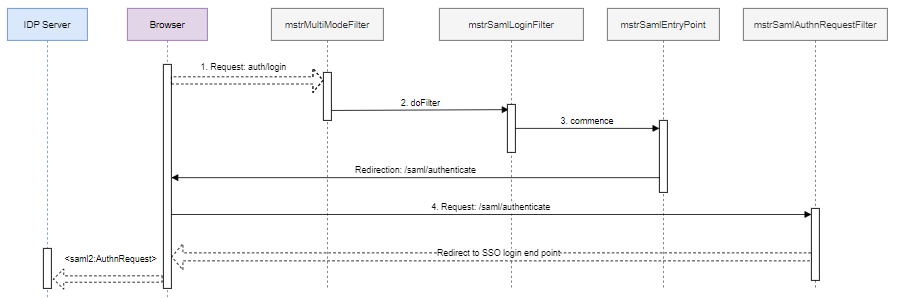
Process to Generate <saml2:AuthnRequest>
-
The multi-mode login page submits a
POST: {BasePath}/auth/loginrequest, which is intercepted by themstrMultiModeFilterbean. -
The multi-mode login filter recognizes this is a SAML login request and delegates the work to the
mstrMultiModeFilterSAML login filter bean. -
The SAML login filter delegates to the
mstrSamlEntryPointSAML entry point bean, which performs a redirection tosaml/authenticationby default.This redirection is designed to support a multi-tenants scenario. If you've configured more than one asserting party, you can first redirect the user to a picker or in most cases, leave it as is.
-
The browser is redirected and sends a
GET: {BasePath}/saml/authenticaterequest, which is intercepted by themstrSamlAuthnRequestFilterbean. -
The
mstrSamlAuthnRequestFilterbean is<saml2:AuthnRequest>, which generates an endpoint that creates, signs, serializes, and encodes a<saml2:AuthnRequest>and redirects to the SSO login endpoint.
Bean Description
| Bean ID | Java Class | Description |
|---|---|---|
mstrSamlEntryPoint
|
com.microstrategy.auth.saml.authnrequest.SAMLEntryPointWrapper
|
A subclass of LoginUrlAuthenticationEntryPoint that performs a redirect to where it is set in the constructor by the String redirectFilterUrl parameter |
mstrSamlAuthnRequestFilter
|
org.springframework.security.saml2.provider.service.servlet.filter.Saml2WebSsoAuthenticationRequestFilter
|
By default, this filter responds to the /saml/authenticate/** endpoint and the result is a redirect that includes a SAMLRequest parameter containing the signed, deflated, and encoded <saml2:AuthnRequest> |
Customization
Before AuthnRequest is sent, you can either leverage the mstrSamlEntryPoint or mstrSamlAuthnRequestFilter bean according to the time you want your code to be executed, create a subclass, and override the corresponding method with your own logic.
Prior to redirection to /saml/authenticate
If you want to customize before the redirection to /saml/authenticate:
-
Create a
MySAMLEntryPointclass that extendscom.microstrategy.auth.saml.authnrequest.SAMLEntryPointWrapperand overrides thecommencemethod. -
Execute your code before calling
super.commence.Copypublic class MySAMLEntryPoint extends SAMLEntryPointWrapper {
MySAMLEntryPoint(String redirectFilterUrl){
super(redirectFilterUrl);
}
@Override
public void commence(HttpServletRequest request, HttpServletResponse response, AuthenticationException e) throws IOException, ServletException {
//>>> Your logic here
super.commence(request, response, e);
}
} -
Configure your customized bean (Fully Qualified Class Name) in
SAMLConfig.xmlunder theclasses/auth/customfolder with the bean ID "mstSamlEntryPoint" to replace the original one, as shown below.The constructor argument must be exactly the same as the original if you don't do any customizations to them.
Copy<!-- Entry point for SAML authentication mode -->
<bean id="mstrSamlEntryPoint" class="com.microstrategy.custom.MySAMLEntryPoint">
<constructor-arg value="/saml/authenticate"/>
</bean>
Prior to SSO IDP Redirection
If you want to customize before the redirection to SSO IDP:
-
Create a
MySAMLAuthenticationRequestFilterclass that extendsorg.springframework.security.saml2.provider.service.servlet.filter.Saml2WebSsoAuthenticationRequestFilter. -
Override the
doFilterInternalmethod. -
Execute your code before calling
super.doFilterInternal.Copypublic class MySAMLAuthenticationRequestFilter extends Saml2WebSsoAuthenticationRequestFilter {
public MySAMLAuthenticationRequestFilter(Saml2AuthenticationRequestContextResolver authenticationRequestContextResolver, Saml2AuthenticationRequestFactory authenticationRequestFactory) {
super(authenticationRequestContextResolver, authenticationRequestFactory);
}
@Override
protected void doFilterInternal(HttpServletRequest request, HttpServletResponse response, FilterChain filterChain) throws ServletException, IOException {
//>>> Your logic here
super.doFilterInternal(request, response, filterChain);
}
} -
Configure your customized bean (Fully Qualified Class Name) in
SAMLConfig.xmlunder theclasses/auth/customfolder with a "mstSamlAuthnRequestFilter" bean ID to replace the original one, as shown below.The two constructor arguments and property must be exactly the same as the original if you don't customize them.
Copy<bean id="mstrSamlAuthnRequestFilter" class="MySAMLAuthenticationRequestFilter">
<constructor-arg ref="samlAuthenticationRequestContextResolver"/>
<constructor-arg ref="samlAuthenticationRequestFactory"/>
<property name="redirectMatcher" ref="samlRedirectMatcher"/>
</bean>
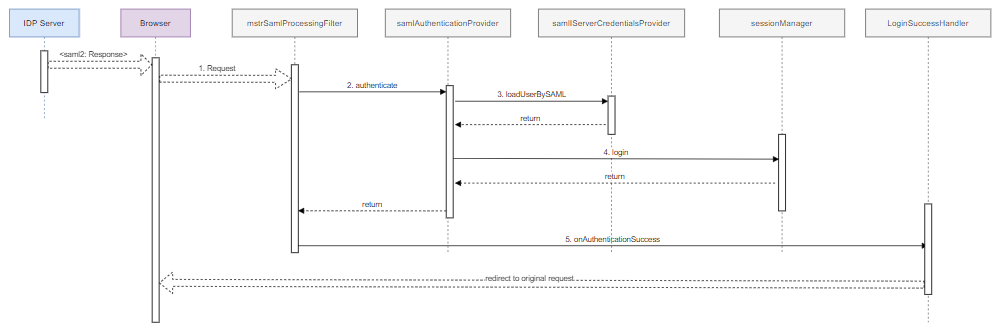
Process to Generate <saml2:Response>
-
SSO redirects the user to the Strategy Library application. The redirected request contains a SAML assertion describing the authenticated user.
-
The
mstrSamlProcessingFilterSAML processing filter bean extracts the SAML assertion from the request and passes it to thesamlAuthenticationProviderauthentication provider bean. -
The
samlAuthenticationProviderbean verifies the assertion and then calls the Intelligence server credentials provider to build an Intelligence server credentials object from the SAML assertion information. -
The
samlAuthenticationProviderbean passes the Intelligence server credentials to the Session Manager to create an Intelligence server session. -
The SAML processing filter calls the login success handler, which redirects the browser to the original request.
Bean Description
| Bean ID | Java Class | Description |
|---|---|---|
mstrSamlProcessingFilter
|
com.microstrategy.auth.saml.response.SAMLProcessingFilter
|
This is the core filter that is responsible for handling the SAML login response (SAML assertion) that comes from the IDP server. |
samlAuthenticationProvider
|
com.microstrategy.auth.saml.response.SAMLAuthenticationProviderWrapper |
This bean is responsible for authenticating a user based on information extracted from SAML assertion. |
samlIserverCredentialProvider
|
com.microstrategy.auth.saml.response.SAMLIServerCredentialsProvider |
This bean is responsible for creating and populating a IServerCredentials instance, defining the credentials for creating Intelligence server sessions. The IServerCredentials object is passed to the Session Manager's login method, which creates the Intelligence server session. |
Customization
The following content uses the real class name, instead of the bean name. You can find the bean name in SAMLConfig.xml.
You can do the following customizations:
Retrieve more information from SAMLResponse
The mstrSAMLProcessingFilter bean, also the com.microstrategy.auth.saml.response.SAMLProcessingFilter Java class, is the first layer that directly accesses the SAML response. It accepts the raw HttpServletRequest, which contains the samlResponse, and produces SAMLAuthenticationToken. This is then passed to SAMLAuthenticationProviderWrapper to perform authentication validation in further steps.

If you need to extract more information from HttpServletRequest, perform the following steps:
-
It is highly recommended that you create a
MySAMLConverterclass that extends theSAMLAuthenticationTokenConverterclass . -
Override the
convertmethod and callsuper.convert, which can getSaml2AuthenticationToken, a subclass ofSAMLAuthenticationToken. -
Extract the information from the raw request in line 11 and return an instance that is a subclass of
Saml2AuthenticationToken.The following classes are under the
com.microstrategy.auth.saml.responsepackage:SAMLAuthenticationTokenConverterSaml2AuthenticationTokenCopypublic class MySAMLConverter extends SAMLAuthenticationTokenConverter {
public MySAMLConverter(Saml2AuthenticationTokenConverter delegate) {
super(delegate);
}
@Override
public Saml2AuthenticationToken convert(HttpServletRequest request) {
Saml2AuthenticationToken samlAuthenticationToken = super.convert(request);
// >>> Extract info from request that you are interested in
return samlAuthenticationToken;
}
} -
Configure your customized bean (Fully Qualified Class Name) in
SAMLConfig.xmlunder theclasses/auth/customfolder with a "mstSamlAuthenticationConverter" bean ID and keep the original constructor argument if you don't perform additional customizations.Copy<bean id="samlAuthenticationConverter" class="com.microstrategy.custom.MySAMLConverter">
<constructor-arg ref="saml2AuthenticationConverter"/>
</bean>
Customize the login process
To verify SAML 2.0 responses, SAMLProcessingFilterWrapper delegates authenticate work to SAMLAuthenticationProvider. It authenticates a user based on information extracted from SAML assertion and logs into the Intelligence server by calling the internal login method.
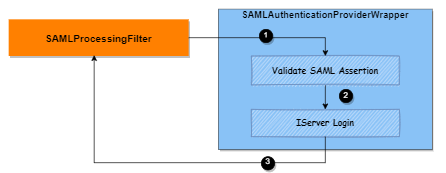
You can customize this login process at the following three specific time points, as illustrated in the diagram above:
Point ①: When pre-processing the assertion before validating the SAML response
-
Create a
MySAMLAuthenticationProviderWrapperclass that extendscom.microstrategy.auth.saml.response.SAMLAuthenticationProviderand overrides theauthenticatemethod.Copypublic class MySAMLAuthenticationProviderWrapper extends SAMLAuthenticationProvider {
@Override
public Authentication authenticate(Authentication authentication) throws AuthenticationException {
// >>>> Do your own work before saml assertion validation ---> Point ① in the above diagram
Authentication auth = super.authenticate(authentication);
return auth;
}
} -
Configure your customized bean (Fully Qualified Class Name) in
SAMLConfig.xmlunder theclasses/auth/customfolder with the bean ID "samlAuthenticationProvider" and keep the original one, as shown below.The two constructor arguments must be exactly the same as the original if you don't customize them.
Copy<bean id="samlAuthenticationProvider" class="com.microstrategy.custom.MySAMLAuthenticationProviderWrapper">
<property name="assertionValidator" ref="samlAssertionValidator"/>
<property name="responseAuthenticationConverter" ref="samlResponseAuthenticationConverter"/>
</bean>
Point ②: When filtering security roles after the Intelligence server login
-
Create a
MySAMLAuthenticationProviderWrapperclass that extendscom.microstrategy.auth.saml.response.SAMLAuthenticationProviderand overrides theauthenticatemethod.Copypublic class MySAMLAuthenticationProviderWrapper extends SAMLAuthenticationProvider {
private @Autowired
SessionManagerLocator sessionManagerLocator;
private @Autowired
HttpServletRequest request;
private @Autowired(required = false)
OAuthTokenProvider oAuthTokenProvider;
@Override
public Authentication authenticate(Authentication authentication) throws AuthenticationException {
Authentication authResult = super.authenticate(authentication);
// >>>> Do something after assertion validation while before iserver login ---> Point ② in the above diagram
IServerCredentials credentials = (IServerCredentials) authResult.getDetails();
if (! Util.wasAdminRequest(request)) {
// No implicit OAuth after SAML login
if (oAuthTokenProvider == null) {
SessionManager sessionManager = sessionManagerLocator.getSessionManager();
try {
sessionManager.login(credentials);
} catch (Exception ex) {
throw new AuthenticationServiceException("IServer authentication failed", ex);
}
}
}
return new AuthenticationWithIServerCredentials(authResult, credentials);
}
} -
Configure your customized bean (Fully Qualified Class Name) in
SAMLConfig.xmlunder theclasses/auth/customfolder with the bean ID "samlAuthenticationProvider" and keep the original one, as shown below.The two constructor arguments must be exactly the same as the original if you don't customize them.
Copy<bean id="samlAuthenticationProvider" class="com.microstrategy.custom.MySAMLAuthenticationProviderWrapper">
<property name="assertionValidator" ref="samlAssertionValidator"/>
<property name="responseAuthenticationConverter" ref="samlResponseAuthenticationConverter"/>
</bean>
Point ③: A time in between Point ① and ③
-
Create a
MySAMLProcessingFilterWrapperclass that extendscom.microstrategy.auth.saml.response.SAMLProcessingFilterWrapperand overrides theAuthenticationmethod.Copypublic class MySAMLAuthenticationProviderWrapper extends SAMLAuthenticationProviderWrapper {
@Override
public Authentication authenticate(Authentication authentication) throws AuthenticationException {
Authentication auth = super.authenticate(authentication);
// >>>> Do something after iserver login ---> Point ③ in the above diagram
return auth;
}
} -
Configure your customized bean (Fully Qualified Class Name) in
SAMLConfig.xmlunder theclasses/auth/customfolder with the bean ID "samlAuthenticationProvider" and keep the original one, as shown below.The two constructor arguments must be exactly the same as the original if you don't customize them.
Copy<bean id="samlAuthenticationProvider" class="com.microstrategy.custom.MySAMLAuthenticationProviderWrapper">
<property name="assertionValidator" ref="samlAssertionValidator"/>
<property name="responseAuthenticationConverter" ref="samlResponseAuthenticationConverter"/>
</bean>
Customize SAMLAssertion validation
To verify SAML 2.0 responses, SAMLProcessingFilter delegates authentication work to the samlAuthenticationProvider bean which is com.microstrategy.auth.saml.response.SAMLAuthenticationProviderWrapper.
You can configure this in the following ways:
-
Set a clock skew or authentication age for timestamp validation
Set a clock skew for timestamp validation
It is not uncommon for your web and IDP servers to have system clocks that are not perfectly synchronized. For that reason, you can configure the default SAMLAssertionValidator assertion validator with some tolerance.
-
Open the
SAMLConfig.xmlfile under theclasses/auth/customfolder. -
Set the
responseSkewproperty to your customized value. By default, it is300seconds.Copy<bean id="samlAssertionValidator" class="com.microstrategy.auth.saml.response.SAMLAssertionValidator">
<property name="responseSkew" value="300"/>
</bean>
Set an authentication age for timestamp validation
By default, the system allows users to single sign on for up to 2,592,000 seconds since their initial authentication with the IDP (based on the AuthInstance value of the authentication statement). Some IDPs allow users to stay authenticated for longer periods than this and you may need to change the default value.
-
Open the
SAMLConfig.xmlfile under theclasses/auth/customfolder. -
Set the
maxAuthenticationAgeproperty in the defaultSAMLAssertionValidatorassertion validator to your customized value.Copy<bean id="samlAssertionValidator" class="com.microstrategy.auth.saml.response.SAMLAssertionValidator">
<property name="maxAuthenticationAge" value="2592000"/><!-- 30 days -->
</bean>
The new spring SAML framework performs minimal validation on SAML 2.0 assertions. After verifying the signature, it:
-
Validates the
<AudienceRestriction>and<DelegationRestriction>conditions -
Validates
<SubjectConfirmation>s, except for any IP address information
While recommended, it’s not necessary to call super.convert(). You may skip this if you don’t need it to check the <AudienceRestriction> or <SubjectConfirmation> since you are doing those yourself.
-
Configure your own assertion validator that extends
com.microstrategy.auth.saml.response.SAMLAssertionValidator. -
Perform your own validation. For example, you can use OpenSAML's
OneTimeUseConditionValidatorto also validate a<OneTimeUse>condition.Copypublic class MySAMLAssertionValidator extends SAMLAssertionValidator {
@Override
public Saml2ResponseValidatorResult convert(OpenSaml4AuthenticationProvider.AssertionToken token) {
Saml2ResponseValidatorResult result = super.convert(token);
OneTimeUseConditionValidator validator = ...;
Assertion assertion = token.getAssertion();
OneTimeUse oneTimeUse = assertion.getConditions().getOneTimeUse();
ValidationContext context = new ValidationContext();
try {
if (validator.validate(oneTimeUse, assertion, context) == ValidationResult.VALID) {
return result;
}
} catch (Exception e) {
return result.concat(new Saml2Error(INVALID_ASSERTION, e.getMessage()));
}
return result.concat(new Saml2Error(INVALID_ASSERTION, context.getValidationFailureMessage()));
}
} -
Configure your customized bean (Fully Qualified Class Name) in
SAMLConfig.xmlunder theclasses/auth/customfolder with the bean ID "samlAssertionValidator" to replace the original one, as shown below.Copy<bean id="samlAssertionValidator" class="com.microstrategy.custom.MySAMLAssertionValidator">
<property name="maxAuthenticationAge" value="2592000"/><!-- 30 days -->
<property name="responseSkew" value="300"/>
</bean>To set properties, see how to set a clock skew or authentication age for timestamp validation.
Coordinate with UserDetailsService
If you would like to include user details from a UserDetailsService legacy, use the response authentication converter.
You are not required to call super.convert. It returns SAMLAuthentication containing the extracted attributes from AttributeStatement, as well as the single ROLE_USER authority.
-
Create a class that extends
com.microstrategy.auth.saml.response.SAMLResponseAuthenticationConverter. -
Inject your
UserDetailServicelegacy.Copypublic class MyResponseAuthenticationConverter extends SAMLResponseAuthenticationConverter {
@Autowired
UserDetailsService userDetailsService;
@Override
public AbstractAuthenticationToken convert(OpenSaml4AuthenticationProvider.ResponseToken responseToken) {
SAMLAuthentication authentication = (SAMLAuthentication)super.convert(responseToken); // >>> ①
Assertion assertion = responseToken.getResponse().getAssertions().get(0);
String username = assertion.getSubject().getNameID().getValue();
UserDetails userDetails = this.userDetailsService.loadUserByUsername(username);// >>> ②
return MySaml2Authentication(userDetails, authentication);// >>> ③
}
} -
Call
super.convert, which extracts attributes and authorities from the response. -
Call
UserDetailServiceusing the relevant information. -
Return a custom authentication that includes the user details.
-
Configure your customized bean (Fully Qualified Class Name) in
SAMLConfig.xmlunder theclasses/auth/customfolder with the bean ID "samlResponseAuthenticationConverter" to replace the original one, as shown below.Copy<bean id="samlResponseAuthenticationConverter" class="com.microstrategy.custom.MyResponseAuthenticationConverter"/>