Strategy ONE
Connect to On-Premises Database Via a Gateway Agent for MCS Environments
Strategy One (November 2025) adds cluster support in the Data Gateway service. This support allows large organizations with scheduled refreshes to distribute the workload among multiple clients to prevent a machine from being overloaded.
Starting in Strategy One (October 2025), the Data Gateway service was redesigned and updated to support Windows and Linux.
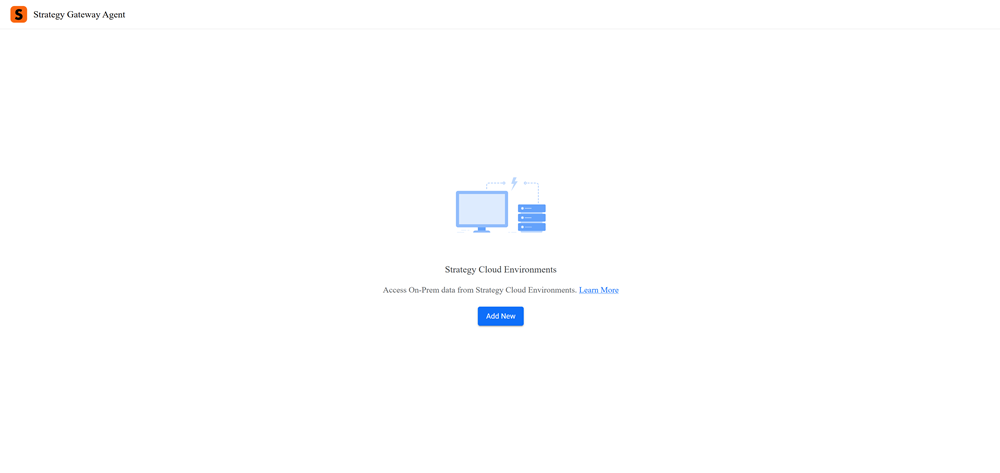
Starting in Strategy One (June 2025), access to on-premises data from the Managed Cloud Standard (MCS) Environment is enabled. Data Gateway Server and Data Gateway Client facilitates connectivity to data residing in your on-premises environment behind a firewall. These components work together to establish a secure, bidirectional, persistent command channel. Use this secured channel to connect to your on-premises databases via the Gateway Agent.
This functionality is also supported for Managed Cloud Enterprise Enteprise. For more information, see Connect to On-Premises Databases Via a Gateway Agent for MCE Environments.
Pre-Installation Checks
Before installing the Data Gateway Client, review the following information to ensure smooth deployment.
-
The Gateway Agent Client must be able to access the database within the private network and make outbound connections to the internet to reach Strategy Cloud.
-
System requirements:
-
Java 17 or higher is required.
-
Windows requirements:
-
Operating System: Windows XP or newer versions.
This operating system is required for NSSM 2.24 compatibility.
-
Administrative privileges: Required to install and manage Windows services.
-
-
Linux Compatibility:
-
The Linux registration script (
agent-service.sh) usessystemdand does not support:-
CentOS 6, RHEL 6, Oracle Linux 6 (default is Upstart or SysVinit)
-
Ubuntu 14.04 or earlier (unless sysadmin has manually replaced Upstart/init with
systemd)
-
-
-
Install the Gateway Agent Client
-
Download the Strategy Data Gateway Agent from theStrategy Download Site in the Federated Data Connectors product category.
-
Extract the package.
The package is typically named
strategy-gateway-agent-[version].zip. -
Rename the extracted folder and move it to your desired installation location. For example,
/opt/strategy-gateway-agent. -
To register and start the service, go to the quick-start folder and run the script for your OS:
-
When the agent client starts running, a web server starts for the configuration. Ports
8080(HTTP) and8443(HTTPS) are used by default. To customize the ports, edit theconfig\application.propertiesfile in the following section:Copy# HTTPS port
server.port=8443
# HTTP port
server.http.port=8080 -
To check the service status, run the following scripts for your OS:
Configure the Connection
-
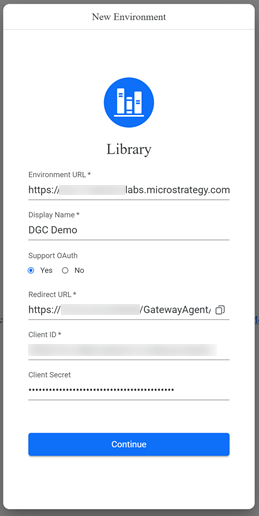
Open your browser to
https://{GatewayAgent_host}:8443. -
Click Add New.
-
Enter values in the following fields:
-
Environment URL: Type your environment URL.
-
Display Name: Type a name for the environment.
-
Support OAuth: Choose whether you want to use OIDC login.
-
-
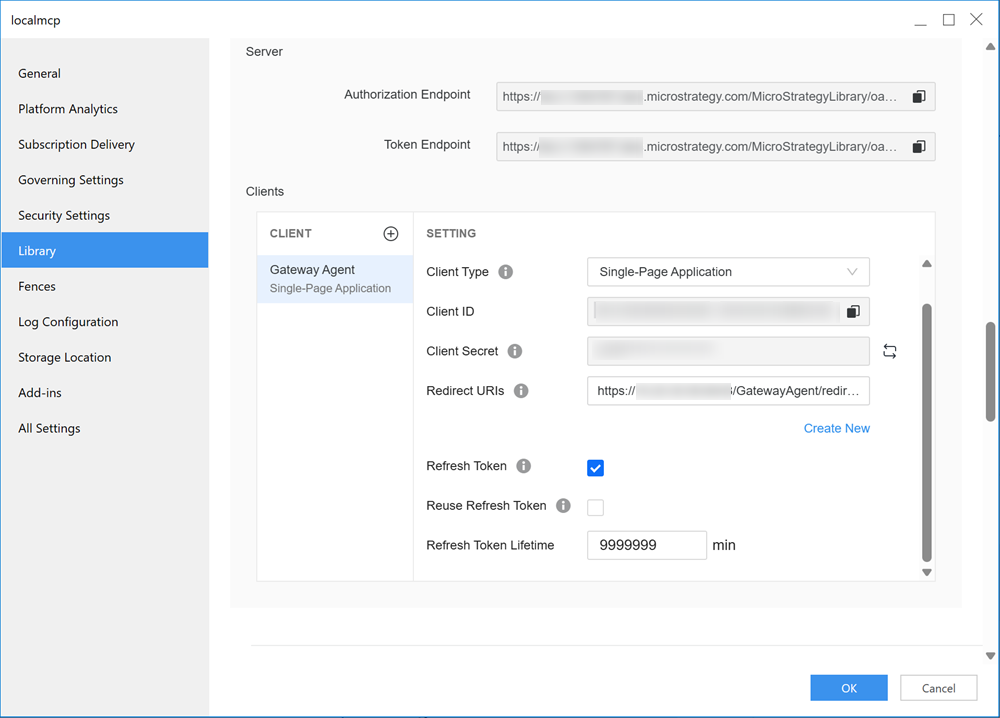
If you choose Yes in Support OAuth:
-
Follow Configure Strategy Library OAuth2 and define the following fields in Workstation:
-
Client Type: Expand the drop-down list and choose Single-Page Application.
-
Refresh Token: Select the check box.
-
Refresh Token Lifetime: Type
9999999. -
Client ID: Copy this value for future use.
-
Client Secret: Copy this value for future use.
-
Redirect URIs: Copy the value from Redirect URL in step 3 and paste it here.
-
-
In your MCE environment, enter values in the following fields.
-
Client ID: Enter the Client ID value you copied above.
-
Client Secret: Enter the Client Secret value you copied above.
-
-
Click Continue.
-
Log in with your credentials.
-
The Whitelist Data Source dialog displays. Whitelist Data Sources define which IP/Hostname and Port combinations are allowed to access on-premises databases using the Data Gateway client. Only the IP/Port combinations defined in the whitelist can establish a channel, protecting other servers in the on-premises network.
Optionally click Add.
To manage the whitelist, you must have the Enable on-premise data access via Gateway Agent privilege.
-
Enter values in the following fields:
-
Display Name: Type a name for the whitelist.
-
Hostname/IP: Enter the IP address you want to permit access to the on-premises database.
-
Port: Type the port number for the IP address.
-
-
Click Add.
-
The whitelist displays in the Whitelist dialog. To edit or delete a whitelist, hover over it and click Edit or Delete.
-
To import or export a whitelist, click Import or Export.
-
To allow the Gateway Agent access to the data sources in the whitelist, toggle on Enable Agent.
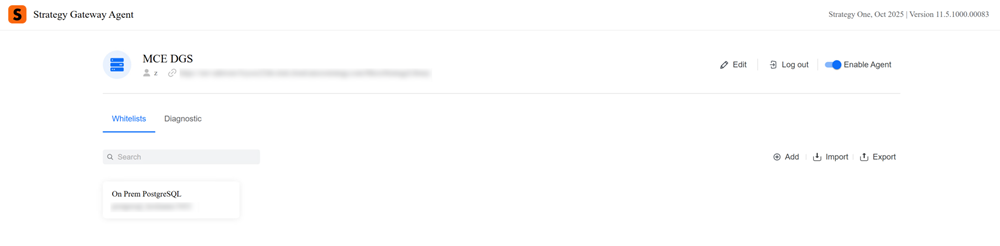
If your environment does not have a whitelist, a toggle will not display next to your environment name.
-
Starting in Strategy One (November 2025), you can create clusters to distribute workloads:
-
Click Cluster.

-
Click New Cluster.
A new cluster displays and the current agent client is added to the cluster by default.
-
To rename the cluster, click Edit
 .
. -
Type a new name and press Enter.
-
Expand the cluster drop-down.
-
In Available Clients, click and drag the clients you want to add to the cluster dropbox.
-
All clients in a cluster must have identical whitelists:
-
Open the Whitelists tab of the client that includes the whitelist you want to use.
-
Click Export.
The whitelist file downloads.
-
Open the Whitelists tab of the client you want to import the whitelist.
-
Click Import.
-
Find your whitelist file and click Open.
-
-
After your clusters are configured, ensure Enable Agent is toggled on for each client you want to connect data to.
-
-
After the Gateway Agent is enabled, users can create a new data source using the Gateway Agent or starting in Strategy One (November 2025), clusters. Use this data source to connect to on-premises data sources specified in the whitelist from the Strategy Cloud Environment.
-
You can then create datasets, live reports, or Mosaic models using the data source.
Upgrade the Gateway Agent Client
If you are already using the Gateway Agent Client and want to upgrade to the latest version:
-
Download the Gateway Agent Client from the Strategy Download Site.
-
Extract the package.
The package is typically named
strategy-gateway-agent-[version].zip. -
Stop the current Gateway agent for your OS:
-
Replace the
agent-server.jarfile in the installation folder with the new version. -
Restart and check the status for your OS:
Additional Functionality
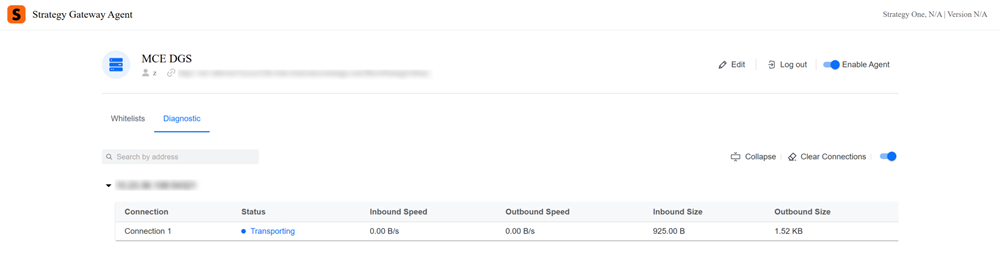
Network Diagnostics
You can open the Gateway Agent and click the Diagnostic tab to monitor inbound/outbound speed and data transfer size for database connections using the Gateway Agent.
System Proxy Support
The Gateway Agent supports proxy configurations.
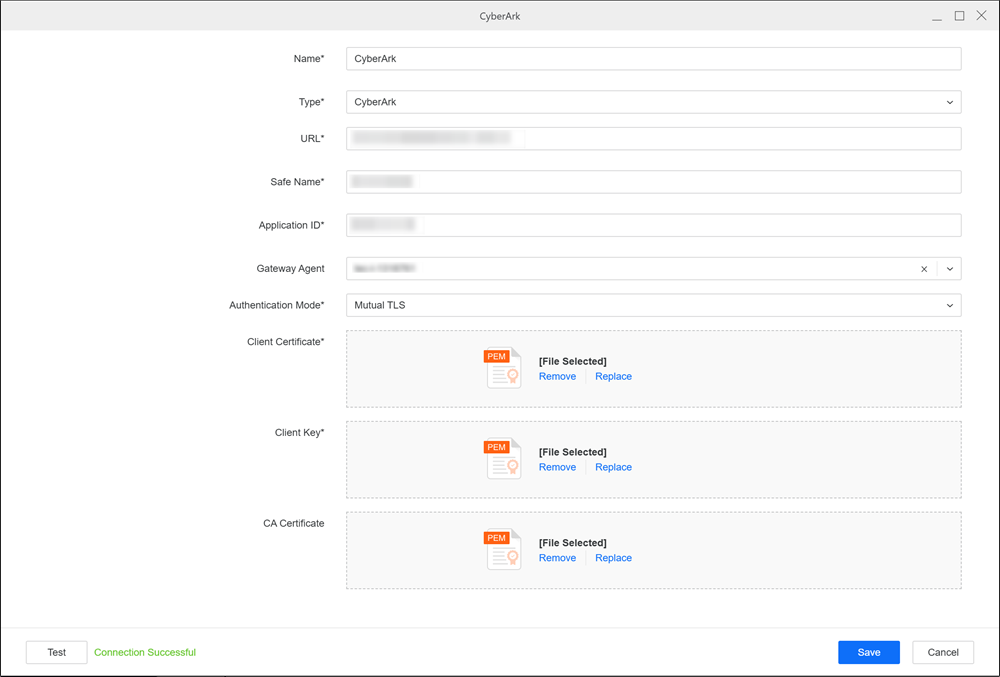
On-Premises Vault Integration
The Gateway Agent supports connections to on-premises vaults, including CyberArk, HashiCorp Vault, AWS Secrets Manager, Azure Key Vault, and Google Secret Manager. For more information, see Create, Edit, and Delete Vault Connections.
Whitelist Configuration for Vault Server Connections
To enable the Data Gateway client to connect to vault servers, add the following IP/Hostname and Port combinations to the client whitelist:
CyberArk
CyberArk vault Hostname/IP and Port. For example, 10.222.xxx.xxx and 443.
HashiCorp
HashiCorp vault Hostname/IP and Port. For example, xxxxx.hashicorpserver.com and 8200.
AWS Secrets Manager
AWS Secrets Manager endpoints and Port. For example, secretsmanager.us-east-1.amazonaws.com and 443.
Azure Key Vault
-
login.microsoftonline.comand443. -
Azure key vault endpoint and port. For example,
xxxxxx-dev-vault.vault.azure.netand443.
Google Secret Manager
-
oauth2.googleapis.comand443. -
secretmanager.googleapis.comand443.