Strategy One
Send a Dashboard via Email
You can send a dashboard to any email address, to allow users to view it even when offline. You can also choose to send a copy of the dashboard's results to the History List folder, an area in Strategy Web where you can store the results of dashboards.
For quick steps to send a dashboard to the History List without sending the dashboard in an email, see Scheduling a dashboard to be sent to the History List.
You must have the Web Edit Dashboard and Web Run Dashboard privileges.
You must have the Use Send Now privilege.
To Email a Dashboard
- Open an existing dashboard.
- From the File
menu, select Send Now (or,
from the dashboard toolbar, click the Send
Now icon
 ).
). - Select a recipient from the To drop-down list. If the recipient
is not listed, complete the following steps:
- Click To to locate the email address of the recipient. The Recipients Browser opens.
- Choose
an address from the Available
list, then click >
to add it to the To field.
If you do not see the email address you want to send the dashboard
to, you can specify a new email address. Perform the following
steps:
- Type a name for the email address in the Address Name field.
- Type the email address in the Physical Address field.
- From the Device drop-down list, select the email client type of the email address.
- Click Add to Recipients.
- Click OK to return to the Send Now dialog box.
- From the Send
drop-down list, specify where to deliver the dashboard by choosing
one of the following options:
- To deliver the dashboard as an attachment in the email, select Data in email. The dashboard is delivered in the email in the selected delivery format, but is not delivered to the History List.
- To deliver the dashboard as an attachment in the email and deliver the dashboard to the History List, select Data in email and to History List. No link to the dashboard is provided in the email.
- To deliver the dashboard as an attachment in the email, deliver the dashboard to the History List, and provide a link to the History List location of the dashboard in the email, select Data and link to History List in email.
- To deliver the dashboard to the History List, and provide a link to the location of the dashboard in the History List in the email, select Link to History List in email. The dashboard is not delivered in the email.
- From the Delivery Format drop-down list, select
the format in which you want to send the dashboard. Select one of
the following:
- To deliver
the dashboard as a PDF file, select PDF.
The dashboard is included as an attachment in the email.
- To reduce attachment size, select the Compress Contents checkbox, which creates a zip file.
- To select formatting options, click the
 PDF Settings button.
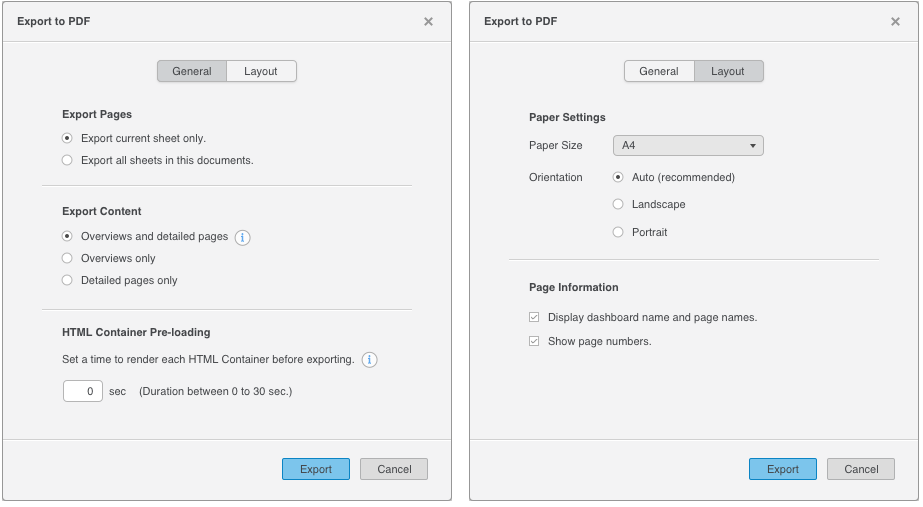
- To deliver
the dashboard as an interactive file, select MSTR.
The dashboard is included as an attachment in the email and can be opened in Presentation mode. Note that .mstr files will not be sent under the following circumstances:
- The .mstr file is too large. The maximum file size of the .mstr file is set by the "MicroStrategy (.mstr) file size" field (in MicroStrategy Developer, in the Project Configuration dialog box, choose Governing Rules > Default > Result sets)
- The cube associated with the .mstr file is too large. The maximum cube size is set by the "Maximum cube size allowed for download" field (in MicroStrategy Developer, in the Project Configuration dialog box, choose Intelligence Cubes > General)
- Users with security filters subscribing to a Visual Insight dashboard built on a cube
- Users with ACL restrictions on objects with Visual Insight dashboards built on a cube
- To deliver
the dashboard as a PDF file, select PDF.
The dashboard is included as an attachment in the email.
- If you have chosen to have the
dashboard delivered as an email attachment, in the File
Name field, type the file name to use for the email attachment.
You can include additional data, such as the date and time, in the
file name by typing shortcuts in the File Name field. Each shortcut
is replaced with the appropriate data when the dashboard is delivered.
To view a list of available shortcuts, hover the cursor over the information
icon
 next to the File Name field.
 - Type a description for the emailed dashboard in the Subject field.
- Type a message to be displayed in the body of the email in the Message field.
- If you chose to send the dashboard
in a zip file, you can specify whether to password protect its contents.
Expand Advanced
Options
- To protect the zip file by providing a password, select the Password Protect Zip File check box, then type a password for the zip file in the field.
- Type the name for the zip file in the Zip File Name field.
- By default, if you have selected a contact group as the recipient of the dashboard, Strategy uses the security filter of the contact group as a whole when delivering the dashboard. To use the separate security filters for each member of the subscribed contact group instead, expand Advanced Options. Then select the Use contact security for each group member check box.
- Click OK.