Strategy ONE
Installing with the Strategy Installation Wizard for Windows
To install Strategy One products, you must log on to your machine using a domain account with Windows administrative privileges for the domain or target machine. The domain must include your database servers.
To exit the installation process at any time, click Cancel.
To access the Strategy Installation Wizard
- Log on to the machine where you are installing one or more Strategy Software products.
- Exit all Windows applications before beginning the installation process.
-
Download the files from the Strategy download site. Locate and run the
Setup.exefile. Be aware of the following:- Contact your Strategy sales representative to determine the location and login credentials for the Strategy download site.
- You need to extract the downloaded files to locate the
Setup.exefile. When extracting the files, ensure that the extraction software maintains the folder structure of the compressed files. Most extraction software maintains the folder structure by default, but if you use WinRAR, ensure that you select the Extract full paths option. - To review an alternative, guided introduction to installing Strategy Software, you can locate and run the
MICROSTRATEGY.exefile. For information on this installation alternative, see Installing with a Guided Strategy Introduction. - You can reduce the amount of data that has to be downloaded for the installation by excluding all of the .zip files, located in the
Installations/DataFilesfolder, from the download. You can use this technique to download only the files required to complete your Strategy Software installation, which can then also be used to reduce the amount of data packaged and downloaded for other Strategy Software installations. For steps to create these custom installation packages, see Creating Custom Installation Packages. Details on using aresponse.inifile to provide the location of the installation files are provided in Automated Installation on Windows and the parameters used to specify the location of the required installation files are described in Installation Files.
- If this is the first time you have installed Strategy Software, you are prompted to choose the language for the wizard. Select the appropriate language from the drop-down list and click OK.
The Strategy Installation Wizard opens and guides you through the rest of the installation process. The sections below describe the actions you must take for each page in the wizard. After you enter all required information on an installation page, click Next to proceed to the next page of the installation routine.
If any services are running for previously installed Strategy products, you are prompted to stop them. Click Yes to proceed. If you click No, you cannot install Strategy products until you stop all Strategy services.
Welcome
If you opened the Strategy Installation Wizard through the Microsoft Control Panel using the Add/Remove Programs option, the wizard opens the Welcome page in maintenance mode. For more information on modifying, repairing, or removing all or part of your Strategy One installation, see Adding or Removing Strategy Components.
License Agreement
Read the license agreement, and accept or decline the agreement by clicking the appropriate button. If you decline, you cannot install Strategy One products.
Click Print to print a copy of the license agreement for your records.
Customer Information
Enter the following customer information:
- User
- Company
- License Key
To request a license key, go to the license key generator in the Strategy Download Site, contact your Strategy Representative or contact Strategy Technical Support.
Install Options
Select one of the following install options:
-
To install the entire platform on a single node environment, click Express. After installing the complete platform, you will have Strategy Analytics, Mobility, and Security installed on your Windows server, as well as the required third-party software libraries.
For steps to use the Express installation, see Performing a Strategy Express installation.
- To install on an environment with multiple servers, or to select which Strategy One products to install, click Custom, and continue with the Installation Wizard.
Choose Destination Location
Browse to the locations where the Strategy One products and Strategy common files are to be installed:
-
Strategy Destination Folder: Browse to and select the location where Strategy One products are installed. This is where executable files and other support files are installed for your licensed Strategy One products.
While this setting determines the default root directory for the Strategy One products you install, you can change the destination of an individual product later as part of selecting which Strategy One products to install.
You can choose the directory for a product only if that product is not already installed on the server machine. Otherwise, the product can only be installed in the same directory in which it already exists.
- Strategy Common Files Destination Folder: Browse to and select the location where Strategy common files are installed. These files are required to support a Strategy One installation.
Select Components
Select the check box of a Strategy One product to include that product in the installation. Alternatively, you can clear a check box to uninstall or exclude a Strategy One product from the installation.
The installation pages you see after this step depend on the products you choose to install. These instructions describe all possible pages.
If you are installing Strategy Communicator, components of Strategy Intelligent Enterprise are also installed.
If you previously installed Community Connectors in 11.0 and are installing a newer version of Strategy One, your whitelist.txt file will be overwritten.
To use your 11.0 whitelist.txt file in a newer version of Strategy, backup the whitelist.txt file located in <installPath>\Tomcat\CommunityConnectors\WEB-INF before performing the upgrade install. After the installation, replace the new whitelist.txt with the backed up whitelist.txt file from 11.0.
Many of the platform components have subcomponents. If you expand the different Strategy One products, you can select the appropriate check boxes to specify the subcomponents to install. For information on Strategy One components and subcomponents,
You can see only Strategy One products that are available with your license key.
Destination Folder
You can select Strategy One products and their subcomponents to define their installation locations. When you select a Strategy One product or subcomponent, the Destination Folder area near the bottom of the interface displays the current installation folder for the product. Click Browse to select a different installation folder.
If you select a Strategy One product or subcomponent and the Browse button is not accessible, this means that the installation location cannot be changed. For example, if you select Strategy Mobile you cannot define an installation location. However, if you expand this product, you can define the installation location for its subcomponents.
Missing Requirements
If there are system requirements that are not met to install the Strategy One products you've selected, a 'Missing Requirements' list will appear. Review the list of requirements to determine if you can proceed with the installation.
If you are missing installation requirements, the uninstalled dependency will be marked as 'Missing' and the Next button will be disabled. Without exiting the installer, go back to change the components selected or install the missing components. Click the Recheck button to determine if all the installation requirements have been met and click Next to proceed.
Strategy Setup and Choose Data Files Location
You see the Strategy Setup dialog box and the Choose data files location page only if some of the files, required to install the Strategy One components you have selected for installation, are not available. If you are using this technique to reduce the amount of data that has to be downloaded for the installation, it is recommended that you do the following:
- Review the files listed in the Strategy Setup dialog box, and make a note of all the required files. These files need to be provided as part of the installation for the Strategy One components you selected using the Select Features page of the installation (see Select Components).
-
Provide the location of the installation files using a
response.inifile. This lets you access the installation files stored on a folder or stored at a URL and accessed using HTTP or HTTPS. Details on using aresponse.inifile as part of an installation are provided in Automated Installation on Windows and the parameters used to specify the location of the required installation files are described in Installation Files.If the files required for the installation are stored in a folder, you can instead click Change on this Choose data files location page to navigate to and select the folder that stores the installation files. If all the required installation files are provided in the folder you select, you can click Next to continue the Strategy One installation.
Missing Requirements
If there are system requirements that are not met to install the Strategy One products you selected, a Missing Requirements list appears. Review the list of requirements to determine if you can proceed with the installation.
If you are missing installation requirements, the uninstalled dependency is marked as Missing and the Next button is disabled. Without closing the installer, go back to change the selected components or install the missing components. Click the Recheck button to determine if all the installation requirements have been met and click Next to proceed.
Topology Configuration
Topology allows administrators to monitor Strategy services and manage them in Strategy Workstation. The following functionality is supported:
-
Service Health Monitor
The administrator can monitor Strategy services through Workstation and visualize if they are running or stopped.
-
Service Start/Stop
The administrator can start or stop Strategy services through Workstation. This functionality is currently limited to SSH authentication with username and password.
See View Environment Toplogy and Monitor Services in the Workstation Help for more information about using topology within Workstation.
The two following types of lightweight agents are used to monitor services in Workstation:
-
Monitoring Agents
The monitoring agents come with the installation of most Strategy services. Use them to monitor services and view their health status.
-
Communication Agents:
Some monitoring agents also act as communication agents. In addition to monitoring services, communication agents help other monitoring agents locate each other and gather monitoring information. The administrator must pick at least one agent to act as a communication agent, so all other agents can locate each other through this agent.
On environments where three or more machines host Strategy Services, it is recommended that you choose at least three communication agents to provide redundancy and improved reliability, in case one communication agent becomes unavailable. The machines chosen to act as communication agents must be machines that host Strategy Services, such as Intelligence Server or Strategy Library. If you decide to use only one communication agent, it is recommended that you choose the machine that houses Strategy Library (if deployed through the Strategy installation), since Library communicates directly with Workstation.
If your Library deployment is done through a WAR file or if you do not use a machine that houses Strategy Library to host the communication agent, then use a machine that houses Intelligence Server.
Strategy One uses Consul technology for Services Registration. A monitoring agent corresponds to a Consul agent in client mode. A communication agent corresponds to a Consul agent in server mode.


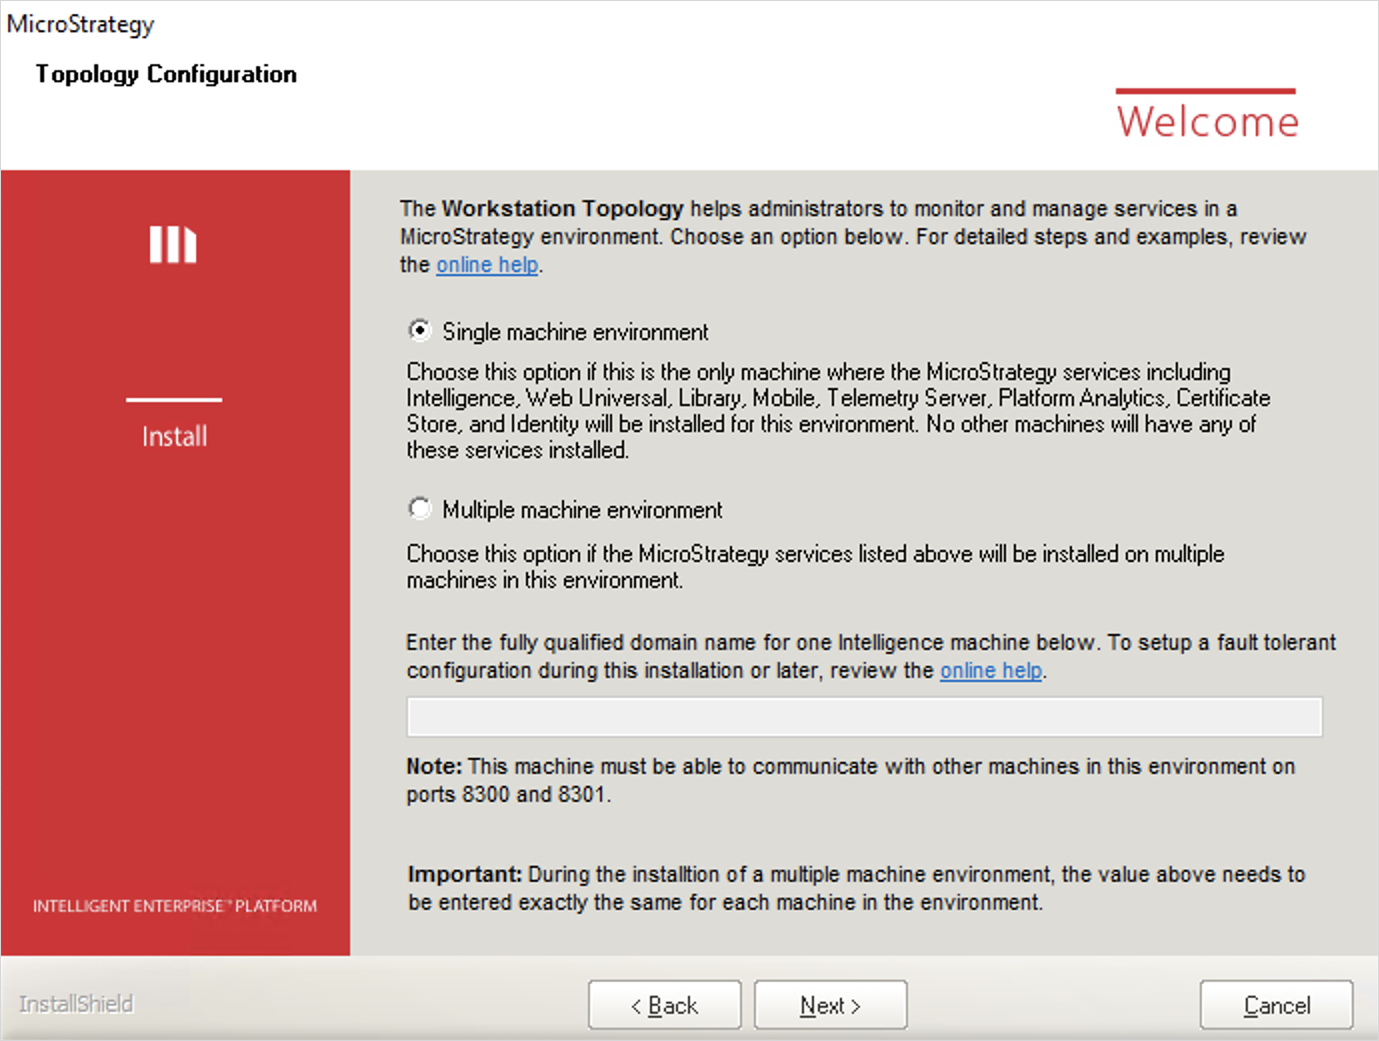
- On the Topology Configuration dialog of the Installation wizard, select whether your environment has Single or Multiple machines.
-
If your environment contains multiple machines, determine which machines in your environment you want to act as communication agents. Among all the machines in your environment that will host Strategy Services, select at least one of them (three are recommended for multiple machine environments) to act as a communication agent. Enter each machine in the text field, separated by semicolons. You must input the exact same list on all machines, using the Topology Configuration dialog of the Installation wizard, including the monitoring and communication agent machines.
The Strategy Services are as follows:
- Strategy Intelligence Server
- Strategy Web Universal
- Strategy Library
- Strategy Mobile
- Strategy Messaging Services
- Strategy Platform Analytics
- Strategy Certificate Store
An odd number of communication agents is required due to the leadership selection algorithm.
Examples:
Copyservername1.domain.com;servername2.domain.com;servername3.domain.com;
servername1.domain.com;Example: Your environment contains the following two machines and you select one machine to host the communication agent:
- Machine 1 hosts Strategy Library and the communication agent
- Machine 2 hosts the Intelligence Server
When performing the installation, enter the full domain name, machine1.domain.com, on both machines.
Example: Your environment contains the following three machines and you want all machines to host a communication agent:
- Machine 1 hosts Strategy Library
- Machine 2 hosts Intelligence Server 1
- Machine 3 hosts Intelligence Server 2
When performing the installation, enter machine1.domain.com;machine2.domain.com;machine3.domain.com; on all three machines.
Example: Your environment contains the following five machines and you select three machines to host the communication agents:
- Machine 1 hosts Strategy Library
- Machine 2 hosts Intelligence Server 1 and a communication agent
- Machine 3 hosts Intelligence Server 2 and a communication agent
- Machine 4 hosts Intelligence Server 3 and a communication agent
- Machine 5 hosts Intelligence Server or other services
Enter machine1.domain.com;machine2.domain.com;machine3.domain.com; on all machines.
Some important information to keep in mind:
-
In MicroStrategy 2019, OpenSSH is no longer installed on Windows machines. You must install Open SSH to start and stop services using topology. Upgrading your system from 11.0 to 2019 removes Open SSH.
If consul is already installed on a machine, prior to installing Strategy One products, the service registration auto configuration and execution is affected. We do not recommend a separate consul installation on the same machine.
- If you select Multiple machine environment, you must enter an odd number of machines.
- If your environment includes more than one machine and machines with dynamic IP addresses as communication agents, use FQDN for the communication agent machine list during the installation.
- If your environment includes more than one machine and machines with more than one IP address as communication agents, it is recommended that you use FQDN for the communication agent machine list during the installation. If IP address list is used, make sure the machine with multiple IP addresses can be pinged with an IP address included in the list.
Topology supports installation on machines with public IP addresses. To avoid unexpected joins to topology nodes, possibly exposing service information, you must configure your firewall correctly. Your firewall should allows ports for Server RPC (default 8300), and Serf LAN (default 8301), and Serf WAN (default 8302) only for the nodes within the Workstation topology node cluster. See Enabling Topology Communication Through a Firewall for more information.
After installing the topology feature, see Installing and Configuring Topology for additional instructions on configuring this feature to work in your environment.
Strategy Identity Configuration
You see this page if you have selected to install Strategy Identity. If you do not have all the information and want to configure this product later, click Skip to proceed with the installation.
- SSL Certificate Authority Certificate: The file that contains the trusted Root CA, Intermediate Root CA bundle (.pem). It must be the complete certificate chain for your SSL Server Certificate that you obtained from your IT Administrator.
- SSL Server Certificate: The server certificate (.crt) file for your Windows server.
- SSL Server Certificate Key: The key for your SSL server certificate (.key) file.
- SSL Certificate Authority Key File Password: If your CA-signed certificate has a password, create a text file containing this password and enter the text file location.To ensure that the SSL certificates are valid for your installation, you can run the following checks:
1 The results for the following two commands should be identical. • openssl.exe x509 -noout -modulus -in sample.crt | openssl.exe md5• openssl.exe rsa -noout -modulus -in sample.key | openssl.exe md52 No error is produced when the command openssl.exe verify -partial_chain -CAfile sample.pem sample.crtis executed. - SMTP Server: Your company's SMTP server, followed by the port number in the next box.
- SMTP Authentication: If your server is password protected, then enter the username and password for the server.
- Email Sender Address: The email address that is authorized to send emails from your SMTP server, and will be used to send badge invitations for your Strategy Identity network.
- Host Name: Enter the Fully Qualified Domain Name you are using, for example,
yourFQDN.com.
Telemetry Server Cluster Configuration
If Intelligence Server or Platform Analytics are chosen for installation, the option to configure a Messaging Services cluster is presented.
If no cluster needs to be configured, click Next.
To configure a cluster:
- Select the I need to create a Messaging Services cluster for Platform Analytics check box.
- Local Node: Provide the address for the local node.
- Remote Nodes: Provide a comma separated list of hostnames for remote nodes in the cluster. The node id is determined by alphabetical order in node list.
For detailed configuration information see, Strategy Telemetry Server
Server Activation
If you have installed one or more Strategy server products, you can request an Activation Code to activate your Strategy server products upon completion of the installation process. The next few pages of the installation process guide you in providing the information you must submit to Strategy to request an Activation Code. Strategy server products include:
- Strategy Intelligence Server
- Strategy Web
- Strategy Mobile Server
This page includes a welcome statement for the software activation process. Read the welcome statement and click Next to proceed.
Server Information
Specify information about your Strategy server installation. Enter the following characteristics:
- Name: Distinguishes the name of this Strategy server product installation from any other Strategy server product installations in your company.
- Location: Physical location of the machine on which Strategy server products are installed.
- Use: Description of how the server is used.
Click Privacy Statement to view the Strategy One Privacy Statement.
Installer Information
Specify contact information of the person installing the software. After your installation is complete an email containing the Activation Code is sent to the email address you confirm in this software activation step. Enter the following installer information:
- Specify whether you are an employee of the licensed company or installing on behalf of the licensed company.
- Enter the necessary data into all text fields. Make sure the email address you enter is correct. This email address is the recipient of the Activation Code.
- Select the check box at the bottom of the page to receive notifications about product updates, events, and special offers from Strategy One.
- Click Privacy Statement to view the Strategy One Privacy Statement.
Contact Information
You see this page if you indicated that you are not an employee of the company licensed to use this software, and are installing the software on behalf of that company.
Specify contact information for the employee license to use the software. Enter the necessary data into all text fields. Make sure the email address you enter is correct. After your installation is complete an email containing the Activation Code is sent to the email address you confirm in this software activation step.
- Select the check box at the bottom of the page to receive notifications about product updates, events, and special offers from Strategy One.
- Click Privacy Statement to view the Strategy One Privacy Statement.
Request Activation Code
This page includes options to request an Activation Code now or at a later time. This page provides the following options:
- Select Yes, I want to request an Activation Code and click Next to request an Activation Code. The Activation Code is sent to the email addresses supplied in the Installer Information and Contact Information pages.
- Select No, I will request the Activation Code at a later time and click Next to request an Activation Code at a later time.
If you choose to request an Activation Code at a later time, a message is displayed that instructs you how to request an Activation Code after the installation procedure is completed.
You have a grace period of 30 calendar days to activate your installation. If you do not complete the activation before the grace period expires, your Strategy One product stops functioning until you activate it. If you wait to activate your installation, you receive periodic reminders.
Once you request an Activation Code, an email is sent to the email addresses you specify in the Installer Information and Contact Information pages of the software activation procedure. The email provides instructions on how to use the requested Activation Code to activate your software.
CPU License Information
Strategy Web (ASP.NET) Setting
You see this page only if you choose to install Strategy Web (ASP.NET) and only if you do not have a previous version of Strategy Web installed.
Specify the Internet Information Services (IIS) virtual directory to be created for Strategy Web pages. The default is MicroStrategy. In IIS, a virtual directory is the home location for a set of Web pages that the Web server hosts.
| • | If you have a previous version of Strategy Web installed on the machine, the new version you install uses the same virtual directory the previous version is using. Therefore, you are not prompted to specify the name of the virtual directory. |
| • | The name provided for a virtual directory must be unique. You cannot use the same name as the default for other Strategy One products. |
| • | Strategy One automatically configures the Strategy Web virtual directory to run with the version of .NET Framework that it requires. |
Strategy Web (ASP.NET) CPU Affinity Setting
You see this page only if you choose to install Strategy Web (ASP.NET) and if the Strategy Web installation detects that the license key entered is a CPU-based license. This page is not displayed on single-processor machines.
Specify the number of CPUs that Strategy Web is licensed to use on the machine. You can specify only the number of CPUs that are allowed by the license. If Strategy Web is installed on more than one machine, the total number of CPUs should not exceed the maximum number of CPUs specified by the license. For machines that support hyper threading technology, the CPU counts correspond to physical CPUs, not logical CPUs.
To allow the setting to take effect, the installation stops IIS. After IIS has been restarted, the Strategy Web application uses the specified number of CPUs.
For more information on the Strategy Web CPU affinity feature, refer to the System Administration Help.
Strategy Mobile Server (ASP.NET) Setting
You see this page only if you choose to install Strategy Mobile Server (ASP.NET) and only if you do not have a previous version of Strategy Mobile Server installed.
Specify the Internet Information Services (IIS) virtual directory to be created for Strategy Mobile Server. The default is MicroStrategyMobile. The virtual directory is part of the URL used to access the interactive reporting and analysis applications deployed on this machine via Mobile Server.
Mobile Server can be deployed using the same techniques used to deploy Strategy Web, as described in Deploying Strategy Web and Mobile Server. For additional configurations required to deploy Mobile Server, see the Strategy Mobile Administration Help.
| • | If you have a previous version of Strategy Mobile Server installed on the machine, the new version you install uses the same virtual directory the previous version is using. Therefore, you are not prompted to specify the name of the virtual directory. |
| • | The name provided for a virtual directory must be unique. You cannot use the same name as the default for other Strategy One products. |
| • | Strategy automatically configures the Strategy Mobile Server virtual directory to run with the version of .NET Framework that it requires. |
Strategy Subscription Portal Setting
You see this page only if you choose to install MicroStrategy Subscription Portal, which is a component of Narrowcast Server, and only if you do not have a previous version of Subscription Portal installed.
Specify the name of the IIS virtual directory to be created for MicroStrategy Subscription Portal pages. The default is NarrowcastServer. In IIS, a virtual directory is the home location for a set of Web pages that the Web server hosts.
Subscription Portal offers you the ability to subscribe to and view Narrowcast Server services, service descriptions, and their most recent modification dates on the Web. For complete information about Subscription Portal and other components of Narrowcast Server, refer to the MicroStrategy Narrowcast Server documentation.
The name provided for a virtual directory must be unique. You cannot use the same name as the default for other MicroStrategy products.
Strategy MDX Cube Provider Setting
You see this page only if you choose to install the Strategy MDX Cube Provider and if you do not have a previous version installed.
Specify the virtual directory to be created for the Strategy MDX Cube Provider. The default is MicroStrategyMDX. This virtual directory is used as part of the URL to connect to TM1 data sources or Microsoft Analysis Services data sources for integration with Strategy One. For information on connecting to these MDX cube data sources, see the MDX Cube Reporting Help.
Strategy Intelligence Server Setting
You see this page if you choose to install Strategy Intelligence Server, and if you do not have a previous version of Intelligence Server installed.
Select the check box to use the local system account as the Intelligence Server service account. If you clear the check box to set a different Intelligence Server service account, enter the following information:
- Login: A Windows login of the form
Domain\Userwith full administrative privileges under which to run the Intelligence Server service.The user account used to run Intelligence Server must have full administrator privileges for the local machine. If the administrator default privileges have been modified for the user account, connection errors can occur. For example, if the user account is denied access to the DSN accessed by Intelligence Server, Intelligence Server connection fails.
- Password: A valid password for the Windows login entered in the Login box
- Confirmation: Retype the password to confirm it is correct
If the password you supply changes, you must reconfigure the Windows service to use the new password. Otherwise, Intelligence Server connections fail when the connection attempts to authenticate the login and password.
Strategy Narrowcast Server Setting
You see this page if you choose to install MicroStrategy Narrowcast Server, and if you do not have a previous version of Narrowcast Server installed.
Select the check box to bypass the creation of a Narrowcast Server service account.
It is recommended you create the Narrowcast Server service account. Clear the check box, and enter the following information:
- Login: A Windows login of the form
Domain\Userwith administrative privileges under which to run the Narrowcast Server service - Password: A valid password for the Windows login entered in the Login box
- Confirmation: Retype the password to confirm that it is correct
If you change the password for this account, you must reconfigure the Narrowcast Server Windows services to use the new password.
Review Installation Settings
This screen provides a summary of the Strategy One products and services you have selected to install along with the destination folder where they will be saved. If you wish to automatically restart your computer when the installation is complete, select the check box below the list of products and services as shown below. Restarting your computer after installation will ensure that the system configuration is completed properly.
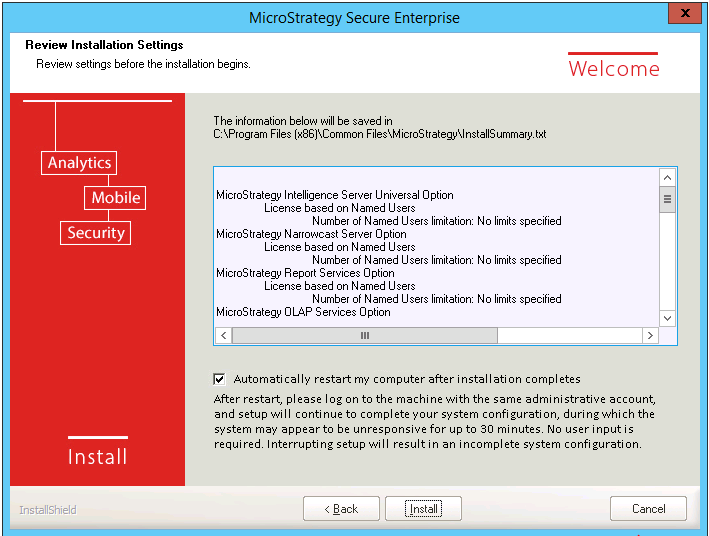
If you do not choose to restart automatically, you can restart manually when the Installation Wizard is complete.
Strategy Installation Wizard Complete
Select Yes I want to restart my computer now as pictured below. Restarting now will ensure the installation process is completed successfully.
Click Finish.
If you encounter errors while installing Strategy One, refer to Troubleshooting.
Default Passwords for Configuration
During the configuration process, the Strategy Installer randomly generates a password for the Strategy Web Administration page, Strategy Mobile Administration page, Strategy Repository, Strategy Repository accounts, and Tomcat
- Username: mstr
- Password: The password can be found in the following file on the server where Strategy Secure Enterprise was installed:
C:\Program Files (x86)\Common Files\MicroStrategy\Default_Accounts.txt
Note the username and password, and store them securely. These credentials will be used to configure the DSN to the Platform Analytics project.
It is recommended to delete the Default_Accounts.txt file after the password is stored securely. This password cannot be recovered if it is lost.