MicroStrategy ONE
Using a Data Mart Table as a Source Table
The following procedures assume that you have an advanced knowledge about fact, metric, and attribute creation. For background information, see the Project Design Help.
After creating a data mart table, you can use it as a source table in your projects. To do this, you must update the Warehouse Catalog for the project, verify that the new data mart table is identified as a source table for the attributes used in the data mart report, add the table as a data source for the appropriate fact, and update the project schema. The steps to do this are below.
To Use a Data Mart as a Source Table in a Project
Update the Warehouse Catalog
- In MicroStrategy Developer, choose Schema > Warehouse Catalog. The Warehouse Catalog opens.
- From the Select current database instance drop-down list, select the database instance to which you saved the data mart table.
You must have the MicroStrategy MultiSource Option installed to use data marts that you save to a different database instance than your project's primary database instance.
- Select the newly created data mart table in the left pane. Then use the > arrow to move it to the right pane.
- For this example, select the newly created data mart table AGG_REG_REV and move it to the right pane.
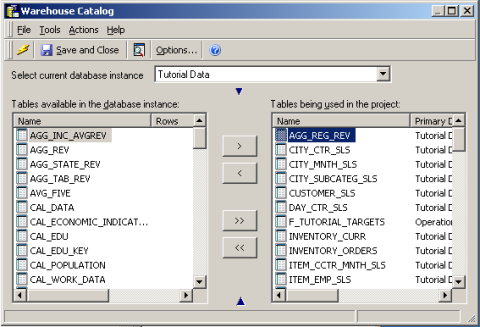
- Click Save and close.
Verify that the New Data Mart Table is Identified as a Source Table for the Attribute Used in the Data Mart Report
- In MicroStrategy Developer, in the Folder List, navigate to the folder which contains the attribute you used in the data mart report. Double-click the attribute. The Attribute Editor opens, as shown in the image below.
- For this example, to verify that the new data mart table AGG_REG_REV is identified as a source table for the Customer Region attribute in the My_Report data mart report, navigate to the Schema Objects folder, open the Attributes folder, and open the Customer folder. Double-click the Customer Region attribute.
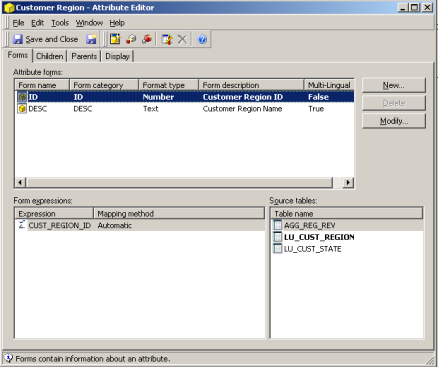
- Look at the Source Tables pane at the bottom right. Ensure that your new data mart table name appears in the list of table names.
Add the Data Mart Table as a Source Table for Facts
To use the data mart table as a source table from which to execute reports, you must update the fact expressions on which the metrics used to create the data mart table are based.
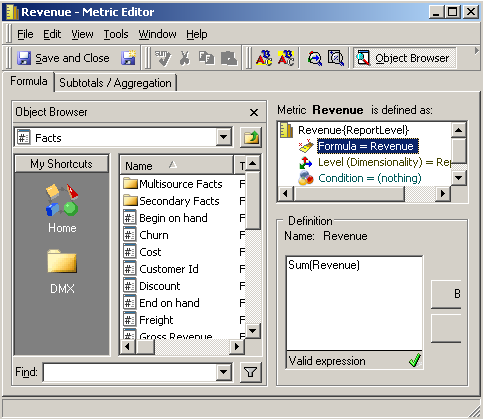
- In MicroStrategy Developer, in the Folder List, navigate to the folder which contains the metric you used in the data mart report. Double-click the metric to open it in the Metric Editor. Note the fact on which the metric is based.
- For this example, navigate to the Metrics Folder and double-click the Revenue metric to open it in the Metric Editor. Note that the Revenue metric is based on the Revenue fact, as shown in the image below.
- In MicroStrategy Developer, in the Folder List, navigate to the folder which contains the fact on which the data mart metric is based. Double-click the fact to open it in the Fact Editor.
- For this example, navigate to Schema Objects, then to the Facts folder. Double-click Revenue to open it in the Fact Editor.
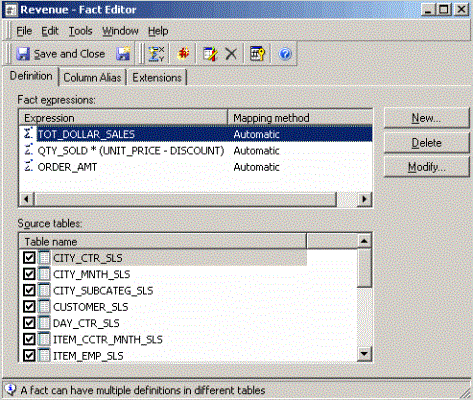
- Click New. This opens the Create New Fact Expression Editor.
- From the Source table drop-down list, select the data mart table as the source table. Then double-click the fact associated with the data mart table, to add it to the Fact Expression pane.
- For this example, select AGG_REG_REV as the source data mart table. Then double-click Revenue to add it to the Fact Expression pane, as shown below:
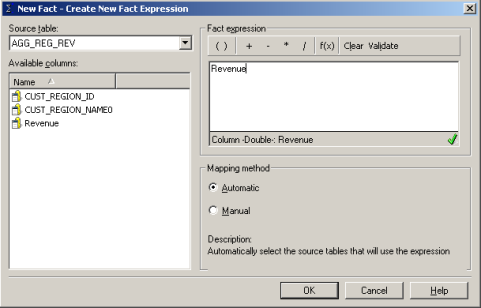
- Under Mapping method, select Automatic.
This ensures that if more data marts are created with the same metric, they are automatically added as source tables for the fact.
- Click OK.
- Click Save and Close.
Update the Project Schema
- In MicroStrategy Developer, choose Schema > Update Schema.
- When prompted to select update options, ensure that all check boxes are selected and click Update.