MicroStrategy ONE
Creating Data Marts
To create a data mart table, you first create a data mart report that defines the columns of the data mart table. You then create the data mart table and populate it with data.
The steps below walk you through the process of creating a data mart report and then executing the report to create a data mart table. The steps also include an example for most steps, based on Tutorial sample data in the MicroStrategy Tutorial project.
You must specify a data warehouse in which to create the data mart table, using a database instance. The database instance specifies warehouse connection information, such as the DSN, user name, password, and other warehouse-specific information. You can use the following database instances as the data mart's database instance:
- Your project's primary database instance
- To identify the project's primary database instance, in the Folder List, right-click the project's name, and select Project Configuration. Expand the Database instances category, and choose SQL Data Warehouses. Under the Select the Primary Database Instance for the Project drop-down, note which database instance is selected.
- A database instance other than your project's primary database instance, which points to the same warehouse as the primary database instance. You must ensure that the database instance has been created, and is available to the project, as described below.
- You can also enable data mart optimization for this database instance, which can improve the performance of reports that use the data mart. For information on enabling data mart optimization, see Enabling Data Mart Optimization.
- A database instance other than your project's primary database instance, which points to a different data warehouse than the primary database instance. You must ensure that the database instance has been created, and is available to the project.
You must have the MicroStrategy MultiSource Option installed to use data marts that you save to a different database instance than your project's primary database instance.
Ensure that any metric column aliases follow the naming conventions for your database, as they are used as column names in the data mart table. To change the metric column alias, open a metric in the Metric Editor. Under Tools, select Advanced Settings and select Metric Column Options. For information on column aliases, see Metric Column Aliases: SQL Identifiers and Data Types.
If you need to run SQL statements before or after the data mart is executed, you must have the Use SQL Statements tab in Datamart/Bulk Export editors privilege in the Developer privileges.
To Create a Data Mart
- In MicroStrategy Developer, create a new report or select an existing report to use as the data mart table. The report should contain the attributes, metrics, and other objects that you want to use as columns in the data mart table and which will populate the data mart table when the data mart report is executed.
Your report cannot be used as a data mart if it contains any of the following:
- View filters
- Report Objects that are not included in the template
- Derived metrics
Use the sample Tutorial project to create a new report with Customer Region as the attribute and Revenue as the metric.
- Choose File > Save, and select an appropriate folder in which to save the report.
Save the report with the name My_Report, in a folder of your choice.
- To use the report as a data mart report, from the Data menu, select Configure Data Mart. The Report Data Mart Setup dialog box opens, as shown below:
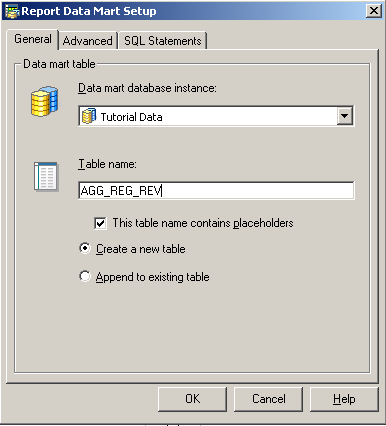
- On the General tab, from the Data mart database instance drop-down list, select a database instance for the data mart table that will be created. The data mart table will be stored in this space.
Choose Tutorial Data.
- In the Table name field, enter a table name that you want to associate with the database instance that you specified. This table name must be compliant with the naming conventions supported by your database.
The table name that you enter in this tab is not validated by the system. Ensure that the table name follows the naming convention rules for your database platform. If you do not use a valid table name, an error message is displayed.
Name the table
AGG_REG_REV. - To use a placeholder in the table name, select the This table name contains placeholders check box.
Placeholders allow you to modify table names dynamically according to your needs. The available placeholders for data mart table names are listed in the following table:
Placeholder
Replacement Options
!u
User name
!d
Date on which the table was created
!o
Report name
!j
Job ID
!r
Report GUID
!t
Timestamp
!p
Project Name
!z
Project GUID
!s
User session GUID
If you use a placeholder character other than those listed in the table, the placeholder is deleted from the table name.
Disable the This table name contains placeholders check box.
- Select whether to Create a new table or Append to existing table, described below:
- Create a new table: Select this option to replace the existing table each time the data mart report is run. The SQL statements drop and create the table each time the report is run.
- Append to existing table: Select this option to add the data mart report results to an existing table.
- Click OK.
Select Create a new table.
If you need to specify governors, table creation settings, and custom SQL for table creation, see Specifying Governors, Table Creation Options, and Custom SQL Statements
Create the Data Mart Table
- Execute the data mart report. MicroStrategy creates the data mart table in the database you selected.
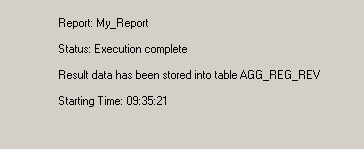
When the data mart table is created, the system displays a message that includes the data mart table name and a notification that the data mart table creation was successful, as shown in the example message below: