MicroStrategy ONE
Custom Expressions
Custom expressions allow you to create highly customized filter expressions. By typing syntax instead of using point-and-click functionality within MicroStrategy, you are able to dictate filter criteria that is more specific and sophisticated than the MicroStrategy interface allows. For an introduction to custom expressions, see Basics of Custom Expressions.
You can use custom expressions in the following situations:
- Custom expression qualifications, which evaluate the custom expression you enter. For more information and examples, see Custom Expression Qualification Filters.
- Attribute-to-attribute qualifications, which compare an attribute and a custom expression. For more information and examples, see Custom Expressions in Attribute-To-Attribute Qualification Filters.
- Relationship (metric) qualifications, which compare metric results to a selected value (in this case a custom expression). For more information and an example, see Custom Expressions in Relationship Qualification Filters. For more information on metric qualifications in general, see the Basic Reporting Help.
Basics of Custom Expressions
Custom expressions are written so that data can be tested against them, and whatever data qualifies as true when it is inserted into the custom expression is returned in the data result set.
All custom expressions must evaluate as either true or false. For example, if you enter 5 = 6 as the custom expression, the expression never evaluates as true, and a filter based on this custom expression excludes all data from a report that uses it. On the other hand, a custom expression consisting of 5 = 5 always evaluates as true, so the filter includes everything. No data is filtered out of a report containing this filter.
As an example of a scenario that uses a custom expression, you notice that your mailing campaigns have been impaired because longer last names do not print correctly on the envelopes you have been using. Therefore, your marketing manager needs a list of customers with last names greater than 15 characters long. This report requires a filter that uses a custom expression and a string function to count the number of characters in a name. (See Example: Test the Length of Last Names for details.)
In another scenario, your shipping company is trying to save freight costs by optimizing shipments, and it offers you a discount for all freight that you ship between 4 AM and 6:59 AM. To determine if you can save substantially on shipping by taking advantage of this offer, you generate a report showing orders that shipped in the three-hour period specified. This report uses a filter that employs a custom expression and a date-manipulation function to test for orders that are shipped between 4 AM. and 6:59 AM. (See Example: Test the Shipping Hour of Orders for details.)
Anything that you can specify in a filter can be specified using a custom expression, though if you can accomplish your goal using the standard point-and-click functionality of MicroStrategy, that will usually be the most efficient method to create your filter. In other words, when point-and-click functionality is not enough for your purpose, use a custom expression to create your filter.
There are certain reports that require a filter with capabilities outside of what MicroStrategy currently offers. These reports, too, use filters with custom expressions, but instead of using built-in MicroStrategy functions, these filters use the functionality of your particular Relational Database Management System (RDBMS). Further details on this functionality are available in Apply Functions in Metrics: Using Database-Specific Functions.
Custom Expression Qualification Filters
Custom expression qualification filters are quite flexible and allow you to create highly customized filters that can test data based on text content, very specific date specifications, or other criteria. These tests are based on the structure of a custom expression qualification, since the two sides of the expression are separated by a comparison operator such as =, <, >, like, and so on.
A custom expression qualification filter is created in the Advanced Qualification pane of the Filter Editor. Two examples of custom expression qualification filters follow the steps below.
To Create a Custom Expression Qualification
- In MicroStrategy Developer, choose File > New > Filter.
If the New Filter dialog box is displayed before the Filter Editor opens, click the Empty Filter icon. If you do not want this dialog box to be shown in the future, select Don't show this dialog in the future. Click OK. For a full description of object templates, including a list of the objects that can use object templates, see Re-Using Objects Via Shortcuts and Object Templates .
- Double-click in the Filter definition pane.
- Select Add an Advanced qualification and click OK.
- From the Option drop-down list, select Custom expression.
-
Type a custom expression in the Custom expression box. For general information on custom expressions, see Basics of Custom Expressions.
You can also enter the custom expression by doing either of the following:
- Drag objects from the Object Browser into the Custom expression box. Select the operators you want to use from the toolbar above the Custom expression box, or simply type them.
- Use the Insert Function Wizard to guide you through the process of creating an expression that uses a function, by clicking f(x) on the toolbar above the Custom expression box. (For details, click the Help menu.)
- Click Validate.
- Click OK.
- Click Save and Close.
Example: Test the Length of Last Names
In this example, your marketing manager needs a list of people with last names greater than 15 characters long. She needs this type of list because customers with such names are not receiving your advertising brochures due to misprinting on the envelopes that you have been using.
To produce the list of names, within MicroStrategy Tutorial, create a custom expression qualification filter using the steps in Custom Expression Qualification Filters. In the Custom expression box, type the following custom expression:
Length(Customer@[Last Name]) > 15
The string-manipulation function Length measures the Last Name form of the Customer attribute elements in your data warehouse. If the length of a particular Customer attribute element is greater than 15 characters long, the custom expression statement evaluates as true, and the Customer attribute element is included in your data. If the length of the attribute element is 15 characters or less, however, the statement evaluates as false, and that element is filtered out of the report data.
A report that uses a filter based on the custom expression above appears below.
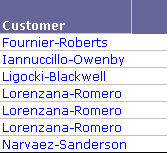
The Last Name form is displayed on the report above. Note that in each entry, the Last Name is greater than 15 characters long.
Be sure to specify the attribute form that you are testing. Moreover, if the attribute form is composed of two or more words—as in the above example, where Last Name was used—enclose the attribute form in brackets or your custom expression will not be validated.
Example: Test the Shipping Hour of Orders
In this scenario, the shipping company you use is trying to reduce costs by shipping more uniformly throughout the day, and it offers your company a new plan that includes discounts for any packages picked up from your facility between 4 AM and 6:59 AM. To predict whether your company would benefit from switching to this plan, your shipping manager requires a list of orders shipped in the three-hour time period specified.
To produce this report, create a custom expression qualification filter using the steps in Custom Expression Qualification Filters to test the hour of the Ship Date/Time attribute in your data warehouse. Notice the syntax required for the custom expression.
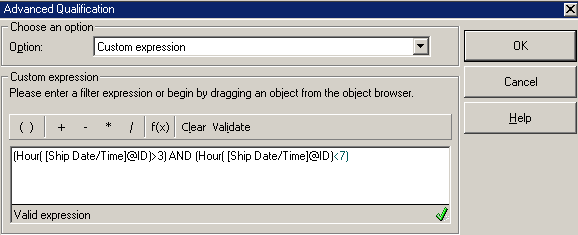
The expression is actually composed of two parts joined by a logical operator, AND. The first part tests whether the Hour component of the Ship Date/Time attribute element being tested is greater than 3. In other words, the first part checks to see whether the item is shipped at 4 AM or later. Similarly, the second part of the custom expression tests whether the Hour component of the Ship Date/Time attribute element tested is less than 7 (the time is no later than 6:59:59 AM.) Since the two parts are joined by a logical AND, the custom expression tests whether the Ship Date/Time attribute element is between 4:00 AM and 6:59:59 AM.
Executing a report using a filter based on the custom expression above yields results similar to those below.
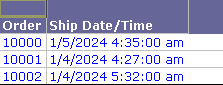
Notice that every Order element listed shipped between 4 AM and 6:59 AM.
This report cannot be created within the MicroStrategy Tutorial because a) the Ship Date/Time attribute does not exist in that project; and b) all attribute elements in Tutorial that are formatted with date information are in Date format instead of Datetime format, and the Hour function does not yield expected results when it uses an argument in Date format since no time information is stored with the date.
Custom Expressions in Attribute-To-Attribute Qualification Filters
Attribute-to-attribute qualification filters use one or more criteria that relate an attribute to a custom expression. Often, with such a filter you first select one attribute and then drag a second attribute into a custom expression box. This causes MicroStrategy to generate a custom expression which is very simple—for instance, ShipDate@ID—so that it is not immediately obvious that you are using a custom expression. For an example of this type of attribute-to-attribute qualification filter, see Example: Customers Who Live in the Same City as Call Centers. For more general information on these filters, as well as additional examples of their use, see Attribute-To-Attribute Qualification.
This section deals with attribute-to-attribute qualification filters where the custom expression is authored by the user rather than generated through a simple drag-and-drop action using the MicroStrategy interface. When you type a custom expression instead of dragging an object into the custom expression field, you have a greater degree of control over your filter and you can create more exact and sophisticated filtering criteria.
For example, by comparing the order date and ship date attributes, you can create a report that displays the orders that were shipped 28 days or later than the order date. For a report sample and steps to create this filter, see Creating an Attribute-To-Attribute Aualification Filter.
Creating an Attribute-To-Attribute Aualification Filter
The procedure below creates a filter within a report; it does not create a stand-alone filter that can be used on other reports, metrics, and so on.
To Create an Attribute-To-Attribute Qualification Filter
- From within a blank report in MicroStrategy Tutorial, double-click inside the Report Filter pane.
- Select Add an Attribute qualification and click OK.
- Find the attribute Ship Date in the Object Browser (in the Customer hierarchy) and drag it to the Attribute field.
- Change Qualify on to ID.
- Change the Operator to Greater than.
- Select Custom and enter the following:
(Day@ID + 27)This adds 27 days to the Day attribute (which is the order date). The Ship Date is compared to this value.
- Click OK.
A portion of the executed report is shown below. Notice that the only data returned in this report is that which satisfies the condition that Ship Date is 28 days or later than Day (the order date).

Custom Expressions in Relationship Qualification Filters
Attributes can be related through lookup, relationship, and fact tables. Creating a report that includes attributes that are not related in any of these ways, however, usually results in a very large result set—known as a Cartesian product—that is not useful since the rows comprising the report are simply a list of every possible combination of the attributes.
There are circumstances where you require a report that consists only of attributes, and no metrics. Even though a fact table exists in your data warehouse that relates the attributes on your report, your attributes are effectively not related by it since no metrics are present on your report. Relationship qualification filters allow you to create meaningful reports in such situations. In fact, relationship qualification filters allow you to create meaningful reports in cases where the attributes on your report are not explicitly related through lookup, relationship, or fact tables—where no lookup table, relationship table, or metric exists to relate your attributes.
Another use of relationship qualification filters is to specify the exact lookup, relationship, or fact table that you want to use to relate the attributes on your report. Choosing the right lookup, relationship, or fact table can impact query performance and report execution time, among other things.
Generally, you must know the structure of your data warehouse to use relationship qualifications.
Relationship qualification filters are created using either the Set Qualification or the Advanced Qualification option in the Filter Editor. Choosing the Set Qualification option provides a wizard to guide you through this process, while the Advanced Qualification option allows you to enter custom expressions. For more information on using the wizard, see the Building Query Objects and Queries, for Designers chapter of the Basic Reporting Help.
Syntax of Custom Expressions in Relationship Qualification Filters
The following syntax is used to create a relationship qualification filter using a custom expression:
<relation; filter qualification>{list of output attributes}Where:
- The
relationcan be a fact, a table, or an empty filter. The fact or table chosen provides a means for MicroStrategy to relate either two attributes which are not in the same hierarchy, or an attribute and a metric. You must know the structure of your data warehouse to choose an appropriate fact or table through which MicroStrategy's engine can provide the necessary database joins to relate either the two attributes or the attribute and metric that you choose.If a relationship is left empty, your project's schema is used to select the appropriate table.
- The
filter qualificationspecifies the criteria that you use for your relationship qualification filter. You may use any of the following types of qualifications: - Attribute qualification
- Filter qualification (the name of a pre-existing filter)
- Metric qualification
-
The
list of output attributesis a comma-separated list of the attributes whose elements are filtered for your report based on the filter qualification specified (immediately beforehand in the syntax). In other words, thefilter qualification—explained in the previous bullet—limits the set of attribute elements contained in your report, and the resultant set of attribute elements is what actually constitutes your filter.If your regional settings are not set to English, the list separator must be whatever is defined in your regional settings.
To specify output attributes, it is easiest to simply drag an attribute from the Object Browser into the Custom expression box. If you manually enter the attribute, it must be in the format
[attributename]@IDor[attributename]@DESC.
Example: Customers Who Have Generated More Than $7500 in Profit
You require a report that lists the customers who have each generated more than $7500 in profits. While you can accomplish this with the Set Qualification option, you can also do this quite easily selecting the Advanced Qualification option and then, from the Option drop-down list, selecting Custom expression.
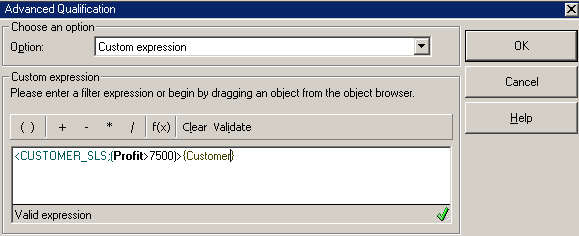
Type the syntax required in the box, click Validate, and then click OK. The image below shows the syntax required:
The syntax is broken down into its components:
- To relate the Profit metric to the Customer attribute, the custom expression specifies the
CUSTOMER_SLStable in your data warehouse as the relation between them. This table is chosen because it contains columns for the Customer attribute and the Profit fact, effectively relating the Customer attribute to the Profit metric, since the Profit metric is an aggregation over individual Profit facts. - The filter qualification is specified by a metric qualification:
Profit > 7500, which allows only data for which Profit exceeds $7500. - The only variable left to choose in the syntax is the attribute or attributes that constitute the filter, based on the criterion specified—
Profit > 7500—and the relationship table chosen,CUSTOMER_SLS. Since you require a list of customers that satisfies your profit condition, you chooseCustomerin the custom expression as the output attribute. The list of Customer elements generated from this entire process will be your filter.
Using this filter and the Profit metric on a report results in the data below:

Note that every customer listed on this report has generated a profit greater than $7500.