Strategy One
Enable OIDC Authentication with Amazon Athena Using Okta and Microsoft Entra ID (Formerly Azure AD)
Starting in MicroStrategy ONE Update 10, you can integrate Strategy with Amazon Athena for Single-Sign On (SSO) with OpenID Connect (OIDC) authentication.
-
Prerequisites
-
Strategy Configuration
-
End-to-End Testing
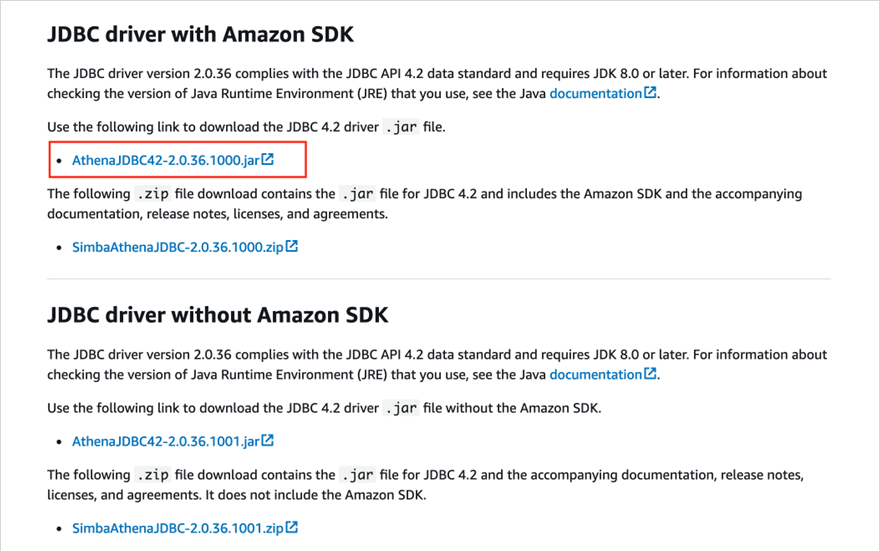
Install Athena JDBC Driver
The Amazon Athena JDBC driver is not installed with Strategy. Therefore, you must download the driver.
-
Download the Athena JDBC driver with Amazon SDK.
-
Upload the driver into the JDBC folder on the Strategy Intelligence server machine (
<MSTR_INSTALL_HOME>/JDBC). See the example paths below.Linux
/opt/MicroStrategy/JDBCWindows
C:\Program Files (x86)\Common Files\MicroStrategy\JDBC
Prepare Your Application in Okta and Entra ID
Follow the steps below to prepare your application in Okta and Entra ID.
Okta
-
Navigate to the Sign On tab of your newly created organization.
-
In OpenID Connect ID Token, click Edit.
-
In Issuer, choose the Okta URL.
-
Click Save.
-
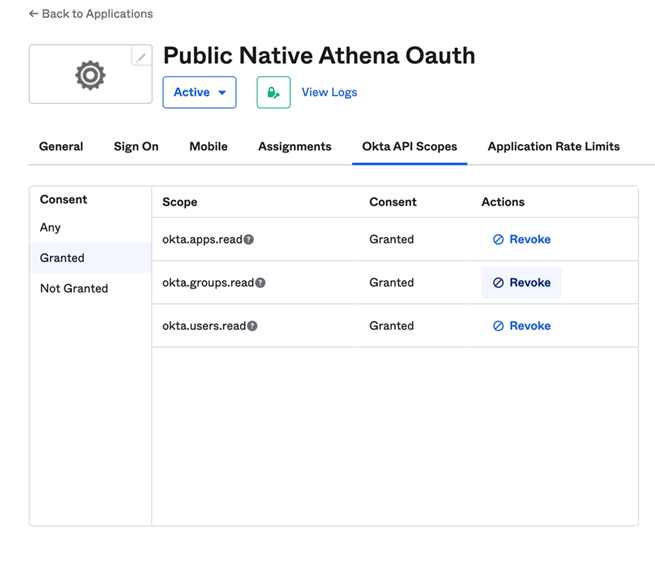
Navigate to the Okta API Scopes tab.
-
Click Grant next to the okta.apps.read, okta.groups.read, and okta.users.read scopes.
Entra ID
-
See Integrate OIDC Support with Microsoft Entra ID (formerly Azure AD) to create your Azure application.
-
Go to the newly created app > Authentication.
-
Under the Implicit grant and hybrid flows section, select ID tokens.
Prepare AWS IAM Objects
Follow the procedures below to prepare IAM objects.
Create a Custom Policy
Create a custom policy to grant permissions to an S3 resource for staging Athena results.
Here is an example policy named get-cc-athena-result:
{
    "Version": "2012-10-17",
    "Statement": [
        {
            "Sid": "VisualEditor0",
            "Effect": "Allow",
            "Action": [
                "s3:PutObject",
                "s3:GetObject",
                "s3:ListBucketMultipartUploads",
                "s3:AbortMultipartUpload",
                "s3:ListBucket",
                "s3:GetBucketLocation",
                "s3:ListMultipartUploadParts"
            ],
            "Resource": [
                "arn:aws:s3:::tec-gd-gateway-data",
                "arn:aws:s3:::tec-gd-gateway-data/athena",
                "arn:aws:s3:::tec-gd-gateway-data/athena/*"
            ]
        }
    ]
}
Create AWS OIDC Identify Providers
See Creating OpenID Connect (OIDC) identity providers to create AWS OIDC identity providers using the issuer URL and client_id for Entra ID and Okta.
Create AWS Role for Web Identity or OpenID Connect Federation
-
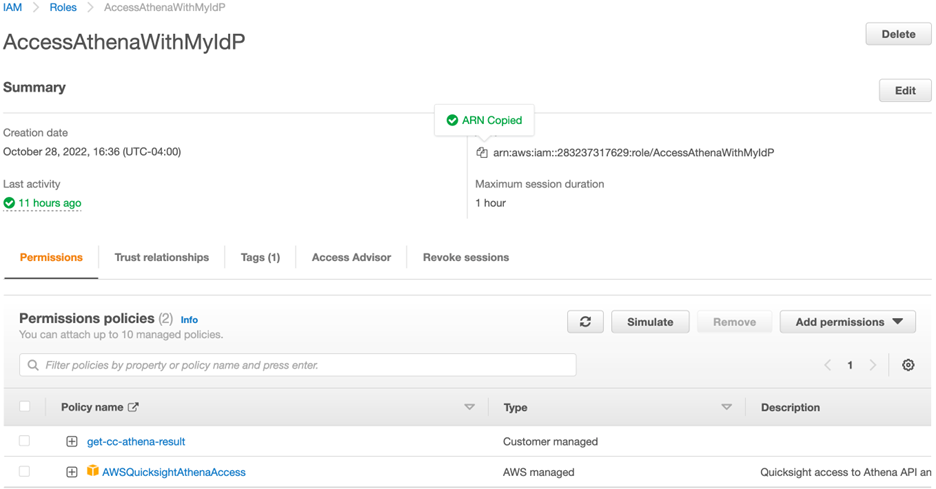
See Creating a role for web identity or OpenID Connect Federation (console) to create an IAM Role, grant a suitable managed policy such as
AWSQuicksightAthenaAccesswith permissions to call the Athena API, and add the custom policy with permissions to S3 that was created above.Example of IAM Role:
-
Under Trust Relationships > Trusted Entities for the IAM role, add the AWS OIDC Identity Providers created above.
Example:
Copy{
"Version": "2012-10-17",
"Statement": [
{
"Sid": "GDAzure",
"Effect": "Allow",
"Principal": {
"Federated": "arn:aws:iam::xxxxxxx:oidc-provider/login.microsoftonline.com/4ca8943a-xxxx-xxxx-868e-c5bdb4d59fee/v2.0"
},
"Action": "sts:AssumeRoleWithWebIdentity",
"Condition": {
"StringEquals": {
"login.microsoftonline.com/4ca8943a- xxxx-xxxx -868e-c5bdb4d59fee/v2.0:aud": "833d15da- xxxx-xxxx -ae3a-ca7a79432950"
}
}
},
{
"Sid": "GDOkta",
"Effect": "Allow",
"Principal": {
"Federated": "arn:aws:iam::xxxxxxx:oidc-provider/dev-xxxxxx.okta.com/oauth2/aus5xhhzgxxxx2ZZ5d7"
},
"Action": "sts:AssumeRoleWithWebIdentity",
"Condition": {
"StringEquals": {
"dev-xxxxxx.okta.com/oauth2/aus5xhhzgxxxx2ZZ5d7:aud": "xxxxxxxx"
}
}
}
]
}This example includes both Entra ID and Okta. You can find more details in Configuring a role for GitHub OIDC identity provider.
Create and Map Users to Okta/Entra ID
-
Open the Workstation window.
-
In the Navigation pane, click Environments.
-
Log into your environment. You must have Administrator privileges.
-
In the Navigation pane, click User and Groups.
-
Next to All Users, click
 .
. -
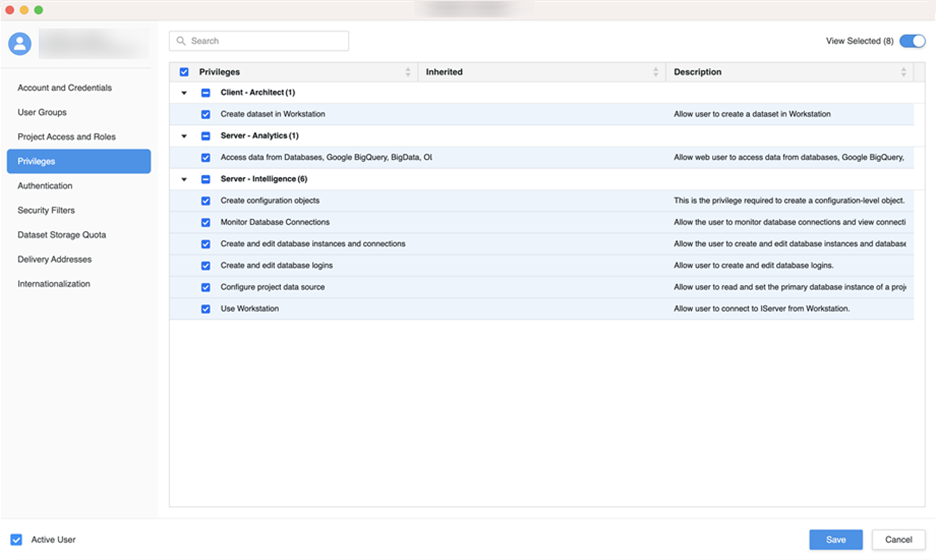
In the left pane, click Privileges and add the following privileges:
-
Access data from Databases, Google BigQuery, BigData, OLAP, BI tools
-
Create and edit database instances and connections
-
Create and edit database logins
-
Create configuration objects
-
Create dataset in Workstation
-
Configure project data source
-
Monitor Database Connections
-
Use Workstation
-
-
In the left pane, click Authentication.
-
Enter user’s email address in Trusted Authenticated Request User ID.
-
Click Save.
Configure Strategy Library in Workstation
-
Open Workstation and connect to the Library environment using standard authentication with an admin privilege user.
-
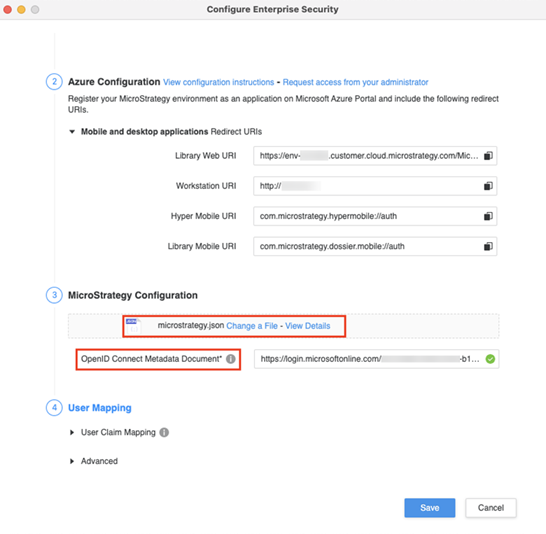
Right-click on the connected environment and choose Configure Enterprise Security.
-
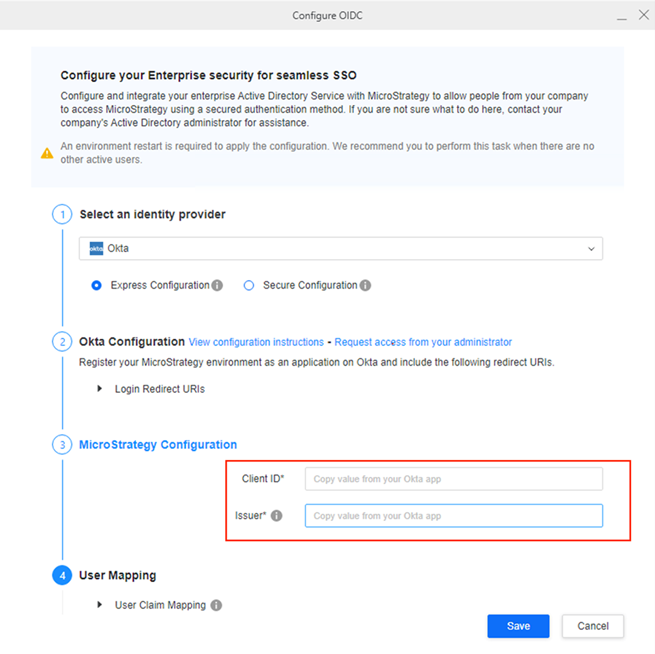
Configure for Entra ID and Okta
Entra ID: Under Strategy Configuration, upload the manifest file you downloaded earlier and provide the OpenID Connect Metadata Document URL.
Okta: Under Strategy Configuration, provide the Client ID and Issuer.
-
Click Save. For more information about enabling OpenID Connection (OIDC) authentication in Workstation, see Configure Enterprise Security.
-
Restart the web server.
Configure Strategy Web
-
Go to the Strategy Web admin page.
https://env-xxxxxx.customer.cloud.microstrategy.com/MicroStrategy/servlet/mstrWebAdmin -
Locate the connected Intelligence server and click Modify.
-
Click Setup next to the trust relationship between the Web server and Strategy Intelligence server.
-
Enter the user credentials with admin privileges and click Create Trust Relationship.
-
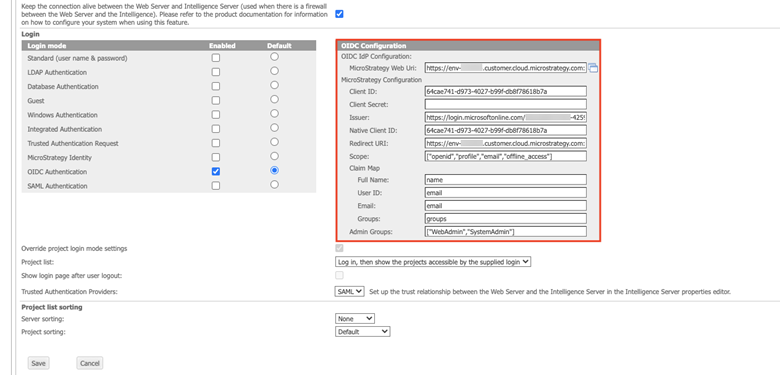
In the navigation pane, click Default properties and enable OIDC Authentication.
-
Under OIDC Configuration, complete the remaining fields. For the Okta Native app, leave Client Secret empty.
 Click here to view details about the OIDC Configuration section.
Client ID Enter the client ID of your Azure application.
Client Secret This field is only required when the Azure application is a Web app. If you deployed a Public client/native app in Create a Custom Policy, you can leave this field blank.
Issuer The OpenID Connect metadata document field in the Endpoints section is the provider's issuer URL suffixed with
/.well-known/openid-configuration. You must remove this suffix from the OpenID Connect metadata document to get the Issuer information.
Example: If OpenID Connect metadata document is
https://login.microsoftonline.com/901c038b-xxxx-4259-b115-c1753c7735aa/v2.0/.well-known/openid-configuration, the Issuer ishttps://login.microsoftonline.com/901c038b-xxxx-4259-b115-c1753c7735aa/v2.0.Native Client ID This is the same as the client ID, unless configured otherwise.
Redirect URI The default web redirect URI. This should not be changed unless configured otherwise.
Scope The scopes used by Strategy to authorize access to a user. This should not be changed unless configured otherwise.
Claim Map
- Full Name The user display name attribute. The default value for this field is name.
- User ID The user distinguished login attribute. The default value for this field is email.
- Email The user email address attribute. The default value for this field is email.
- Groups The user group attribute. The default value for this field is groups.
Admin Groups: Select admin groups whose members can access to the admin pages. You can have multiple admin groups.
Example: ["WebAdmin","SystemAdmin"]
Members belonging to WebAdmin and SystemAdmin can access the admin pages. -
Click Save. For more information, see Enabling OIDC Authentication for JSP Web and Mobile.
-
Restart the web server.
Create an Enterprise Security Object
Follow the steps in Manage OAuth Enterprise Security with Identity and Access Management (IAM) Objects to create an enterprise security object.
For Okta, choose Okta from the identity provider drop-down and enter the Client ID, OAuth URL, and Token URL for your Okta application. Use the following format for the URLs:
https://dev-xxxxxx.okta.com/oauth2/microstrategy/v1/authorize
https://dev-xxxxxx.okta.com/oauth2/microstrategy/v1/token
Create an Amazon Athena JDBC Data Source with OAuth On-Behalf-Of Authentication
-
Open the Workstation window.
-
In the Navigation pane, click
, next to Data Sources. -
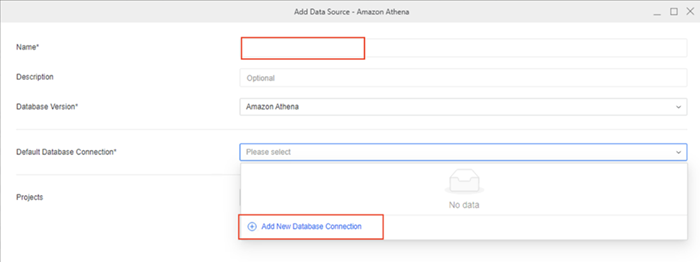
Select Amazon Athena.
-
Enter a Name.
-
Expand Default Database Connection and click Add New Database Connection.
-
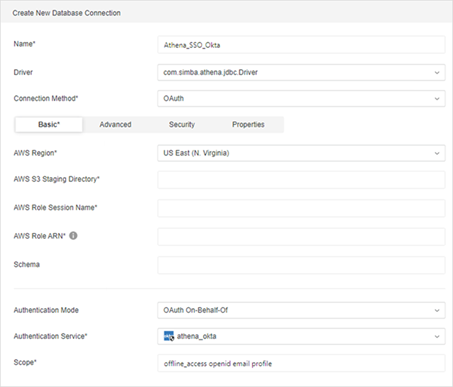
Enter a Name, select OAuth as the connection method, and enter the required connection information.
Click here to connection information details.AWS Region The AWS region of the Athena and AWS Glue instance that you want to connect to.
AWS S3 Staging Directory The path of the Amazon S3 location where you want to store query results, prefixed by
s3://.AWS Role Session Name Enter AthenaJWT.
AWS Role ARN The Amazon Resource Name (ARN) of the role that you want to assume when authenticated through JWT. This is the name you created in Prepare AWS IAM Objects.
Schema The name of the database schema to use. This field is optional.
See the Magnitude Amazon Simba Athena JDBC Data Connector Installation and Configuration Guide for more information.
-
Select OAuth On-Behalf-Of as Authentication Mode.
-
Select the IAM object created in Create an Enterprise Security Object
-
Click Save.
-
Select the Projects to which the data source is assigned and can be accessed.
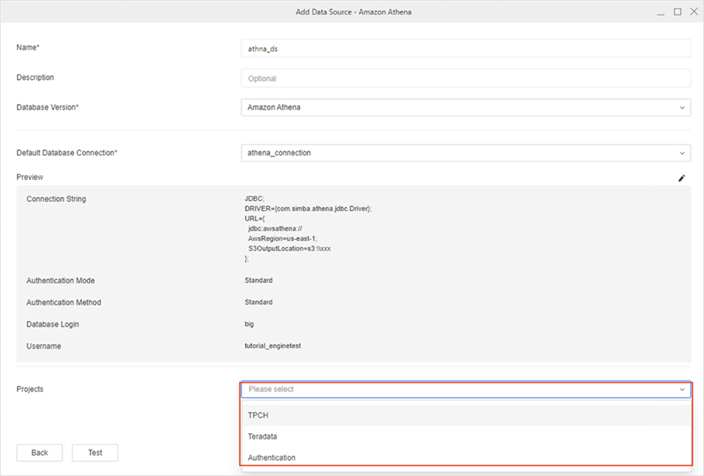
- Click Save.
Test Workstation
-
Open the Workstation window.
-
Verify that the environment is using the default OIDC authentication mode.
-
Click Environments in the Navigation pane.
-
Right-click the environment you want to use and click Edit Environment Information.
-
Verify that Authentication Mode is set to "Default OIDC".
-
-
Log into your Strategy environment using your Okta/Entra ID username and password.
-
In the Navigation pane, click
, next to Datasets. -
Select Data Import Cube and click OK.
-
Select Amazon Athena.
-
Select any of import options and click Next.
-
Click on the data source created in Create an Amazon Athena JDBC Data Source with OAuth On-Behalf-Of Authentication.
The namespaces and tables list appears.
Test Library
-
Open Strategy Library and click Log in with OIDC.
-
In the toolbar, click
 , and choose Dashboard.
 -
Click Blank Dashboard.
-
Click Create.
-
Click New Data and select the Amazon Athena gateway.
-
Select any of import options and click Next.
-
Click on the data source created in Create an Amazon Athena JDBC Data Source with OAuth On-Behalf-Of Authentication.
The namespaces and tables list appears.
Test Strategy Web
-
Open Strategy Web and log in using your Okta/Entra ID username and password.
-
Click Create.
-
Click Add External Data.
-
Select the Amazon Athena gateway.
-
Select any of import options and click Next.
-
Click on the data source created in Create an Amazon Athena JDBC Data Source with OAuth On-Behalf-Of Authentication.
The namespaces and tables list appears.