Strategy ONE
Preview Feature: Enable SQL Template for Agents
Starting in Strategy One (January 2026), you can use the SQL template to create custom instructions to pick columns when specified conditions are met. Rules can be based on attributes only, adding to the previous scenarios of metrics only and attribute and metric combined.
Starting in Strategy One (December 2025), you can enable the SQL template to allow for custom instructions for specific calculations or questions. This is an improvement on the current approach of using Customer Instruction and column description, because it is easier to use.
These SQL template rules define how queries are structured and calculated beyond standard column selections. They incorporate custom instructions, calculation logic, and column interpretations to ensure accurate, context-aware results tailored to each use case.
- Rules can be based on metrics only, but not attributes only.
- Starting in Strategy One (January 2026), rules can be based on attributes only.
-
Rules can be based on both an attribute and a metric.
-
Add the configuration under the metric.
-
The rule takes effect when the question is related to the metric the rule is based on.
Preview features are early versions of features and are not to be used in a production environment as the core behavior remain subject to change between preview and GA. By selecting to expose preview features, you can access these features and use them as you would any other dashboard functionality. The official versions of preview features are included in subsequent releases.
Enable the Feature Flags
-
In Library Server, add the line
services.ai.v2.sqlTemplateEnabled=true. This displays the Enable SQL Template toggle on the General panel of agents. -
In the chat/AI service, add the line
SQLER_TEMPLATE=True.
Enable the SQL Template
- Create a new agent or open an existing agent and click the Edit
 icon in the upper right.
 - Click the General panel
 .
. - Toggle on Enable SQL Template.
A Rules tab displays.
Create a Rule
- After you enable the SQL template, click the Rules panel
 .
.
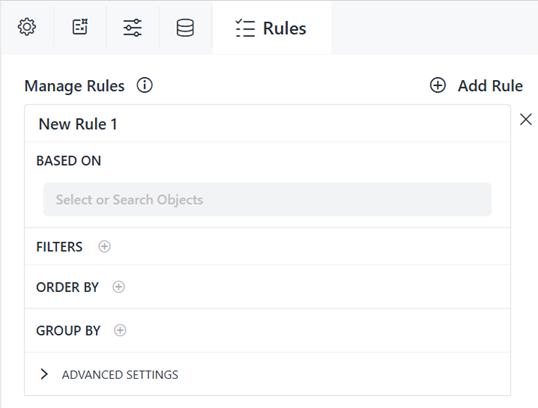
- Click Add Rule.
- Rename the rule by typing over the default name at the top.
- From the Based On drop-down list, select an object or search for one. You can select multiple objects.
- If you select a metric, you can configure actions for that metric only. Follow the steps below:
- To do so, expand the metric and click the Add icon
 next to Configurations.
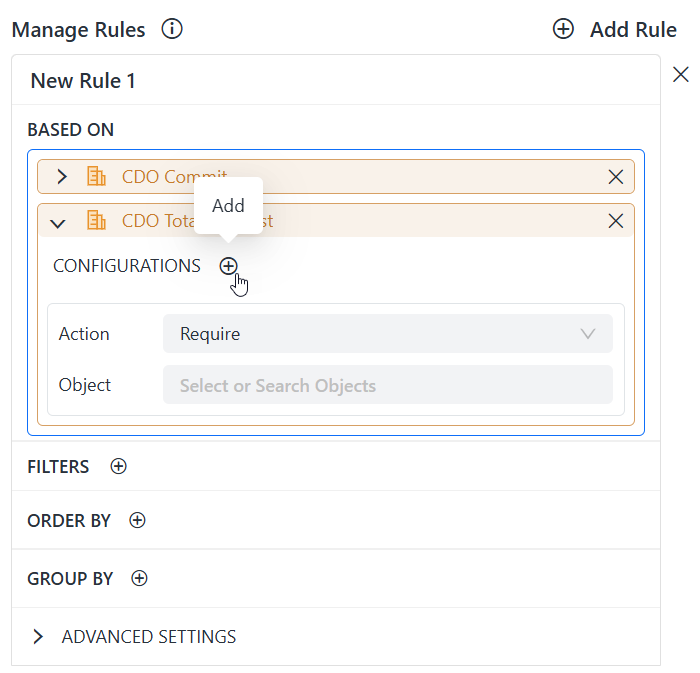
Select an Action from the drop-down list.
If you select Group By, follow the steps in To group the rule.
If you select Filter By, follow the steps in To filter the rule.
Select Break By to restart the metric calculation for each attribute element. In the Object box, select the object to break by or search for it. The object is selected first and then grouped in the SQL query.
If you select Order By, follow the steps in To order the rule.
If you select Forbid With, in the Object box, select the object to forbid or search for it. You can select multiple objects.
If you select Require, in the Object box, select the object to require or search for it. You can select multiple objects.
You can add another configuration by repeating these steps.
- To do so, expand the metric and click the Add icon
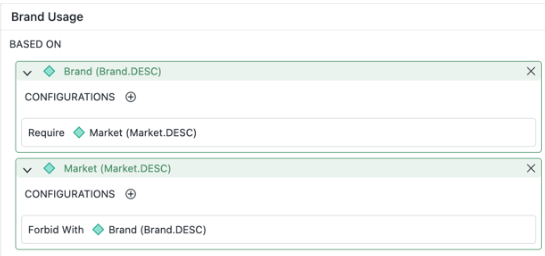
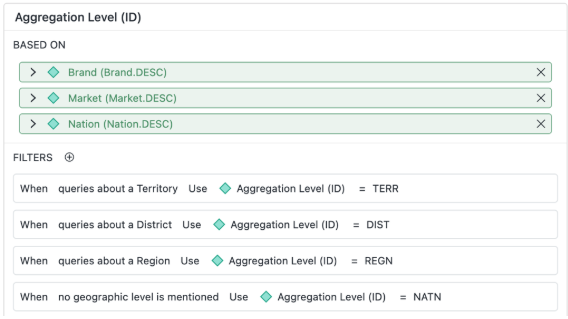
- Starting in Strategy One (January 2026), as shown in the example below, you can set configurations on attributes. if the Brand_DESC column is selected, then Market_DESC must also show in the result. If Market_DESC is selected on its own, without Brand_DESC, then Brand_DESC is not included unless it is explicitly selected.
The remaining steps apply filters, ordering, grouping, and advanced settings for all metrics in the rule.
- To filter the rule:
- Click the Add icon
 next to Filters.
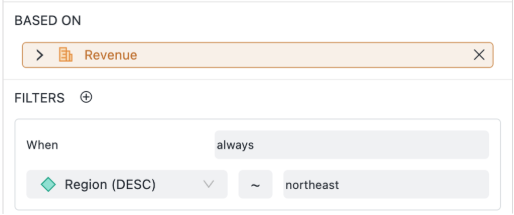
 - In the When box, determine when to apply the filter, such as Category is Music. To always filter the rule, type always.
- From the drop-down list, select the object to compare or search for it.
- By default, the operator is equals exactly (=). To change the operator to similar to, click = and select ~.
- In the box, type the expression to compare the object to.
For example, the following rule includes only the Northeast region in revenue calculations. If the question "What is the revenue by region?" is asked, the agent returns the Northeast revenue value. Using the ~ means that the comparison is not case-sensitive, so Northeast, NorthEast, and northeast are all considered the same.
 For more examples of scenarios available starting in Strategy One (January 2026), click here.
Create a list of filters to determine which value to use. In the example below, the rule applies different aggregation level attributes depending on what the query is about.
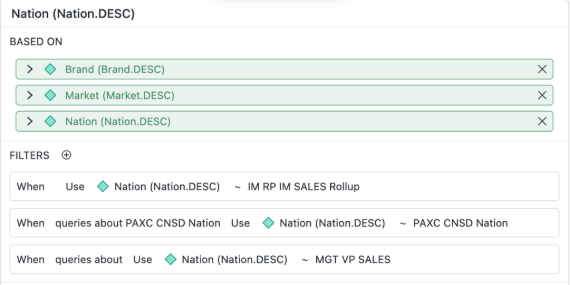
Set a default filter that changes only if the user explicitly specifies something different. In the example below, queries about nation use the IM RP IM Sales Rollup filter. If the PAXC CNSD nation is used in the query, that nation is used as the filter.
In the example below, the default filter is Rolling 13 weeks, changed only if the query includes a different time period.

- Click the Add icon
- To order the rule:
- Click the Add icon next to Order By.
- In the When box, determine when to order the rule, such as Category is Music. To always order the rule, type always.
- From the Order By drop-down list, select the object to order by or search for it.
- Choose Ascending or Descending (the default) order.
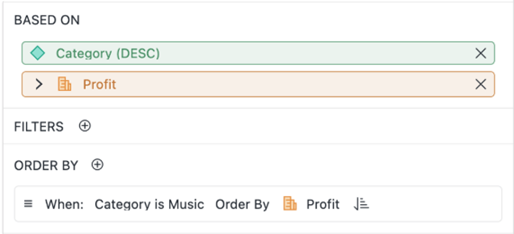
For example, the following rule sorts Profit values in ascending order for the Music category. If the question "Show me the Profit for all Items in Music Category" is asked, the values are sorted in ascending order. If the question "Show me the Profit for all Items in Books Category" is asked, the values are sorted in descending order, the default.
- Click the Add icon
- To group the rule:
- Click the Add icon next to Group By.
- In the When box, determine when to order the rule, such as Category is Music. To always order the rule, type always.
- From the Group By drop-down list, select the object to group by or search for it. The object is selected first in the SELECT clause of the SQL query.
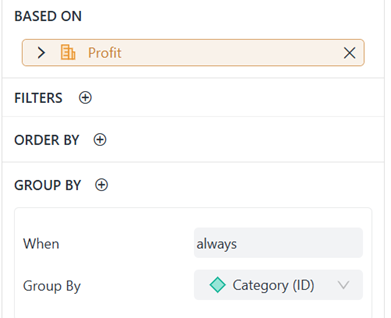
For example, the following rule groups Profit values by the Category ID. If the question "What is the Profit by Region" is asked, the values are separated by region (from the question) and category (from the rule).
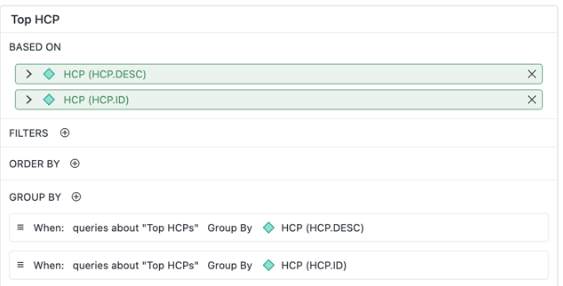
Beginning in Strategy One (January 2026), you can specify that a specific column displays but group by a different column. In the example below, if a query contains the text "Top HCPs", the response is grouped by description and then ID.
- Click the Add icon
- You can configure Advanced Settings for time, preferences, and guards. For example, the following preference displays the category ID rather than the description.

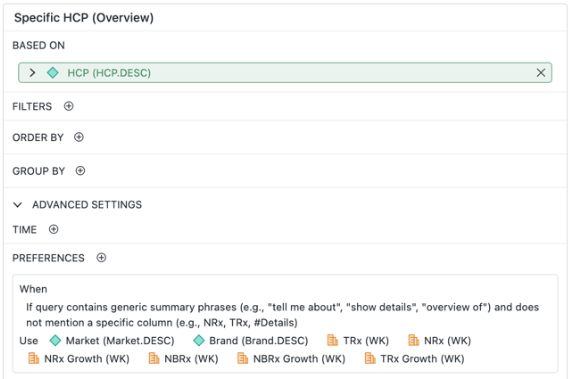
Beginning in Strategy One (January 2026), you can specify that if a query contains generic summary phrases such as "tell me about" and does not mention a specific column, a summary grid displays as the response.
- You can create additional rules following the steps above.
- Save your changes.