Strategy One
Using the Library Mobile Sidebar
The Library sidebar allows you to switch different applications or view your downloads. You can also view Favorites, Recents, Subscriptions, and custom groups that you have created.
View Other Applications
You must add applications before switching.
-
From the left sidebar menu, tap the Library drop-down list.
The Library drop-down list can be expanded or collapsed.
-
Tap an application name in your environment to view the content of the specific workspace.

Add Another Application
An environment can have multiple applications. If you copy and add an application link, Strategy Library Mobile automatically adds all applications that you have access to. For example, you may see a Sales app and a Finance app in the same environment.
-
Expand the left sidebar menu.
-
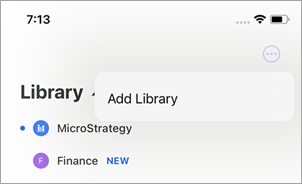
Tap More
 .
. -
Tap Add Library.
-
Enter the Name, Address, Port, and Path.
-
Enable HTTPS if applicable.
-
Tap Save. The new application(s) are added to the view.
Favorites
Rather than scrolling through your Library content or searching, you can add your most frequently used dashboards, documents, and reports as Favorites.
Use the Library Home page to easily add content to your Favorites. To do this, tap and hold on the content you want to add, then tap Favorite ![]() . The content displays at the top of the Home section with a yellow star. Beginning in Strategy One (July 2025), the content is also displayed in a separate Favorites section, if your administrator enabled it.
. The content displays at the top of the Home section with a yellow star. Beginning in Strategy One (July 2025), the content is also displayed in a separate Favorites section, if your administrator enabled it.

To remove content from the Favorites section, tap and hold on the content, then tap Remove from Favorites. The content no longer displays in the Favorites section.
You can also favorite and un-favorite content from the Info Windows or toolbar in a specific dashboard.
Grouping
To organize your library, create custom groups for specific content. There is no limit to the number of groups that you can create in your library. You can also edit or delete groups at any time.
To add content to an existing group or create a new group:
- Open the Home folder.
- To add content to an existing group:
- Tap and hold on the content, then tap Add to Group
 . Tap the group.
 - To select multiple objects, tap and hold on the content, then tap Multi-select. Select the additional objects to add to the group. Tap Add to Group at the bottom of the screen. Tap the group.
-
If the correct group does not exist, you can create a new group by tapping Add Group
 .
.
- Tap Save.
To create a new group:
-
Open the sidebar menu. , tap Add Group
-
Tap Add Group
. -
Type a Name.
-
Tap the color of the dot that displays with the name.
-
Tap Create.
To view a group's content, open the sidebar menu and select the group.
To edit a group's name and color, open the sidebar menu. Swipe left on the group and select Edit.
To delete a group, open the sidebar menu. Swipe left on the group and select Delete.
Downloads Folder
Open the sidebar menu and scroll to view the Downloads  folder. Use this folder to view all PDF, Excel, and .mstr files from across environments.
To export or download a dashboard, use the Share ![]() option within the dashboard. All files are automatically sent to the local Downloads folder. The folder stores up to 100 files before replacing the oldest file with new downloads.
option within the dashboard. All files are automatically sent to the local Downloads folder. The folder stores up to 100 files before replacing the oldest file with new downloads.
You can also view the downloads for a specific dashboard in the Information Window. In the Information Window of your Library Home, you can easily share, rename, or delete downloaded files.
Sort and Filter Files
Use the Downloads folder to view downloads from across different libraries. The downloads from your current library are shown at the top of the folder.
- Open the Downloads folder.
- Tap Sort & Filter.
-
Sort by Name, Date Exported, or Library.
- Filter by the type of download file.
- Tap Apply to view changes in the folder.
Share Files
- Open the Downloads folder
- Tap More
 .
. - Choose Share.
- Share the file via email or other applications.
Rename Files
- Open the Downloads folder.
- Tap More .
- Choose Rename.
- Delete the text or add to the file name.
- Tap Done to save your changes.