Strategy One
Enable OIDC Authentication with Azure Databricks Using Microsoft Entra ID (Formerly Azure AD)
Starting in MicroStrategy ONE Update 11, integrating Strategy with Azure Databricks for sign-sign on (SSO) with OpenID Connect (OIDC) authentication is supported.
Learn to configure Databricks OIDC authentication with Azure Databricks using Entra ID:
Prerequisites
Configure Your Application in Entra ID
- Configure an Entra ID application for Azure Databricks SSO to add the additional resource permission for Azure Databricks. For more information, see https://learn.microsoft.com/en-us/azure/databricks/dev-tools/app-aad-token#configure-an-app-in-azure-portal.
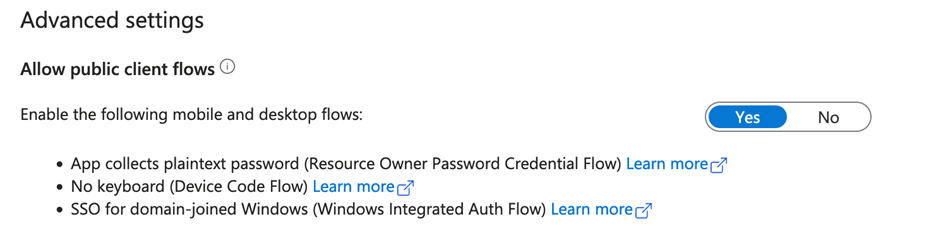
- Go to the newly created app and click Authentication.
- Under Allow public client flows, toggle Enable the following mobile and desktop flows to Yes.

Assign an Entra ID User to the Azure Databricks Workspace
- Launch workspace from the Azure Portal.
- Click your username and select Admin Settings from the drop-down.
- Click Add user.
- Enter the user email address.
- Click OK.
- Assign the user Databricks SQL access.
Configure Strategy for Databricks OIDC Authentication
Create and Map a Strategy User to an Entra ID User in Workstation
- Open the Workstation window.
- In the Navigation pane, click Environments.
- Log in to your environment. You must have administrator privileges.
- In the Navigation pane, click User and Groups.
- Click
 next to All Users.
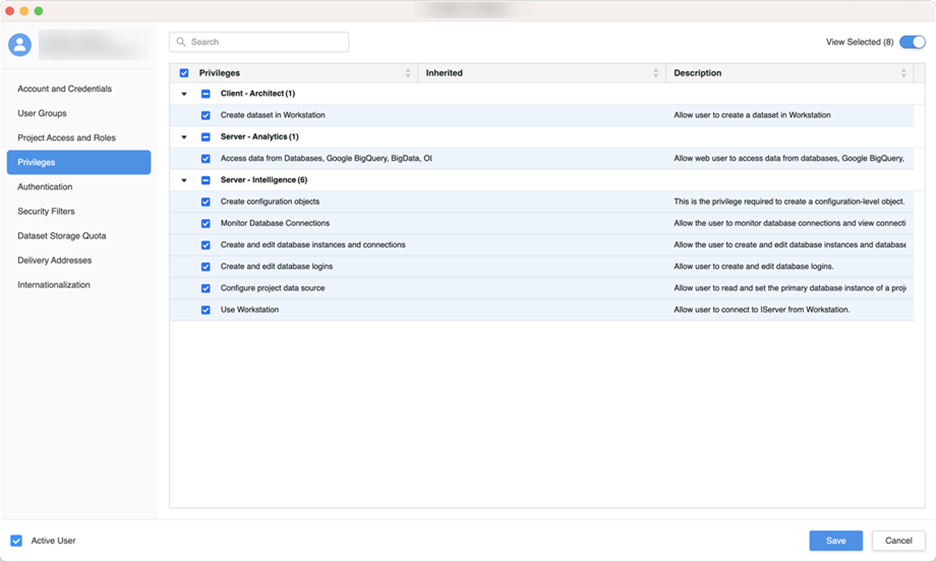
 - In the left pane, click Privileges and add the following privileges:
- Access data from Databases, Google BigQuery, BigData, OLAP, BI tools
- Create and edit database instances and connections
- Create and edit database logins
- Create configuration objects
- Create dataset in Workstation
- Configure project data source
- Monitor Database Connections
- Use Workstation
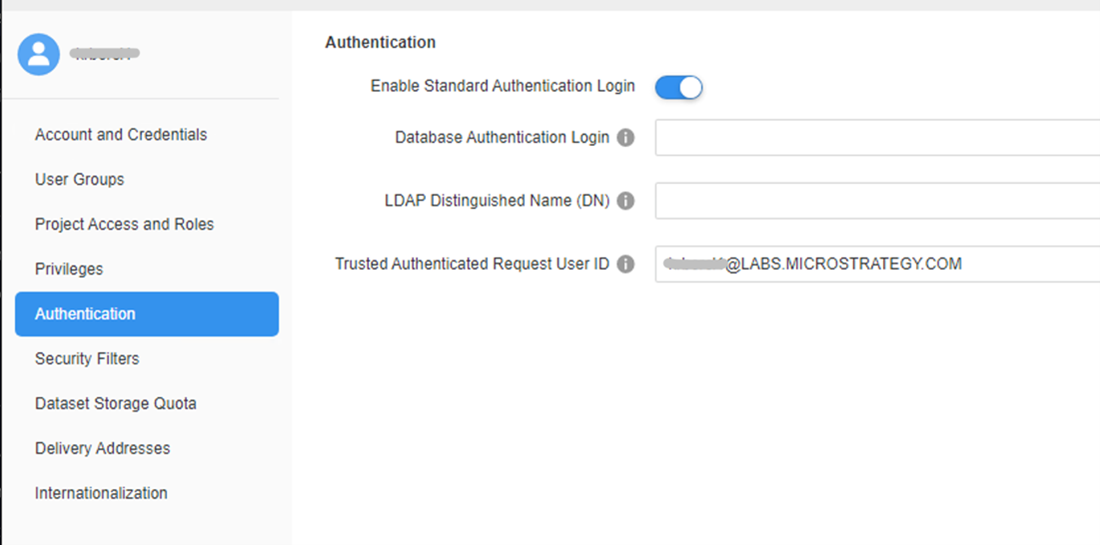
- In the left pane, click Authentication.
- Enter a user's email address in Trusted Authenticated Requires User ID.
- Click Save.
Configure Strategy Library in Workstation
- Open the Workstation window.
- Connect to your Library environment using standard authentication. You must have administrator privileges.
- Right-click your connected environment and click Configure Enterprise Security > Configure OIDC.
- From the identity provider drop-down, select Azure.
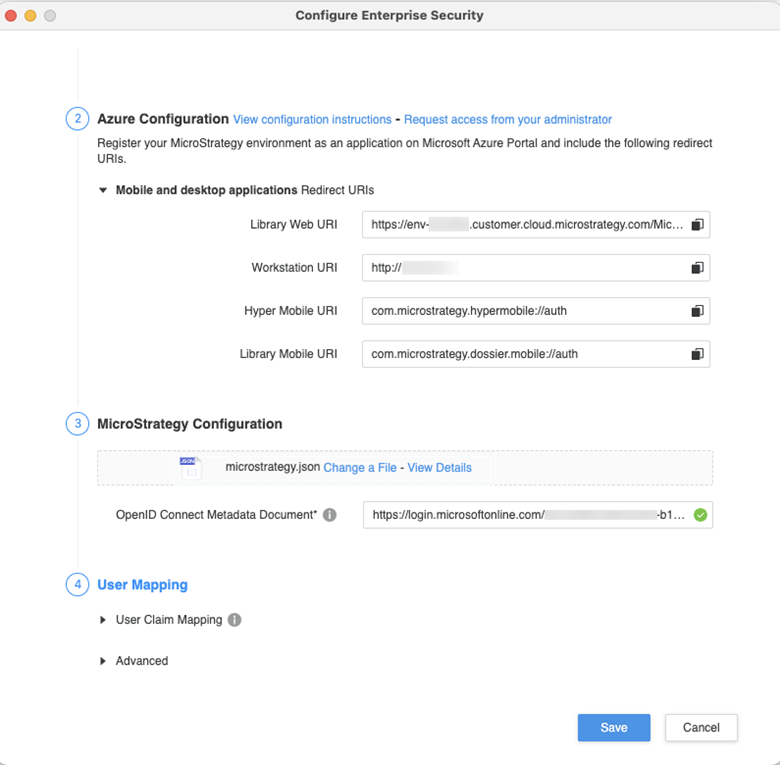
- Copy the Mobile and desktop applications Redirect URIs and add them to the native application URIs in your Entra ID application.
- In Entra ID, go to your Entra ID application.
- Click Manifest and download the manifest file.
- In Workstation, upload the manifest file in Strategy Configuration.
- In Entra ID, copy the OpenID Connect Metadata Document link:
- Go to your Entra ID application and click Overview > Endpoints.
- Click OpenID Connect metadata document and copy the link.
- In Workstation, paste the link in OpenID Connect Metadata Document.
- Click Save.
- Restart the web server.
For more information on enabling OIDC authentication, see Enable Single Sign-On with OIDC Authentication.
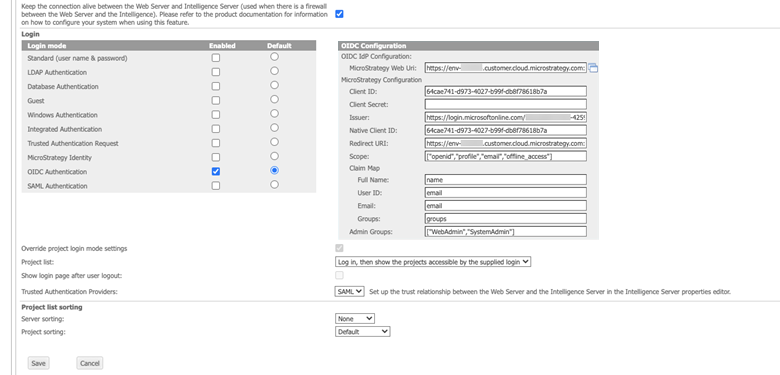
Configure Strategy Web
- Go to the Strategy Web admin page similar to
https://env-xxxxxx.customer.cloud.microstrategy.com/MicroStrategy/servlet/mstrWebAdmin. - Find the connected Intelligence server and click Modify.
- Next to the trust relationship between the Web server and Strategy Intelligence server, click Setup.
- Enter your user credentials with administrator privileges and click Create Trust Relationship.
- In the left pane, click Default properties.
- Select the checkbox next to OIDC Authentication.
- In OIDC Configuration, complete the fields.
- Click Save.
- Restart the web server.
Create an Enterprise Security Object
Create an enterprise security object for Entra ID using Manage OAuth Enterprise Security with Identity and Access Management (IAM) Objects.
The value of the scope should be 2ff814a6-3304-4ab8-85cb-cd0e6f879c1d/.default. Do not update the value of the scope field. For more information, see https://learn.microsoft.com/en-us/azure/databricks/dev-tools/service-prin-aad-token.
Create a Databricks Data Source with OIDC Single Sign-On
- Open the Workstation window.
- In the Navigation pane, click , next to Data Sources.
- Choose Databricks.
- Enter a Name.
- Expand the Default Database Connection drop-down and click Add New Database Connection.
- Enter a Name.
- Select OAuth from the Connection Method drop-down.
- Enter the required information:
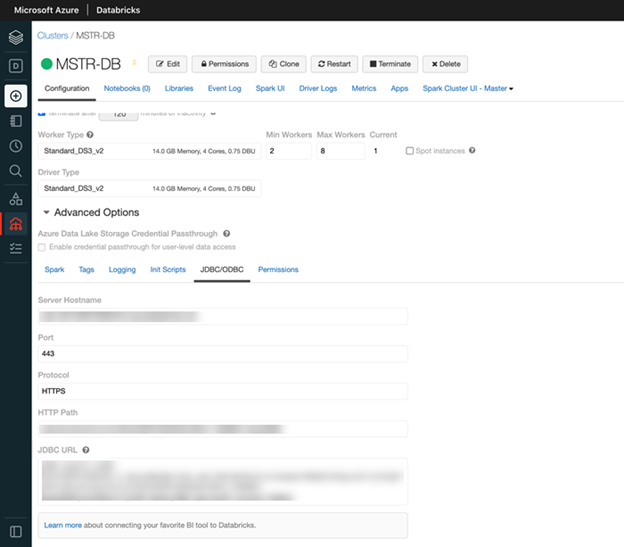
- Log in to your Databricks workspace.
- Select your cluster to go to the Clusters management page.
- Click the Advanced Options drop-down.
- Click the JDBC/ODBC tab to find the Hostname, Port, HTTP Path, and Database.
- Enter the corresponding fields in your Strategy Database Connection.
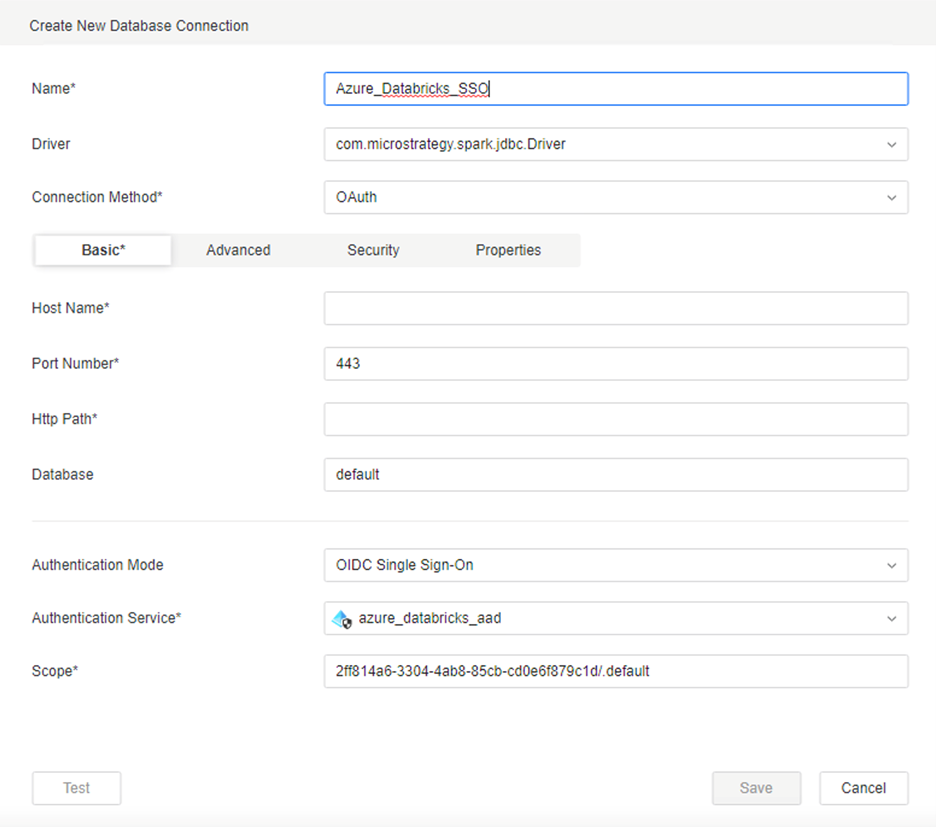
- In Workstation, select OIDC Single Sign-On from the Authentication Mode drop-down.
- Select the IAM created in Create an Enterprise Security Object.
- Click Save.
- Select the Projects to which the data source is assigned and can be accessed.
- Click Save.
Create a Databricks Data Source with OAuth
- Open the Workstation window.
- In the Navigation pane, click , next to Data Sources.
- Choose Databricks.
- Enter a Name.
- Expand the Default Database Connection drop-down and click Add New Database Connection.
- Enter a Name.
- Select OAuth from the Connection Method drop-down.
- Enter the required information:
- Log in to your Databricks workspace.
- Select your cluster to go to the Clusters management page.
- Click the Advanced Options drop-down.
- Click the JDBC/ODBC tab to find the Hostname, Port, HTTP Path, and Database.
- Enter the corresponding fields in your Strategy Database Connection.
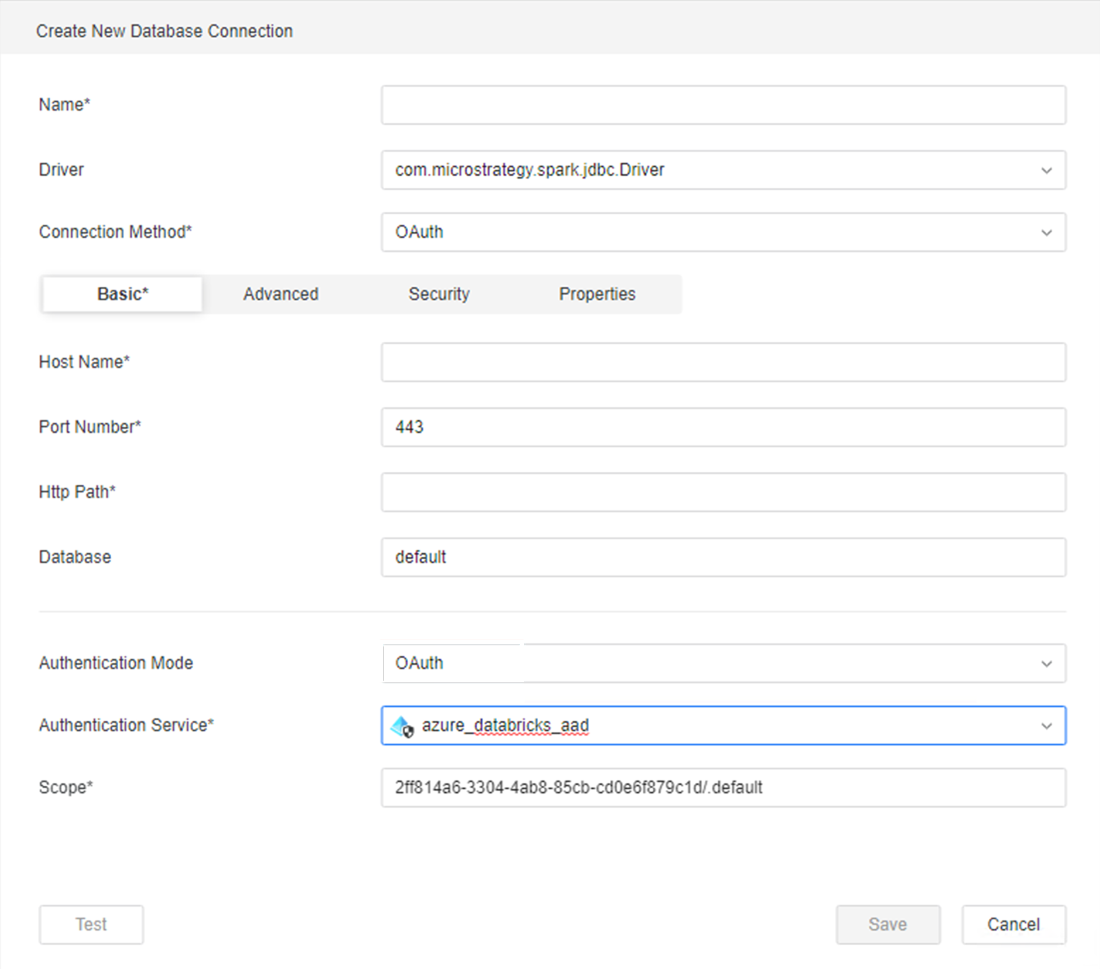
- In Workstation, select OAuth from the Authentication Mode drop-down.
- Select the IAM created in Create an Enterprise Security Object.
- Click Save.
- Select the Projects to which the data source is assigned and can be accessed.
- Click Save.
Test the OIDC Connection
Workstation
- Open the Workstation window.
-
Check that the environment is using the Default OIDC authentication mode.
- Log in to your Strategy environment.
- In the Navigation pane, click Environments.
- Right-click the environment you are using and click Edit Environment Information.
- Verify that Default OIDC is selected in Authentication Mode.
- Log in to your Strategy environment using your Entra ID username and password.
- In the Navigation pane, click , next to Datasets.
- Select Data Import Cube, then click OK.
- Select the Databricks gateway.
- Select any of the import options and click Next.
- Select the data source you created.
- The namespaces and tables display.
Library
- Open Strategy Library and click Log in with OIDC.
- In the toolbar, click and choose Dashboard.
- Click Blank Dashboard and click Create.
- Click New Data and select the Databricks gateway.
- Select any of the import options and click Next.
- Select the data source you created.
- The namespaces and tables display.
Web
- Open Strategy Web and log in using your Entra ID username and password.
- Click Create.
- Click Add External Data and select the Databricks gateway.
- Select any of the import options and click Next.
- Select the data source you created.
- The namespaces and tables display.