Strategy ONE
Using the Derived Elements Editor
While the quick groups features described in Quickly creating groups, calculations, and sorts enable you to quickly create derived elements using right-click menu options while reviewing report results, the Derived Elements Editor provides the full set of derived elements functionality when creating derived elements. The Derived Elements Editor is shown in the image below.
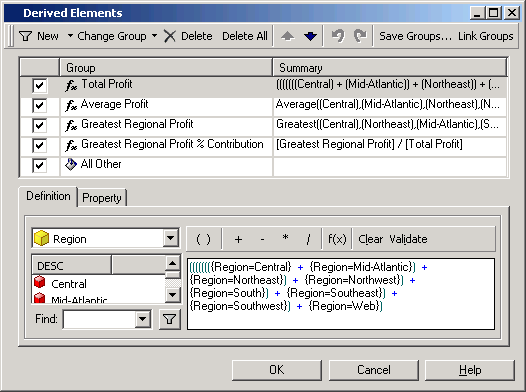
For example, if you use right-click menu options create a quick calculation on a report connected to an Intelligent Cube, the expression can only include one type of function or operand such as +, /, and Average. However, in the Derived Elements Editor, you can create expressions with a valid combination of different functions. You can create a derived element from the Derived Elements Editor with an expression of the following form:
(AttributeElement1 + AttributeElement2) / Sum(AllAttributeElements)
You can modify derived elements in the following ways using the Derived Elements Editor:
- Applying derived element values to subtotals
- Displaying derived elements or their attribute elements
- Displaying derived elements and their attribute elements simultaneously
- Formatting derived elements
- Creating and using stand-alone derived elements
- Creating Filter derived elements with Not in List and Where filter qualifications
- Creating advanced Calculation derived elements
- Deleting derived elements
Sample report
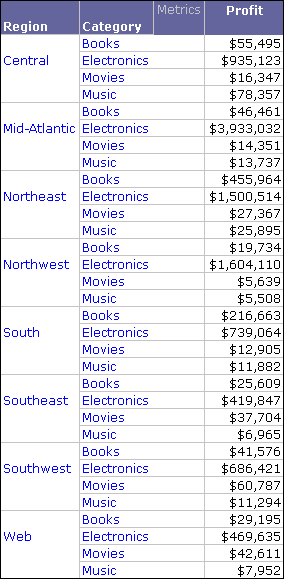
The report shown below is used in the procedures and examples that follow for creating derived elements with the Derived Elements Editor.
Accessing the Derived Elements Editor
Using the Derived Elements Editor, you can create derived elements with groups, filters, and calculations. These derived elements can be created from the Derived Elements Editor in MicroStrategy Developer and Web in the reporting objects listed below:
- A standard report.
- A report which is connected to an active Intelligent Cube. The table below lists the views you can access the Derived Elements Editor from, in MicroStrategy Developer and Web. To access the Derived Elements Editor from reports, see To access the Derived Elements Editor in reports connected to an active Intelligent Cube.
- A Grid/Graph in a Report Services document. The table below lists the modes you can access the Derived Elements Editor from, in MicroStrategy Developer and Web.
|
Report Object Type |
View/Mode |
MicroStrategy Developer/Web |
Can Access Derived Element Editor |
|
Standard report |
Grid View |
Web |
Yes |
|
Report connected to an active Intelligent Cube |
Grid View |
Developer and Web |
Yes |
|
Grid and Graph View |
Developer and Web |
Yes |
|
|
Design View |
Developer |
Yes |
|
|
Design View |
Web |
No |
|
|
Grid/Graph in a Report Services document |
Design View |
Developer |
Yes |
|
Design Mode |
Web |
No |
|
|
Interactive Mode (Grid/Graph must be displayed as a Grid or a Grid and Graph) |
Web |
Yes |
|
|
Editable Mode (Grid/Graph must be displayed as a Grid or a Grid and Graph) |
Web |
Yes |
You can also create stand-alone derived elements by accessing the Derived Elements Editor from outside reports or Grid/Graphs. Stand-alone derived elements can be used by multiple reports and Grid/Graphs. For information on using a derived element in multiple reports and accessing the Derived Elements Editor to create stand-alone derived elements, see Creating and using stand-alone derived elements.
To access the Derived Elements Editor in reports connected to an active Intelligent Cube
- In MicroStrategy Developer or Web, log in to a project that contains reports connected to active Intelligent Cubes.
- Open a report and run it. View it in either Grid View, Grid and Graph View, or Design View.
- In the grid display of the report, right-click the attribute you want to create or modify derived elements for, and click Derived Elements. The Derived Elements Editor opens.
To access the Derived Elements Editor in standard reports
- In MicroStrategy Web, log in to a project that contains the report.
- Open the report in View Mode, in either Grid View or Grid and Graph View.
- In the grid display of the report, right-click the attribute you want to create or modify derived elements for, and click Derived Elements. The Derived Elements Editor opens.
To access the Derived Elements Editor in Grid/Graphs
- In MicroStrategy Developer or Web, log in to a project that contains Grid/Graphs in Report Services documents.
- Open the document. Accessing the Derived Elements Editor depends on what mode you are viewing the document in. Follow the steps below depending on which view or mode you are using:
- Design View in MicroStrategy Developer only:
- Expand the document section that contains the Grid/Graph.
- Right-click the Grid/Graph and select Edit Grid.
- Right-click the attribute to create or modify derived elements for, and click Derived Elements. The Derived Elements Editor opens.
- Interactive Mode or Editable Mode in MicroStrategy Web only:
- In the grid display of the Grid/Graph, right-click the attribute to create or modify derived elements for, and click Derived Elements. The Derived Elements Editor opens.
Grouping attribute elements to create a derived element
When viewing a report you can combine attribute elements into a single group of aggregated data. This combined set of attribute elements is called a Group derived element. This derived element enables you to view and analyze the attribute elements' data as a single, distinct group.
For example, in a report with Region and Category attributes and a Profit metric, you can combine the regions on the report into various geographical groups. The final report you create with attribute elements grouped based on geography is shown below.

The steps below show you how to create a Group derived element on a report, as well as specific instructions to create the sample report shown above.
Prerequisites
- The report on which you create the derived element is connected to an active Intelligent Cube, or the Report Services document with a Grid/Graph included in one of the document sections, on which you create the derived element.
- You need the Define Derived Elements (Developer) and/or the Web Define Derived Elements (Web) privileges. These privileges are part of OLAP Services.
To create a Group derived element
While this procedure creates only Group derived elements, you can create any combination of Group, Filter, and Calculation derived elements on a report or Grid/Graph.
- Log in to a project in MicroStrategy Developer. For steps to use the Derived Elements Editor to create derived elements in MicroStrategy Web, see the Strategy Web Help.
- Open the report or Grid/Graph (the example scenario uses a report connected to an Intelligent Cube), as follows:
- To access the Derived Elements Editor for a report connected to an Intelligent Cube:
- Execute the report and run it in Grid View or Grid and Graph View.
- Right-click the attribute to create or modify derived elements for, and click Derived Elements. The Derived Elements Editor opens.
For the example scenario, right-click the Region attribute, and click Derived Elements.
- To access the Derived Elements Editor for a Grid/Graph in a Report Services document:
- Expand the document section that contains the Grid/Graph.
- Double-click the Grid/Graph to edit it.
-
Right-click the attribute to create or modify derived elements for, and click Derived Elements. The Derived Elements Editor opens.
For the example scenario, right-click the Region attribute, and click Derived Elements.
-
To create a new Group derived element, from the New drop-down list select Group.
Two new derived elements are created, a blank Group derived element and an All Other derived element. The All Other derived element is a collection of all attribute elements that are not included in any of the other derived elements for the attribute. For further explanation of the All Other derived element, see All Other derived element.
-
Select the new Group derived element. This displays the available attribute elements in the Definition tab.
For the example scenario, the Region attribute elements are displayed.
-
From the left pane, select attribute elements to include in the derived element, and then click the right arrow (>) to add your selections to the Selected objects pane.
For the example scenario, select the Mid-Atlantic, Northeast, and Southeast attribute elements.
-
To rename the Group derived element, from the Change Group drop-down list, select Rename Group. Type a name for the derived element.
For the example scenario, rename the group as East Coast.
- From the Property tab, you can make various modifications to the new derived element such as:
- Displaying derived elements or their attribute elements
- Applying derived element values to subtotals
- Displaying derived elements and their attribute elements simultaneously
- From the Change Group drop-down list, you can format derived element headers and values. For information on these formatting techniques, see Formatting derived elements.
- You can change the order in which the derived elements are displayed on the report using the up (
) and down (
) arrows.
- You can continue to create more derived elements, or you can click OK to close the Derived Elements Editor and return to the report. The steps below continue the example scenario.
- From the New drop-down list, select Group. A blank group is created.
- Select the new derived element. This displays the available attribute elements in the Definition tab.
- From the left pane, select the Northeast and Southeast attribute elements, and then click the right arrow (>) to add your selections to the Selected objects pane.
- From the Change Element drop-down list, select Rename Group. Type West Coast to rename the Group derived element.
- From the New drop-down list, select Group. A blank group is created.
- Select the new derived element. This displays the available attribute elements in the Definition tab.
- From the left pane, select the Central and South attribute elements, and then click the right arrow (>) to add your selections to the Selected objects pane.
- From the Change Group drop-down list, select Rename Group. Type Central and South to rename the derived element group.
- You can save your derived element for the report or Grid/Graph, or save the derived element as a stand-alone object that can be used by multiple reports and Grid/Graphs:
- To save the derived element for the report or Grid/Graph, click OK. The Derived Elements Editor closes and you are returned to the report or document.
-
To save the derived element as a stand-alone object that can be used by multiple reports and Grid/Graphs, click Save Groups. Choose a location to save the derived element to, type a name, and click Save. Click OK.
Stand-alone derived elements can only be modified by editing the stand-alone object; you cannot modify them from within reports or Grid/Graphs. For information stand-alone derived elements, see Creating and using stand-alone derived elements.
If you used the steps above to create the sample report, the report is displayed with the regions grouped into East Coast, West Coast, Central and South, and Web.
Filtering attribute elements to create a derived element
While viewing a report, you can combine attribute elements into a single group of aggregated data using filter qualifications. This group of attribute elements is called a Filter derived element. This derived element enables you to view and analyze the attribute elements' data as a single distinct group by utilizing various filter qualifications.
For example, in a report with Region and Category attributes and a Profit metric, you can filter the regions on the report into various geographical groups based on the region names. The final report you create with Filter derived elements is shown below.
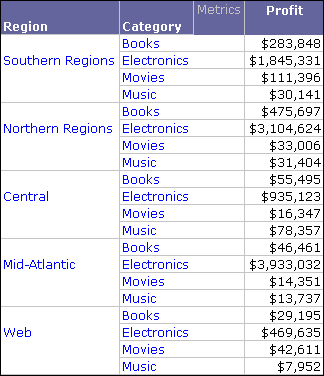
The steps below show you how to create a Filter derived element on a report, as well as specific instructions to create the report shown above.
Prerequisites
- You need the Define Derived Elements (Developer) and/or the Web Define Derived Elements (Web) privileges. These privileges are part of OLAP Services.
To create a Filter derived element
While this procedure creates only Filter derived elements, you can create any combination of Group, Filter, and Calculation derived elements on a report or Grid/Graph.
- Log in to a project in MicroStrategy Developer. For steps to use the Derived Elements Editor to create derived elements in MicroStrategy Web, see the Strategy Web Help.
- Open the report or Grid/Graph (the example scenario uses a report connected to an Intelligent Cube), as follows:
- To access the Derived Elements Editor for a report connected to an Intelligent Cube:
- Execute the report. Then view it in either Grid View or Grid and Graph View.
-
Right-click the attribute to create or modify derived elements for, and click Derived Elements. The Derived Elements Editor opens.
For the example scenario, right-click the Region attribute, and click Derived Elements.
- To access the Derived Elements Editor for a Grid/Graph in a Report Services document:
- Expand the document section that contains the Grid/Graph.
- Double-click the Grid/Graph to edit it.
-
Right-click the attribute to create or modify derived elements for, and click Derived Elements. The Derived Elements Editor opens.
For the example scenario, right-click the Region attribute, and click Derived Elements.
-
To create a new Filter derived element, from the New drop-down list, select Filter.
Two new derived elements are created, a blank Filter derived element and an All Other derived element. The All Other derived element is a collection of all attribute elements that are not included in any of the other derived elements for the attribute. For further explanation of the All Other group, see All Other derived element.
- Select the new Filter derived element.
- From the Definition tab, click Click here to start a new qualification.
-
Click Field, and then select an attribute.
For the example scenario, select Region.
- Click Operator, and then select one of the following operators to create a filter qualification (for the example scenario, select Where):
- In list: Returns attribute data for the list of attribute elements you select. Click Value, and then select the attribute elements to return data for.
- Not in List: Returns attribute data for the list of attribute elements that are not in the list of attribute elements you select. Click Value, and then select the attribute elements to exclude data for.
- Where: Returns attribute data based on a filter qualification of an attribute form. Proceed to the next step to select an attribute form and complete the filter qualification.
- For filter qualifications that use the operator Where, new Field, Operator, and Value fields appear. Follow the steps below to complete the filter qualification:
- Click Field, and then select an attribute form. For the example scenario, select DESC.
- Click Operator, and then select the operator for the filter qualification on the attribute form. For the example scenario, select Begins with.
- Click Value, and use one of the options to enter in the required value. For the example scenario, select Type a value, and then type South.
-
To rename the derived element group, from the Change Group drop-down list, and select Rename Group. Type a name for the Filter derived element.
For the example scenario, rename the derived element as Southern Regions.
- From the Property tab, you can make various modifications to the new derived element such as:
- Displaying derived elements or their attribute elements
- Applying derived element values to subtotals
- Displaying derived elements and their attribute elements simultaneously
- From the Change Group drop-down list, you can format derived element headers and values. For information on these formatting techniques, see Formatting derived elements.
- You can change the order in which the derived elements are displayed on the report using the up (
) and down (
) arrows.
- You can continue to create more derived elements, or you can click OK to close the Derived Elements Editor and return to the report. The steps below continue the example scenario.
- From the New drop-down list, select Filter. A blank Filter derived element is created.
- Select the new derived element.
- From the Definition tab, click Click here to start a new qualification.
- Click Field, and then select Region.
- Click Operator, and then select Where.
- Click Field, and then select the DESC attribute form.
- Click Operator, and then select Begins with.
- Click Value, and then select Type a value, and then type North.
- To rename the derived element group, from the Change Group drop-down list, and select Rename Group. Type Northern Regions to rename the derived element.
- You can save your derived element for the report or Grid/Graph, or save the derived element as a stand-alone object that can be used by multiple reports and Grid/Graphs:
- To save the derived element for the report or Grid/Graph, click OK.
-
To save the derived element as a stand-alone object that can be used by multiple reports and Grid/Graphs, click Save Groups. Choose a location to save the derived element to, type a name, and click Save. Click OK.
Stand-alone derived elements can only be modified by editing the stand-alone object; you cannot modify them from within reports or Grid/Graphs. For information on using derived elements, see Creating and using stand-alone derived elements.
If you used the steps above to create the sample report, the report is displayed with the regions grouped into Southern Regions and Northern Regions, along with the Central, Mid-Atlantic, and Web regions.
Using calculations to create derived elements
When viewing a report you can combine attribute elements into a single set of aggregated data using calculations. This combined set of attribute elements is called a Calculation derived element. This derived element enables you to view and analyze the attribute elements' data as a single, distinct group by utilizing various calculation functions and operators.
For example, in a report with Region and Category attributes and a Profit metric, you can combine the regions on the report into various groups for profit analysis. The final report you create with Calculation derived elements is shown below.
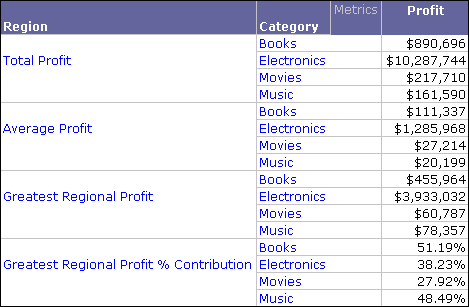
The steps below show you how to create a Calculation derived element on a report, as well as specific instructions to create the sample report shown above.
Prerequisites
- You need the Define Derived Elements (Developer) and/or the Web Define Derived Elements (Web) privileges. These privileges are part of OLAP Services.
To create a Calculation derived element
While this procedure creates only Calculation derived elements, you can create any combination of Group, Filter, and Calculation derived elements on a report or Grid/Graph.
- Log in to a project in MicroStrategy Developer. For steps to use the Derived Elements Editor to create derived elements in MicroStrategy Web, see the Strategy Web Help.
- Open the report or Grid/Graph (the example scenario uses a report connected to an Intelligent Cube), as follows:
- To access the Derived Elements Editor for a report connected to an Intelligent Cube:
- Execute the report. The view it in either Grid View or Grid and Graph View.
-
Right-click the attribute to create or modify derived elements for, and click Derived Elements. The Derived Elements Editor opens.
For the example scenario, right click the Region attribute, and click Derived Elements.
- To access the Derived Elements Editor for a Grid/Graph in a Report Services document:
- Expand the document section that contains the Grid/Graph.
- Double-click the Grid/Graph to edit it.
-
Right-click the attribute to create or modify derived elements for, and click Derived Elements. The Derived Elements Editor opens.
For the example scenario, right click the Region attribute, and click Derived Elements.
-
To create a new Calculation derived element, from the New drop-down list, select Calculation.
Two new derived elements are created, a blank Calculation derived element and an All Other derived element. The All Other derived element is a collection of all attribute elements that are not included in any of the other derived elements for the attribute. For further explanation of the All Other derived element, see All Other derived element.
-
Select the new Calculation derived element. This displays the available attribute elements in the Definition tab.
For the example scenario, the Region attribute elements are displayed.
-
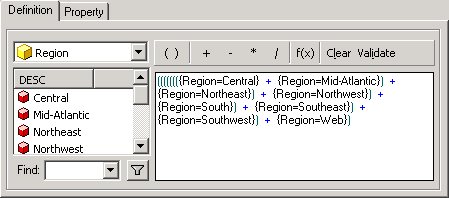
From the left pane, select attribute elements to include in the Calculation derived element, and add them to the expression area on the right (shown below). You can also use the toolbar above the expression to include operators and functions, as well as validate or clear the expression.
For the example scenario, select all the attribute elements available and drag the entire selection to the expression area. This adds all the attribute elements to the expression area, and automatically use the addition operator to combine the attribute elements, as shown below.
-
To rename the derived element, from the Change Group drop-down list, select Rename Group. Type a name for the derived element.
For the example scenario, rename the group as Total Profit.
- From the Property tab, you can make various modifications to the new derived element, such as:
- Displaying derived elements or their attribute elements
- Applying derived element values to subtotals
- Displaying derived elements and their attribute elements simultaneously
- From the Change Group drop-down list, you can format derived element headers and values. For information on these formatting techniques, see Formatting derived elements.
- You can change the order in which the derived elements are displayed on the report using the up (
) and down (
) arrows.
- You can continue to create more derived elements, or you can click OK to close the Derived Elements Editor and return to the report. The steps below continue the example scenario.
- From the New drop-down list, select Calculation. A blank Calculation derived element is created.
- Select the new derived element.
- On the Definition tab, click f(x). The Insert Function Wizard opens.
- Select the Average function, and click Next. The Arguments page opens.
- Click ... (browse) next to Argument 1, and in the Select an Object dialog box, select Central. Then click OK. Repeat this step for each successive argument, selecting the following regions:
- Mid-Atlantic
- Northeast
- Northwest
- South
- Southeast
- Southwest
- Web
- Click Finish.
- From the Change Group drop-down list, select Rename Group. Type Average Profit to rename the derived element.
- From the New drop-down list, select Calculation. A blank Calculation derived element is created.
- Select the new derived element.
- On the Definition tab, click f(x). The Insert Function Wizard opens.
- Select the Greatest function, and click Next. The Arguments page opens.
- Click ... (browse) next to Argument 1, and in the Select an Object dialog box, select Central. Then click OK. Repeat this step for each successive argument, selecting the following regions:
- Mid-Atlantic
- Northeast
- Northwest
- South
- Southeast
- Southwest
- Web
- From the Change Group drop-down list, select Rename Group. Type Greatest Regional Profit to rename the derived element.
- From the New drop-down list, select Calculation. A blank Calculation derived element is created.
- Select the new derived element.
- On the Definition tab, from the drop-down list select Groups.
- From the left pane, select Greatest Regional Profit and drag and drop it into the expression area on the right.
- Click /.
-
From the left pane, select Total Profit and drag and drop it into the expression area on the right. Your final expression should appear as shown below:

- From the Change Group drop-down list, select Rename Group. Type Greatest Regional Profit % Contribution to rename the derived element.
- You can save your derived element for the report or Grid/Graph, or save the derived element as a stand-alone object that can be used by multiple reports and Grid/Graphs:
- To save the derived element for the report or Grid/Graph, click OK. The Derived Elements Editor closes and you are returned to the report or document.
-
To save the derived element as a stand-alone object that can be used by multiple reports and Grid/Graphs, click Save Groups. Choose a location to save the derived element to, type a name, and click Save. Click OK. The Derived Elements Editor closes and you are returned to the report or document.
Stand-alone derived elements can only be modified by editing the stand-alone object; you cannot modify them from within reports or Grid/Graphs. For information on sharing derived elements, see Creating and using stand-alone derived elements.
If you used the steps above to create the sample report, the report is displayed with the regions grouped into Total Profit, Average Profit, Greatest Regional Profit, and Greatest Regional Profit % Contribution.
