MicroStrategy ONE
Displaying Attribute and Attribute Form Headers in a Grid
You can format the display of column or row headings (headers) for attributes and attribute forms in a grid. For example, you can choose to have a header containing the attribute form name automatically displayed above each attribute form shown in the grid, or have a single header automatically displayed for each attribute in the grid, with each header containing only the attribute name. The following images depict examples of each way in which you can choose to have attribute and attribute form headers displayed.
This procedure assumes that you have already created the report whose attributes and attribute form headers you want to display.
The Show Attribute Form Names option in the Grid Display preferences in Web must be set to Read from Report. For steps to modify user preferences in Web, see the MicroStrategy Web Help.
To Display Attribute and Attribute Headers in a Grid
- In MicroStrategy Web, click the name of the report to run it.
- Choose Tools > Report Options.
- On the General tab, from the Show attribute form names drop-down list, select one of the following:
- Select Off (default) to have the attribute name automatically displayed in the header of each attribute in the grid. No attribute form names are included in the grid. For example:
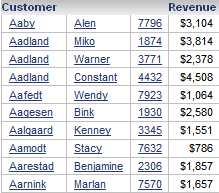
The grid above contains the Customer attribute, for which the Last Name, First Name, and ID attribute forms are each shown in a separate column. In this example, the designer of the grid has chosen to have the attribute name automatically displayed in the header of each attribute in the grid, so the header for the Customer attribute is displayed as Customer.
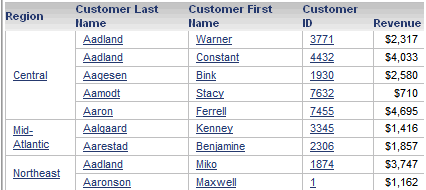
- Select On to have a header automatically displayed for each attribute form in the grid, with each header consisting of the attribute name followed by the attribute form name. For example:
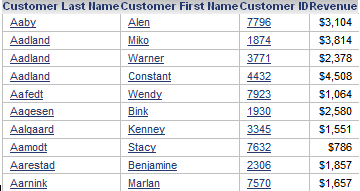
In the image above, the headers for the Last Name, First Name, and ID attribute forms are displayed as Customer Last Name, Customer First Name, and Customer ID, respectively.
- Select Form name only to have a header automatically displayed for each attribute form in the grid, with each header consisting of only the attribute form name. For example:
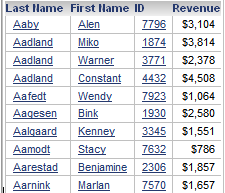
In the image above, the headers for the Last Name, First Name, and ID attribute forms appear as Last Name, First Name, and ID, respectively.
- Select Show attribute name once to have a header automatically appear for each attribute form in the grid and have the attribute name included only in the header for the first attribute form for each attribute. The remaining attribute forms are displayed using the attribute form name only. For example:
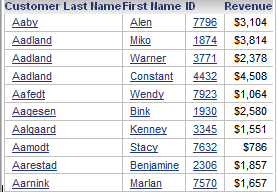
In the image above, the Last Name attribute form is the first attribute form displayed for the Customer attribute, and its header is therefore displayed as Customer Last Name. The remaining attribute forms are displayed using the attribute form name only: First Name and ID, respectively
- Select Automatic to automatically display either headers for each attribute or each attribute form depending on the number of attribute forms visible in the grid for each attribute. If only one attribute form is shown in the grid for an attribute, the attribute is displayed with a header containing the attribute's name. If more than one of the attribute's forms are visible in the grid, each attribute form is displayed with a header containing the attribute name followed by the attribute form name. For example:
In the image above, both the Region and Customer attributes have been added to the grid. Because the Region attribute is displayed using a single attribute form, it is displayed with a header containing the attribute name, Region. On the other hand, three attribute forms are displayed for the Customer attribute, so a header is displayed for each attribute form: Customer Last Name, Customer First Name, and Customer ID, respectively.
- Click OK.