Strategy One
Configure Caches in a Cluster
You can configure caches in one of two ways:
- Local caching: Each node hosts its own cache file directory and Intelligent Cube directory. These directories need to be shared so that other nodes can access them. For more information, see Synchronizing Cached Information Across Nodes in a Cluster.
- Centralized caching: All nodes have the cache file directory and Intelligent Cube directory set to the same network locations. For more information, see Synchronizing Cached Information Across Nodes in a Cluster. Strategy recommends this method since it’s simpler in both configuration and maintenance.
Configure Caches in a Cluster on Windows
Use one of the procedures below to share cache files among the nodes in your cluster. For a detailed explanation of the two methods of cache sharing, see Synchronizing Cached Information Across Nodes in a Cluster.
Configure Cache Sharing Using Multiple Local Cache Files
- Open the Project Configuration Editor for the project.
- Select Caching > Result Caches > Storage.
-
In the Cache file directory box, type:
Copy.\Caches\ServerDefinitionwhere
ServerDefinitionis the name of the server definition.This tells the other clustered nodes to search for caches in the following path on all machines in the cluster:
<Intelligence Server Application Folder>\Caches\ServerDefinition - Click OK.
-
On each machine in the cluster, open Windows Explorer and navigate to the cache file folder. The default location is:
C:\Program Files (x86)\MicroStrategy\Intelligence Server\Caches\ServerDefinitionwhere
ServerDefinitionis the name of the server definition. -
Right-click the cache file folder, and select Sharing.
-
On the Sharing tab, select the Shared as option. In Share Name, delete the existing text and enter
ClusterCaches.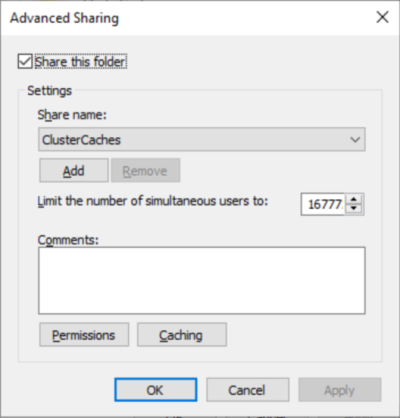
- Click OK.
- Select Intelligent Cubes > General.
-
In Intelligent Cube File directory, enter:
Copy.\Cube\ServerDefinitionWhere
ServerDefinitionis the name of the server definition.This tells the other clustered nodes to search for caches in the following path on all machines in the cluster:
<Intelligence Server Application Folder>\Cube\ServerDefinition - Click OK.
-
On each machine in the cluster, open Windows Explorer and navigate to the cache file folder. The default location is:
C:\Program Files (x86)\MicroStrategy\Intelligence Server\Cube\ServerDefinitionwhere
ServerDefinitionis the name of the server definition. -
Right-click the cache file folder and select Sharing.
-
Select the Shared as option and in Share name, delete the existing text and enter
ClusterCube.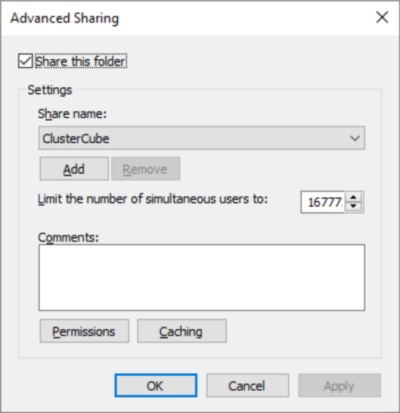
-
Click OK.
-
Restart the server. If the other cluster servers are running during the configuration, restart them as well.
Configure Cache Sharing Using a Centralized Cache File
- Open the Project Configuration Editor for the project.
- Select Caching > Result Caches > Storage.
-
In Cache file directory, enter:
Copy\\<Machine Name>\<Shared Folder Name>\Cachesor
Copy\\<IP Address>\<Shared Folder Name>\CachesFor example,
\\My_File_Server\My_Cache_Directory\Caches. - Click OK.
- Select Intelligent Cubes > General.
-
In Intelligent Cube File directory, enter:
Copy\\<Machine Name>\<Shared Folder Name>\Cubeor
Copy\\<IP Address>\<Shared Folder Name>\CubeFor example,
\\My_File_Server\My_Cache_Directory\Cube. -
On the machine that is storing the centralized cache, create the file folder that will be used as the shared folder. The file folder name must be identical to the name you specified earlier in Cache file directory. This is shown as the
Shared Folder Nameabove. -
Restart the server. If the other cluster servers are running during the configuration, restart them as well.
Make sure this cache directory is writable to the network account under which Intelligence server is running. Each Intelligence server creates its own subdirectory.
Configure History List Sharing Using Multiple Local Cache Files
If you are using a file-based history list, you can set up history lists to use multiple local disk backups on each node in the cluster, using a procedure similar to the procedure above, Configure Cache Sharing Using Multiple Local Cache Files. The history list messages are stored in the History folder. To locate this folder, in the Intelligence Server Configuration Editor, expand History settings and select General.
The History List location is .\Inbox\ServerDefinition, where Server Definition is the name of the folder containing the history lists. This folder must be shared with the share name "ClusterInBox" because this is the share name used by Intelligence server to look for history lists on other nodes.
Configure Caches in a Cluster on Linux
To configure a cluster of Intelligence servers in a Linux environment, all servers must have access to each others' caches and inbox (history list) files. Both cache and history list files are referred to generally as cache files throughout this section. An Intelligence server looks for cache files from other nodes in the cluster by machine name. For an explanation and diagrams of general cache synchronization setup, see Synchronizing Cached Information Across Nodes in a Cluster.
The cache and Inbox folders must be named as follows:
/<machine_name>/ClusterCaches
/<machine_name>/ClusterInBox
For example, a two-node cluster with Intelligence servers is running on UNIX1 and UNIX2 machines. Intelligence server running on UNIX1 looks for caches of the other Intelligence server only on /UNIX2/ClusterCaches.
The procedures below demonstrates how to configure the caches on two servers, named UNIX1 and UNIX2. Use these steps as a guideline for configuring your own system.
You can choose to use either procedure below, depending on whether you want to use centralized or local caching. For a detailed description and diagrams of cache synchronization setup, see Synchronizing Cached Information Across Nodes in a Cluster.
Configure a Cluster with Multiple Local Cache Files
This procedure makes the following assumptions:
- The Linux machines are called UNIX1 and UNIX2. Note that UNIX1 and UNIX2 are the hostnames, not the IP address.
- Intelligence server is installed in
MSTR_HOME_PATHon each machine.
Set Up the UNIX1 Machine
Mount the folders from UNIX2 on UNIX1.
mkdir /UNIX2
mount UNIX2:/<MSTR_HOME_PATH>/IntelligenceServer  /UNIX2
Set Up the UNIX2 Machine
Mount the folders from UNIX1 on UNIX2.
mkdir /UNIX1
mount UNIX1:/<MSTR_HOME_PATH>/IntelligenceServer  /UNIX1
Configure the Server Definition and Project
- Start Intelligence server on UNIX1.
- In Developer, create project sources pointing to UNIX1.
- Connect to UNIX1 using Developer.
- Right-click the project source of UNIX1 and select Configure Server.
- Select History Settings and General.
-
Set the path to
./ClusterInBoxand click OK. - Right-click the project name and select Project Configuration.
- Select Caching > Result Caches > Storage.
- Set the path for the cache file directory to
./ClusterCaches. - Select Intelligent Cubes > General > Intelligent Cube File directory.
- Set the path for the cube cache file directory to
./ClusterCube. - Disconnect from the project source and restart both Intelligence servers.
Configure a Cluster with a Centralized Cache
This procedure assumes that the Linux machines are called UNIX1 and UNIX2.
Create the Cache Folder on the Shared Device
-
Create the folders for caches on the shared device called UNIX3 as described in Prerequisites for Clustering Intelligence Servers
Copymkdir /sandbox -
On UNIX1, mount the folders from the shared device on UNIX1.
Copymkdir /sandbox
mount UNIX3:/sandbox /sandbox -
On UNIX2, mount the folders from the shared device on UNIX2.
Copymkdir /sandbox
mount UNIX3:/sandbox /sandbox
Configure the Server Definition and Project
- Start Intelligence server on UNIX1.
- In Developer, create project sources pointing to UNIX1.
- Connect to UNIX1 using Developer.
- Right-click the project source of UNIX1 and select Configure Server.
- Select History Settings and General.
-
Set the path using the following convention:
//<SharedLocation>/<InboxFolder>In this example, set it as
//sandbox/Inbox. - Right-click the project name and select Project Configuration.
- Select Caching > Result Caches > Storage.
-
Following the convention,
//<SharedLocation>/<CacheFolder>, set the path to//sandbox/Caches.For caches stored on Linux machines using Samba, set the path to
\\<machine name>\<shared folder name>. -
Select Intelligent Cubes > General > Intelligent Cube File directory.
-
Following the convention,
//<SharedLocation>/<CubeFolder>, set the path to//sandbox/Cube.For caches stored on Linux machines using Samba, set the path to
\\<machine name>\<shared folder name>. - Disconnect from the project source and restart both Intelligence servers.
Configure History Lists in a Clustered Environment
Strategy recommends that you enable user affinity clustering to reduce history list resource usage. User affinity clustering causes Intelligence server to connect all sessions for a user to the same node of the cluster. For background information about user affinity clustering, see Synchronizing Cached Information Across Nodes in a Cluster.
If you are not using user affinity clustering, Strategy recommends that you set the cache backup frequency to 0 (zero) to ensure that history list messages are synchronized correctly between nodes. For more information about this setting, see Configuring Result Cache Settings.
Configure the History List Governing Settings for a Clustered Environment
- In Developer, log in to a project source. You must log in as a user that has administrative privileges.
- From the Administration menu, go to Server > Configure MicroStrategy Intelligence Server.
- Expand the Server Definition category and select Advanced.
- Do one of the following:
- To enable user affinity clustering, select the User Affinity Cluster check box.
- OR, if you do not want to enable user affinity clustering, in the Backup frequency (minutes) field, type 0 (zero).
- Click OK.
- Restart the Intelligence server.