Strategy ONE
Passing filters and selectors in dashboards
Starting in MicroStrategy ONE (June 2024), you can create a URL API for passing filter and selector values. Follow the topics below to get started.
Prerequisites
To get started you must download files to help generate the URL and verify Node.js is installed.
-
Download and extract URLHelper.zip. It contains the following files:
-
main.jsGenerates the selector key -
encode.jsEncodes the JSON in sample.json file -
sample.jsonThe JSON file to be encoded.
-
-
Open a terminal and navigate to the
URLHelperfolder. If you are using Windows, you can use PowerShell instead.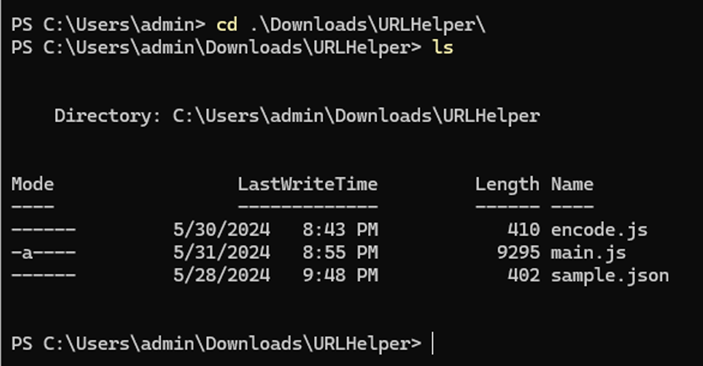
-
Check to see if
Node.jsis installed on your machine by running the following command:Copynode -v -
If the version number appears, this means
Node.jsis installed on your machine. Otherwise, download Node.js.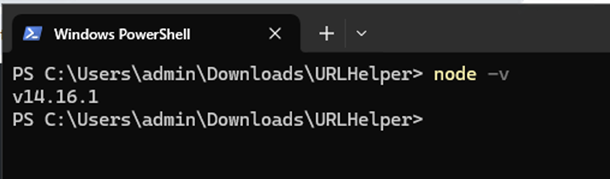
Generate the Filter or Selector Key
To construct the URL API, you must get the filter/selector key first.
-
Have the following parameters ready for executing
main.js:-
dossierURLThe URL of the dashboard (formerly known as a dossier), should include thepageKeypath. -
loginModeThe login mode for the environment. Use1for standard mode,16for LDAP mode. -
usernameThe username for the login. -
passwordThe password for the login. -
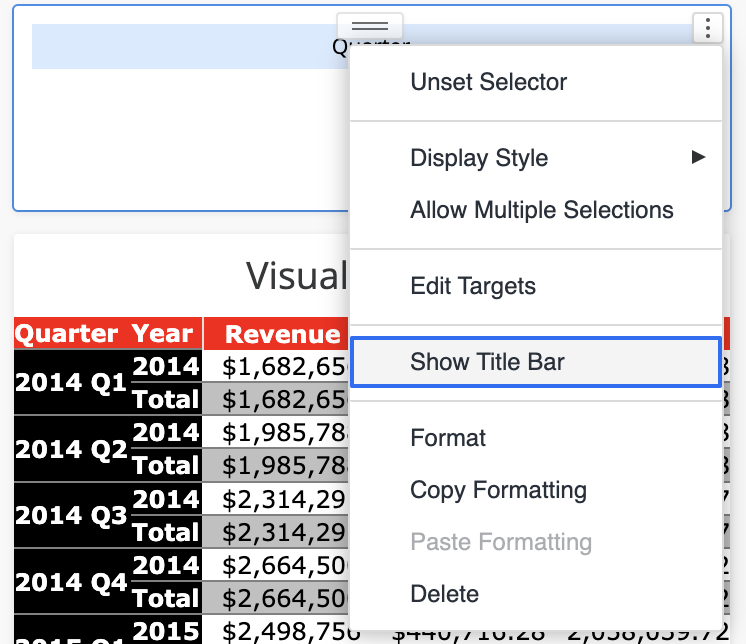
selectorNameThe selector/filter name for getting the corresponding key. TheselectorNameis the same as the selector title in your dashboard.Click here for steps on obtaining theselectorName.In this selector, the
selectorNameis Selector 1.
If the selector name is hidden, right-click the selector and choose Show Title Bar.
-
-
In the terminal, under the
URLHelperfolder path, execute the following command:Copynode main.js <dossierURL> <loginMode> <username> <password> <selectorName>MicroStrategy recommends wrapping the
url,username,password, andselectorNamein double quotes as shown in the example below. This prevents issues if the selector name contains special characters.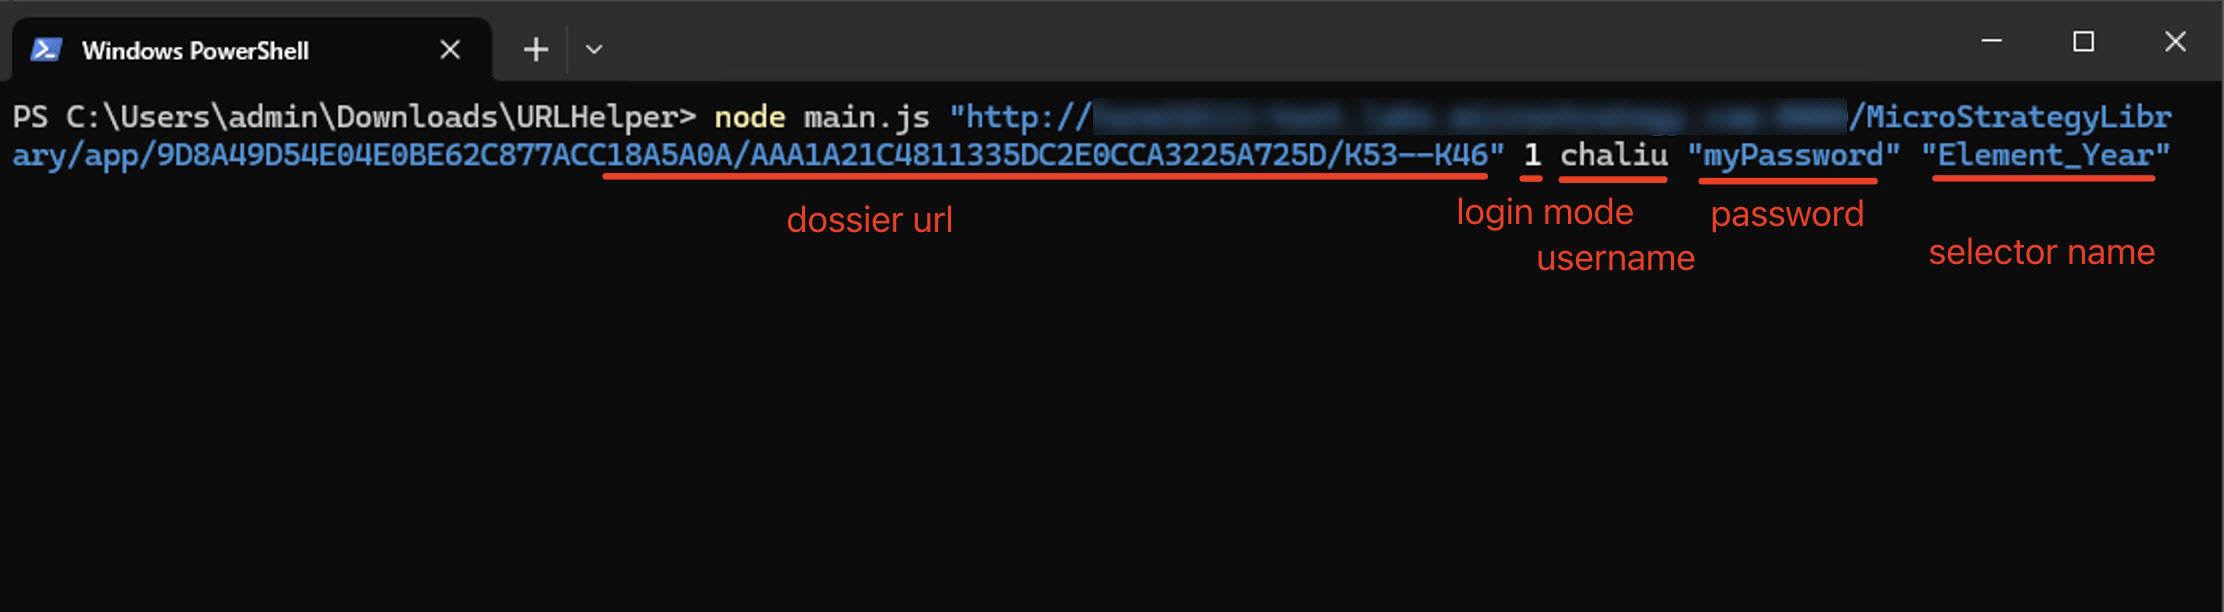
If the password is empty, use the
__EMPTY__placeholder.
Get the Filter or Selector Key
-
If the arguments in your script are correct, the corresponding filter or selector key appears after
Filter/Selector key for <selectorName>:. Take note of the key, as well as any element names and their corresponding IDs. In this the example below,W6ECB225F6E014F0EB768F4988564C6B4is the key,h1;8D679D3711d3E4981000E787EC6DE8A4is the element ID, andCategoryis the element name.
-
In some cases, there may be a filter and selector with the same name. Take note of the key to use later.

-
If no selector is found based on the
selectorNameyou provided, the script displays all the selector/filter information for the page. Take note of the key you want to use.
Build the JSON
You must build a JSON data structure that indicates the state of the filter or selector you want to apply. There are different JSON templates for different filter or selector types, so you must choose the appropriate one.
Element List Filters/Selectors or Element List Parameters
-
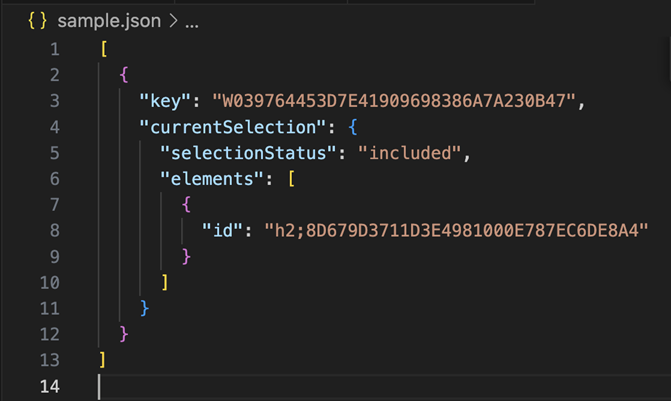
Get started by using the following JSON template for element list filters and selectors or element list parameters.
-
key -
currentSelection.selectionStatus -
currentSelection.allSelected -
currentSelection.hideSelectedElements -
currentSelection.elements[i].name -
currentSelection.elements[i].id -
Enter the
keyvalue to specify the selector or filter you want to apply. This is the key you obtained in Get the Filter or Selector Key. This field is required. -
Specify the selector status in
currentSelection.selectionStatus. This field is optional and the default value isincluded. Available values areincluded,excluded, andunfiltered. -
To select or clear all elements, use a Boolean value of
trueincurrentSelection.allSelected. This field is optional and the default value isfalse. -
Distinguish between the Select All and Clear All status using
currentSelection.hideSelectedElements. Set this value totrueto clear all elements, whileallSelectedis also set totrue. This field is optional and the default value isfalse. -
Indicate which elements are selected using
currentSelection.elements[i].id.elements[i]indicates which element should be selected, whileidindicates the element's ID. This field is required. However, if you want to Select All/Clear All/Unset the filter/selector, theelementsfield is optional. Use the element IDs that you retrieved in Get the Filter or Selector Key.The screen below contains examples of the following element IDs:
h2;8D679D4211D3E4981000E787EC6DE8A4,h3;8D679D4211D3E4981000E787EC6DE8A4,h4;8D679D4211D3E4981000E787EC6DE8A4,h5;8D679D4211D3E4981000E787EC6DE8A4.
The examples below show the different statuses you can use with the
idfield.Copy// Include "Books" and "Music" elements
{
"key": "W6ECB225F6E014F0EB768F4988564C6B4",
"currentSelection": {
"elements": [
{
"id": "h2;8D679D4211D3E4981000E787EC6DE8A4",
},
{
"id": "h3;8D679D4211D3E4981000E787EC6DE8A4",
}
]
}
}
// Exclude "Books" elements
{
"key": "W6ECB225F6E014F0EB768F4988564C6B4",
"currentSelection": {
"selectionStatus": "excluded"
"elements": [
{
"id": "h2;8D679D4211D3E4981000E787EC6DE8A4",
},
]
}
}
// Select All elements
{
"key": "W6ECB225F6E014F0EB768F4988564C6B4",
"currentSelection": {
"allSelected": true,
}
}
// Clear All elements
{
"key": "W6ECB225F6E014F0EB768F4988564C6B4",
"currentSelection": {
"allSelected": true,
"hideSelectedElements": true,
}
}
// Using name field pass the elements
{
"key": "W6ECB225F6E014F0EB768F4988564C6B4",
"currentSelection": {
"elements": [
{
"name": "Books",
},
{
"name": "Music",
}
]
}
} -
You can also pass the selected elements using the element name, instead of the element ID. This process is simpler, but has a few limitations. Use the following JSON template.
Copy{
"key": String,
"currentSelection": {
"selectionStatus": Enum("included", "excluded", "unfiltered""), // Optional, default value: "included"
"allSelected": Boolean, // Optional, default value: false
"hideSelectedElements": Boolean, // Optional, default value: false
"elements": [ // Arrary
{
"name": "String", // Optional
},
{
"name": "String", // Optional
}
]
}
}Example:
Copy{
"key": "W6ECB225F6E014F0EB768F4988564C6B4",
"currentSelection": {
"elements": [
{
"name": "Books",
},
{
"name": "Music",
}
]
}
} -
Report parameters do not support the passing of the name field.
-
The dynamic link and element cannot include special characters.
{
    "key": String,
    "currentSelection": {
      "selectionStatus": "included", // Optional, default value: "included"
      "allSelected": true, // Optional, default value: false
      "hideSelectedElements": false, // Optional, default value: false
      "elements": [
        {
          "name": "String", // Optional
          "id": "String"
        }
      ]
    }
}
The template contains the following fields:
Metric Filters/Selectors
-
Get started by using the following JSON template for metric filters/selectors.
Copy{
"key": "W81E086AB3DA843A998AADD489D4070FC",
"currentSelection": {
"expression": {Expression Object}
}
}The template contains the following fields:
-
key -
currentSelection.expression
-
-
Enter the
keyvalue to specify the selector or filter you want to apply. This is the key you obtained in Get the Filter or Selector Key. This field is required. -
Specify the metric filter/selector expression information in
currentSelection.expression. It includes the following fields:-
operatorThe operator’s name. -
operandsThe operand object array.
The operator and operand structures vary between different display styles and whether you use the following:
Qualify on Value
There are 12 operators for Qualify on Value:
-
'Equals' -
'Does not equal' -
'Greater than' -
'Greater than or equal to' -
'Less than' -
'Less than or equal to' -
'Between' -
'Not between' -
'In' -
'
Not In' -
'Is Null' -
'Is Not Null'
The corresponding
operatorString is:-
Equal -
NotEqual -
Greater -
Less -
GreaterEqual -
LessEqual -
Between -
NotBetween -
In -
NotIn -
IsNull -
IsNotNull
There are four categories of operands, based on the number of metric nodes. Here we introduce the structure for each class.
non-operands
'IsNull','IsNotNull'The operands must include only one object, which represents the metric information.
-
typeMust bemetric(required) -
idThe metric ID (required) -
nameThe metric name (required)
The expression object should appear similar to the example below.
Copy"expression": {
"operator": "IsNotNull",
"operands": [
{
"type": "metric",
"id": "4C051DB611D3E877C000B3B2D86C964F",
"name": "Profit"
}
]
}one-operand
'Equals','NotEqual','Greater','GreaterEqual','Less','LessEqual'The
operandsmust include only two objects.The first object represents the metric information.
-
typeMust bemetric(required) -
idThe metric ID (required) -
nameThe metric name (required)
The second object represents the metric value.
-
typeMust beconstant(required) -
dataTypeMust beReal(required) -
valueThe metric value (required)
The expression object should appear similar to the example below.
Copy"expression": {
"operator": "Greater",
"operands": [
{
"type": "metric",
"id": "4C051DB611D3E877C000B3B2D86C964F",
"name": "Profit"
},
{
"type": "constant",
"dataType": "Real",
"value": "100"
}
]
}two-operands
'Between','NotBetween'The
operandsmust include only three objects.The first object represents the metric information.
-
typeMust bemetric(required) -
idThe metric ID (required) -
nameThe metric name (required)
The second object represents the metric value.
-
typeMust beconstant(required) -
dataTypeMust beReal(required) -
valueThe between/not between beginning metric value (required)
The third object represents the other metric value.
-
typeMust beconstant(required) -
dataTypeMust beReal(required) -
valueThe between/not between ending metric value (required)
The expression object should appear similar to the example below.
Copy"expression": {
"operator": "Between",
"operands": [
{
"type": "metric",
"id": "4C051DB611D3E877C000B3B2D86C964F",
"name": "Profit"
},
{
"type": "constant",
"dataType": "Real",
"value": "100"
},
{
"type": "constant",
"dataType": "Real",
"value": "200"
}
]
}multiple-operands
'In','NotIn'The
operandsmust include only two objects.The first object represents the metric information.
-
typeMust bemetric(required) -
idThe metric ID (required) -
nameThe metric name (required)
The second object represents the metric value.
-
typeMust beconstant(required) -
dataTypeMust beReal(required) -
valuesThe value array for the In/NotIn operator (required)
The expression object should appear similar to the example below.
Copy"expression": {
"operator": "In",
"operands": [
{
"type": "metric",
"id": "4C051DB611D3E877C000B3B2D86C964F",
"name": "Profit"
},
{
"type": "constants",
"dataType": "Real",
"values": [
"100",
"200",
"300"
]
}
]
}Qualify on Rank
There are four operators for Qualify on Rank:
-
Highest -
Lowest -
Highest % -
Lowest %
The corresponding operator
Stringis:-
Rank.Top -
Rank.Bottom -
Percent.Top -
Percent.Bottom
The
operandsshould contain only two objects.The first object represents the metric info:
-
typeMust be metric (required) -
idThe metric ID (required) -
nameThe metric name (required)
The second object represents the metric value:
-
typeMust beconstant(required) -
dataTypeMust beReal(required) -
valueThe metric value (required)
The expression object should appear similar to the example below. Construct the JSON according to the metric type and operator.
Copy"expression": {
"operator": "Rank.Top",
"operands": [
{
"type": "metric",
"id": "4C05177011D3E877C000B3B2D86C964F",
"name": "Revenue"
},
{
"type": "constant",
"dataType": "Real",
"value": "8"
}
]
} -
Check out multiple examples of the different types of metric filters below.
// Equals 30000
{
"key": "W4F95921F59514B5AA17E0870BBF20A26",
"currentSelection": {
"selectionStatus": "included",
"expression": {
"operator": "Equals",
"operands": [
{
"type": "metric",
"id": "4C051DB611D3E877C000B3B2D86C964F",
"name": "Profit"
},
{
"type": "constant",
"dataType": "Real",
"value": "30000"
}
]
}
}
}
// Between 30000 to 40000
{
"key": "W4F95921F59514B5AA17E0870BBF20A26",
"currentSelection": {
"selectionStatus": "included",
"expression": {
"operator": "Between",
"operands": [
{
"type": "metric",
"id": "4C051DB611D3E877C000B3B2D86C964F",
"name": "Profit"
},
{
"type": "constant",
"dataType": "Real",
"value": "30000"
},
{
"type": "constant",
"dataType": "Real",
"value": "40000"
}
]
}
}
},
// In 30000;40000;50000
{
"key": "W4F95921F59514B5AA17E0870BBF20A26",
"currentSelection": {
"selectionStatus": "included",
"expression": {
"operator": "In",
"operands": [
{
"type": "metric",
"id": "4C051DB611D3E877C000B3B2D86C964F",
"name": "Profit"
},
{
"type": "constants",
"dataType": "Real",
"values": [
"30000",
"40000",
"50000"
]
}
]
}
}
}
// Is NOT Null
{
"key": "W4F95921F59514B5AA17E0870BBF20A26",
"currentSelection": {
"selectionStatus": "included",
"expression": {
  "operator": "IsNotNull",
  "operands": [
    {
      "type": "metric",
      "id": "4C051DB611D3E877C000B3B2D86C964F",
      "name": "Profit"
    }
  ]
}
}
},
// Highest 5
{
"key": "WF619A8EB4DDB43F789114A38AB1BC66A",
"currentSelection": {
"selectionStatus": "included",
"expression": {
"operator": "Rank.Top",
"operands": [
{
"type": "metric",
"id": "4C05177011D3E877C000B3B2D86C964F",
"name": "Revenue"
},
{
"type": "constant",
"dataType": "Real",
"value": "5"
}
]
}
}
}
// Lowest% 30
{
"key": "WF619A8EB4DDB43F789114A38AB1BC66A",
"currentSelection": {
"selectionStatus": "included",
"expression": {
"operator": "Percent.Bottom",
"operands": [
{
"type": "metric",
"id": "4C05177011D3E877C000B3B2D86C964F",
"name": "Revenue"
},
{
"type": "constant",
"dataType": "Real",
"value": "0.3"
}
]
}
}
}Value Parameter Filters/Selectors
-
Get started by using the following JSON template for value parameter filters/selectors.
-
key -
currentSelection.selectionStatus -
currentSelection.values -
Enter the
keyvalue to specify the selector or filter you want to apply. This is the key you obtained in Get the Filter or Selector Key. This field is required. -
Specify the selector status in
currentSelection.selectionStatus. This field is optional and the default value isincluded. Available values areincluded, orunfiltered(unset to default status). -
To specify the parameter value, use
currentSelection.values. Place the parameter value invalues, surrounding the parameter value with brackets [ ] as shown in the examples below. This field is required.
{
  "key": String,
  "currentSelection": {
    "selectionStatus": Enum("included", "unfiltered""), // Optional, default value: "included"
    "values": [] // Required, the parameter value
  }
}
The template contains the following fields:
Check out multiple examples of the different types of value parameters below.
// Number Value Parameter, Cost is 123
{
  "key": "W01485906486E4F67929B2F74E0A309C6",
  "currentSelection": {
    "selectionStatus": "included",
    "values": ["123"]
  }
}

// Text Value Parameter, Profit is abc
{
  "key": "W01485906486E4F67929B2F74E0A309C6",
  "currentSelection": {
    "selectionStatus": "included",
    "values": ["abc"]
  }
}

// Date/Time Value Parameter, dayTime is 5/6/2024 12:00:00 AM
{
  "key": "W01485906486E4F67929B2F74E0A309C6",
  "currentSelection": {
    "selectionStatus": "included",
    "values": ["5/6/2024 12:00:00 AM"]
  }
}

// Unset Value Parameter
{
  "key": "W01485906486E4F67929B2F74E0A309C6",
  "currentSelection": {
    "selectionStatus": "unfiltered",
    "values": []
  }
}
Generate the URL
Let's generate the filter URL API. This URL consists of the Specific_Dossier_Page_URL and Filter_Parameter.
-
Get the
Specific_Dossier_Page_URLfrom the address bar of your browser.
This URL contains the project ID, dashboard, ID, and page key.
Copyhttp://localhost:8181/MicroStrategyLibrary/app/50DBC23A45219CFBFAD623A01E53EC74/96299F0C11E8E6A5CA620080EFF57FA7/K53--K46 -
Next let's generate the
Filter_Parameter. Copy the JSON you previously created for your selector/filter in Build the JSON. Remember that in Prerequisites,encode.jswas provided to encode your JSON. -
Copy your JSON into
sample.json. This file was provided in Prerequisites.You must use brackets [ ] to wrap the JSON data. Your data should be an array object since it is allowed to pass multiple selectors together.
-
Use the terminal to navigate to the
URLHelperfolder and execute the code shown below.Copynode encode.jsIf the JSON format is correct, the encoded JSON is output to the terminal as shown below.

-
Get the encoded URL parameters.
Copy%5B%7B%22key%22%3A%22W039764453D7E41909698386A7A230B47%22%2C%22currentSelection%22%3A%7B%22selectionStatus%22%3A%22included%22%2C%22elements%22%3A%5B%7B%22id%22%3A%22h2%3B8D679D3711D3E4981000E787EC6DE8A4%22%7D%5D%7D%7D%5D -
Append
?filters=in front of the encoded URL parameters. This is yourFilter_Parameter.Copy?filters=%5B%7B%22key%22%3A%22W039764453D7E41909698386A7A230B47%22%2C%22currentSelection%22%3A%7B%22selectionStatus%22%3A%22included%22%2C%22elements%22%3A%5B%7B%22id%22%3A%22h2%3B8D679D3711D3E4981000E787EC6DE8A4%22%7D%5D%7D%7D%5D -
Combine the
Specific_Dossier_Page_URLandFilter_Parameter. This gives you the final URL used to pass filter/selector information to a specific dashboard page.Copyhttp://localhost:8181/MicroStrategyLibrary/app/50DBC23A45219CFBFAD623A01E53EC74/96299F0C11E8E6A5CA620080EFF57FA7/K53--K46?filters=%5B%7B%22key%22%3A%22W039764453D7E41909698386A7A230B47%22%2C%22currentSelection%22%3A%7B%22selectionStatus%22%3A%22included%22%2C%22elements%22%3A%5B%7B%22id%22%3A%22h2%3B8D679D3711D3E4981000E787EC6DE8A4%22%7D%5D%7D%7D%5D
Generate a Dynamic Link
You can generate a dynamic link using the above static filter/selector URL API you created in Generate the URL You can only generate dynamic links for element list filters/selectors and element list parameters.
Example Workflow
-
The source dashboard is shown below. In this example, you want to be able to click a Category cell and then pass the Year and Category information to the target dashboard's selector.
Source Dashboard:
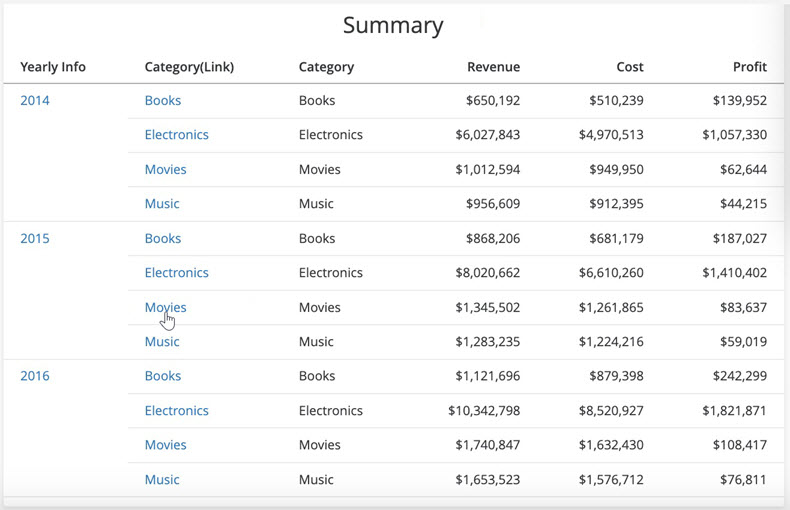
Target Dashboard:

-
The JSON format for the URL to pass the Category and Year selectors is shown below.
Copy[
{
"key": "W75",
"currentSelection": {
"selectionStatus": "included",
"elements": [
{
"id": "h2;8D679D3711D3E4981000E787EC6DE8A4",
}
]
}
},
{
"key": "W73",
"currentSelection": {
"selectionStatus": "included",
"elements": [
{
"id": "h2014;8D679D5111D3E4981000E787EC6DE8A4",
}
]
}
}
]The long-term ID,
h2;8D679D4211D3E4981000E787EC6DE8A4("id": "h2014;8D679D5111D3E4981000E787EC6DE8A4") is the actual value for theidfield. Notice that the value of the long-term ID after the'h'char is the only difference between elements.The encoded JSON is:
Copy%5B%7B%22key%22%3A%22W75%22%2C%22currentSelection%22%3A%7B%22selectionStatus%22%3A%22included%22%2C%22elements%22%3A%5B%7B%22id%22%3A%22h2%3B8D679D3711D3E4981000E787EC6DE8A4%22%7D%5D%7D%7D%2C%7B%22key%22%3A%22W73%22%2C%22currentSelection%22%3A%7B%22selectionStatus%22%3A%22included%22%2C%22elements%22%3A%5B%7B%22id%22%3A%22h2014%3B8D679D5111D3E4981000E787EC6DE8A4%22%7D%5D%7D%7D%5DThis means the entire static URL for the target dashboard looks like this.
Copyhttp://localhost:8181/MicroStrategyLibrary/app/9D8A49D54E04E0BE62C877ACC18A5A0A/666E6EF9ED463F9D24C03E97A94E10BA/K53--K46?filters=%5B%7B%22key%22%3A%22W75%22%2C%22currentSelection%22%3A%7B%22selectionStatus%22%3A%22included%22%2C%22elements%22%3A%5B%7B%22id%22%3A%22h2%3B8D679D3711D3E4981000E787EC6DE8A4%22%7D%5D%7D%7D%2C%7B%22key%22%3A%22W73%22%2C%22currentSelection%22%3A%7B%22selectionStatus%22%3A%22included%22%2C%22elements%22%3A%5B%7B%22id%22%3A%22h2014%3B8D679D5111D3E4981000E787EC6DE8A4%22%7D%5D%7D%7D%5D -
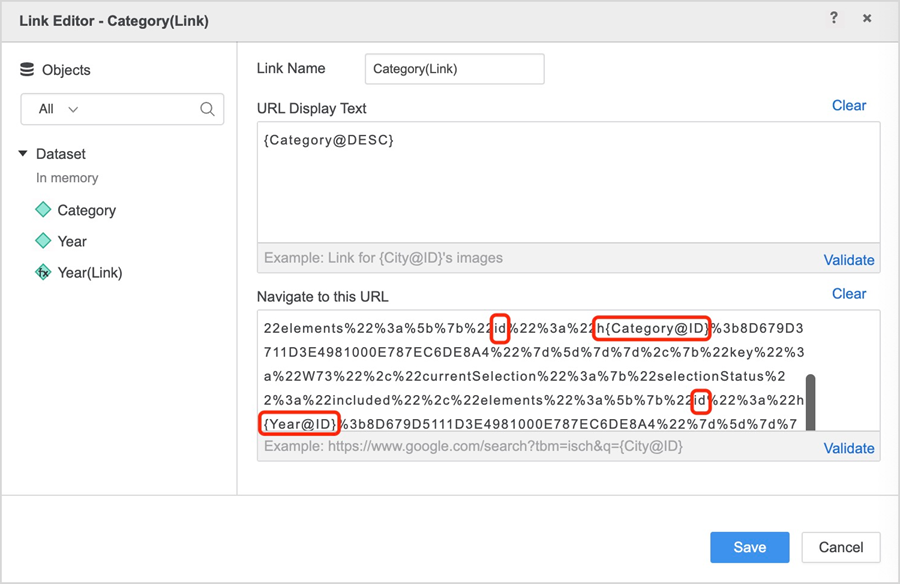
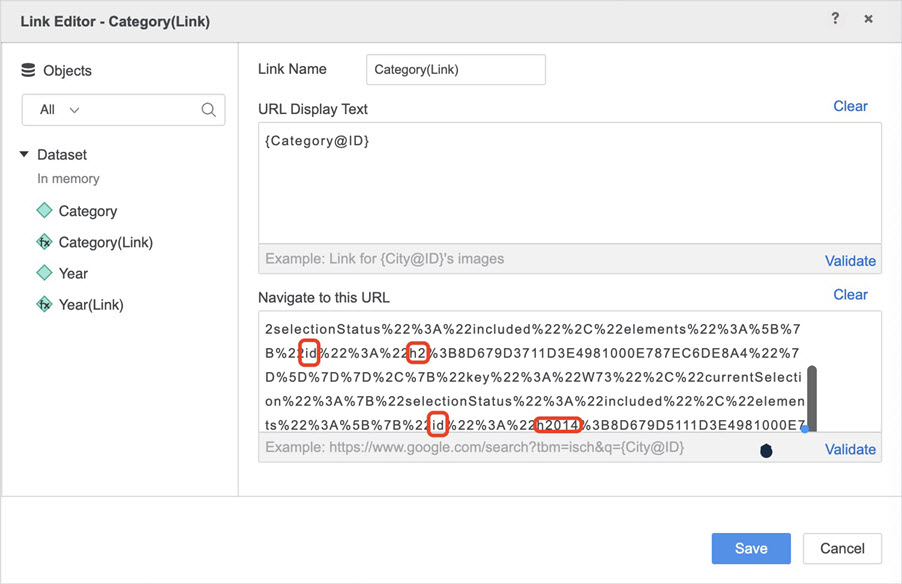
In the source dashboard, you create a static link for the Category.
-
As mentioned earlier, the value of the long-term ID after
his the only difference between the elements. This means you can set the value after thehchar as the dynamic ID.