MicroStrategy ONE
Integrating a SAML-Enabled Web Application with MicroStrategy Identity
Users can log in to your web applications by using their smartphones to scan a QR code displayed on the computer screen. You can enable this type of login by integrating MicroStrategy Identity with web applications that are compatible with the Security Assertion Markup Language (SAML) 2.0 protocol used for single sign-on.
For a list of web applications that you can integrate with MicroStrategy Identity without following the manual configuration steps below, see Logical Gateways.
To allow your SAML-enabled web application users to sign in with MicroStrategy Identity, you must provide U with the SAML settings for your web application. You do this by registering the web application in your Identity Network. To do this, follow the steps below. You must also configure your web application to add MicroStrategy Identity as an identity provider; see your third-party documentation for steps.
The web application that you want to integrate supports the Security Assertion Markup Language (SAML) 2.0 standard.
The steps below assume that you are familiar with the SAML 2.0 standard. For detailed information about the SAML 2.0 standard, see the third-party SAML documentation available at https://www.oasis-open.org.
You have administrative privileges for the web application to which you want to allow login access.
Gather the information and files that your web application requires for SAML 2.0 requests to work with MicroStrategy Identity.
If your web application allows you to export a service provider metadata .xml file, you can upload it to MicroStrategy Identity to populate many of the fields that are required to register your web application. You can also upload your web application's service provider metadata .xml file that is available via a URL. See your web application's documentation for requirements and instructions.
Alternatively, you can provide data to MicroStrategy Identity manually. Examples of required items include the following:
- Service provider ID: The ID or Issuer of the service provider. This uniquely identifies your SAML service provider and is often a URL.
- Assertion Consumer Service URL: The remote SAML sign-in URL.
- The attribute names to be included in a SAML assertion and how they must be formatted.
- If the web application's SAML request is signed, you need the signed service provider certificate (
.crtor.cer) file.
- For an on-premises implementation, you must configure your MicroStrategy Identity system with the information necessary to connect with a SAML-enabled web application.
- To display a custom image on the web application's login page, you must create the image to display. Supported image formats are
.png,.jpeg, and.jpgfiles.
If the users of your SAML-enabled web application are populated from an identity management (IDM) system such as Microsoft Active Directory or OpenLDAP, MicroStrategy recommends that you add users to your network by synchronizing MicroStrategy Identity with the same IDM system. Synchronizing MicroStrategy Identity with the same IDM system as your SAML-enabled web application helps add user information to the Identity Server and may be easier than adding users manually or by importing a file. For steps, see Synchronizing Users from Microsoft Active Directory or Synchronizing Users from OpenLDAP.
To Register a SAML-Enabled Web Application with MicroStrategy Identity
- Log into Identity Manager.
- Click Logical Gateways.
- Under Web Application Login, click SAML.
- You can upload the image to be displayed on your web application's login page. Next to the image preview, click Import An Icon. Select an image to display, then click Open.
- In the Enter Display Name field, enter a name to display on your web application's login page. The name can be up to 30 characters.
- If the users in your network are added from Microsoft Active Directory, you can enable users to sign in to your web application by typing their Active Directory user name and password, rather than scanning a QR code. For example, if not all users in your network have access to a smartphone, you can enable users to sign in with their user name and password. To do this, select the Enable user name and password as a login option check box.
- Some service providers enable you to supply an identity provider metadata file that automatically configures the settings that your service provider uses for connecting to the identity provider. The MicroStrategy Identity provider metadata includes a configuration
.xmlfile that your web application uses to automatically configure the settings for connecting to MicroStrategy Identity. Depending on how your web application enables you to supply the metadata, select from the following:- If you can upload a metadata file to your service provider, download the MicroStrategy Identity provider metadata file. Note the location on your computer where the metadata
.xmlfile is saved. - If you can provide your service provider with a URL to the location of the metadata, note the MicroStrategy Identity metadata URL.
- If you can upload a metadata file to your service provider, download the MicroStrategy Identity provider metadata file. Note the location on your computer where the metadata
- Depending on if you have a service provider metadata file from your web application, select from the following:
- If you have a service provider metadata file:
- Select Upload Pre-configured Metadata.
- Click Upload Metadata.
- Upload the service provider SAML metadata (
.xml) file that was exported from your web application.
- If your service provider metadata file is available via a URL, select Upload Metadata from URL, then enter the URL to your service provider metadata file.
- If you do not have a service provider metadata file, select Manually Configure.
- Click Next. If you supply MicroStrategy Identity with a metadata file from your service provider, the metadata file provides information for many of the fields.
- If a value is not already provided, in the Service provider ID field, enter the web application's Service provider ID. To find the ID, which is often a URL, see your web application's documentation or look for the value of Issuer in your web application's SAML request.
- From the Default NameID Format drop-down list, specify a default name identifier format to be used in the SAML request. This format is used if the web application does not specify a NameID format in the SAML request.
- From the Mapped MicroStrategy Identity Attribute for Unspecified NameID Format drop-down list, select the user's information to send in the subject line of a SAML response when the request from the web application provides a NameID format of Unspecified. For example, select the user's email address.
- To specify the web page that you want to send users to when they log out of the web application, click Advanced Settings, then enter the URL in the Redirect on Logout URL field.
- If the users in your network log in to the web application through the MicroStrategy Identity single sign-on web portal, you can provide additional SAML parameters to support this. See your web application's third-party documentation for information about required parameters for identity-provider-initiated logins. Click Advanced Settings, then select from the following:
- To specify the URL that users are directed to when they log in (the SAML 2.0
RelayStateparameter), enter the URL in the Relay State field. - If your service provider requires a
SPNameQualifierattribute for theNameIDparameter, enter this value in the Assertion Subject NameID field. - By default, an authentication context (
AuthnContext) value ofPasswordis specified. To specify a different value, select the value from the Assertion AuthnContext drop-down list.
- To specify the URL that users are directed to when they log in (the SAML 2.0
- You can require users to log in to your web application each time they attempt to access the web application, regardless of whether or not their user session is still valid. Requiring users to log in again provides increased security if your service provider does not allow you to specify an identity provider logout URL. Click Advanced Settings, then select from the following:
- To require users to log in each time they attempt to access your web application, clear the Application Logout Callback Support check box.
- To allow users to access your web application without logging in again while their user session is still valid, select the Application Logout Callback Support check box. (For steps to specify the length of time that a user session remains active, see Setting security preferences for web applications.)
- Click Next.
- If a value is not already provided, in the Assertion Consumer Service URL field, click Add Assertion Consumer Service URL. Enter the index and remote SAML sign-in URL for your web application. To determine this URL, see your web application's documentation.
- You can define additional Assertion Consumer Service URLs to be included in the SAML assertion. To do this, click Add Assertion Consumer Service URL again, then enter an additional Index and Assertion Consumer Service URL. Then select one Assertion Consumer Service URL as the default to use.
- If the SAML request is signed, do the following:
- Select the Service Provider requests are signed check box.
- Click Upload Security Certificate.
- Upload the certificate (
.crtor.cer) file that is used to sign the SAML request.
- Click Next.
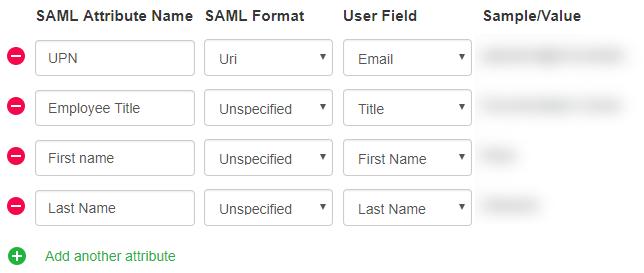
- If your service provider requires attributes to be included in the SAML assertion, you can specify which user attributes are included. Each group of attributes is called an Attribute Consuming Service. You can include multiple attributes in an Attribute Consuming Service. To add a group of attributes, click Add Attribute Consuming Service. For each attribute, specify the following:
- SAML Attribute Name: The unique name of the attribute that the web application needs as part of the assertion. For example, a web application can require an attribute called UPN that contains a user's email address. See your web application's documentation for the required attribute names.
- SAML Format: The format of the attribute name in the SAML assertion. Select from the following:
- Unspecified (default): The attribute name is formatted as
urn:oasis:names:tc:SAML:2.0:attrname-format:unspecified - Basic: The attribute name is formatted as
urn:oasis:names:tc:SAML:2.0:attrname-format:basic - URI: The attribute name is formatted as
urn:oasis:names:tc:SAML:2.0:attrname-format:uri
- Unspecified (default): The attribute name is formatted as
User Field: The user field in the profile to share when authenticated by the web application. After you select a value, sample information is displayed.
Below is an example of a SAML Attribute Consuming Service with several attributes.
- To define additional Attribute Consuming Services, click Add Attribute Consuming Service and define the attributes to include in the Attribute Consuming Service. Provide Index values for each Attribute Consuming Service, then select one Attribute Consuming Service as the default to use.
- To see an example SAML assertion with your configured settings and attributes, click Preview Template. You can test the SAML assertion in your own environment.
When you are finished viewing the SAML assertion, click Close Preview.
- Click Next.
- To enable your web application to work with MicroStrategy Identity, configure your web application with the following information provided in Identity Manager. See your web application's third-party documentation for requirements and steps to configure your web application.
- MicroStrategy Identity Metadata: If your web application allows you to upload an identity provider metadata file to configure the SAML settings for Identity, click MicroStrategy Identity Metadata to download an Identity metadata
.xmlfile. Save the file to a location on your computer so you can upload it to your web application. - Login URL: The URL that redirects users from the web application to MicroStrategy Identity when logging in.
- Logout URL: The URL used to log out of MicroStrategy Identity when a user logs out of the web application.
- MicroStrategy Identity Security Certificate: MicroStrategy Identity signs all assertions sent to the web application. If your web application server needs the identity provider's certificate to validate SAML assertions signed by the identity provider, download the MicroStrategy Identity security certificate by clicking MicroStrategy Identity Security Certificate. Save the security certificate (for example,
saml2.crt) to a location on your computer so you can upload it to your web application server.
- MicroStrategy Identity Metadata: If your web application allows you to upload an identity provider metadata file to configure the SAML settings for Identity, click MicroStrategy Identity Metadata to download an Identity metadata
- Click Done.
Related Topics
Categorizing MicroStrategy Badge Resources
Signing in to MicroStrategy Identity-Enabled Web Applications from a Centralized Website
Creating a MicroStrategy Identity Network and Issuing an Administrator Badge