MicroStrategy ONE
Access and Analyze Multiple Data Sources with Query Builder
With Query Builder, you can access multiple data sources in the same project and use MicroStrategy reporting features to analyze your data. Connection to databases, Excel file, and text files is described in Connect to Databases, Excel Files, and Text Files.
Once you connect to a valid data source, you can create a Query Builder report to retrieve and analyze the data from the data source. The Query Builder Editor helps you create and modify SQL queries to run against your ODBC data sources, while requiring only a basic knowledge of SQL functionality. These queries are the basis of any Query Builder report, which enable you to analyze the data returned from the data source.
The sections below describe how to create Query Builder reports:
- Create a Query Builder Report to Access Relational Databases
- Create a Query Builder Report to Access Excel Files
- Create a Query Builder Report to Access Text Files
- Select and Add Tables
- Define Joins
- Automatically Join Columns
- Select Columns of Data to Return
Create a Query Builder Report to Access Relational Databases
The following steps run through a scenario to create a Query Builder report that accesses the database provided with the MicroStrategy Tutorial project. The report created in these steps is used throughout the rest of this Query Builder section to demonstrate the different features available.
The MicroStrategy Tutorial project comes with a fully developed attribute and fact schema, which is not necessary to build Query Builder reports.
Query Builder reports can be created in MicroStrategy Developer only. However, these reports can be manipulated and executed from both MicroStrategy Developer and Web. Access to the Query Builder Editor is available only to Developers with the Define Query Builder Report privilege and those with the Create schema objects privilege.
You must connect Query Builder to a database, which is described in Connect to Databases.
To Create a Query Builder Report
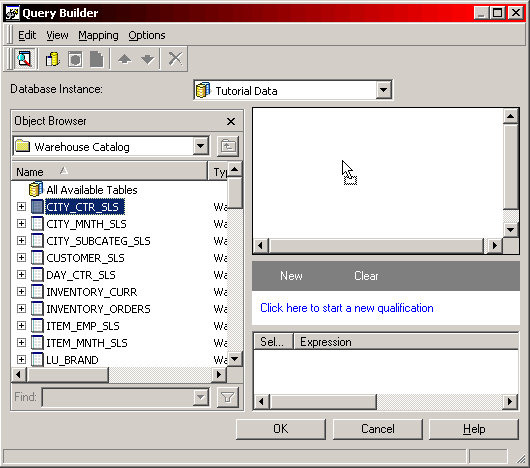
- In MicroStrategy Developer, choose File > New > Report.
- On the Freeform Sources tab, select Create Query Builder report.
- In the Source area, select a database instance for the data source to access using Query Builder.
Select the Tutorial Data database instance.
- Click OK.
Add Tables to Your Query Definition
- From the Object Browser drop-down list, select Warehouse Catalog. The list of imported tables along with the All Available Tables feature appears.
- If the Object Browser is not displayed, from the View menu > Show Object Browser.
- Select the LU_YEAR table and drag it into the Tables and Joins pane. A graphical representation of the
LU_YEARtable is displayed within the pane. Drag the following additional tables into the Tables and Joins pane: LU_CATEGORYYR_CATEGORY_SLS
Create the Joins
- In the Tables and Joins pane, select the CATEGORY_ID column in the
LU_CATEGORYtable and drag it onto theCATEGORY_IDcolumn in theYR_CATEGORY _SLStable. A line representing the join is drawn between the two columns. - Repeat the previous step to join
YR_CATEGORY_SLSandLU_YEARby theYEAR_IDcolumn. The graphic below shows how your tables and joins should be defined: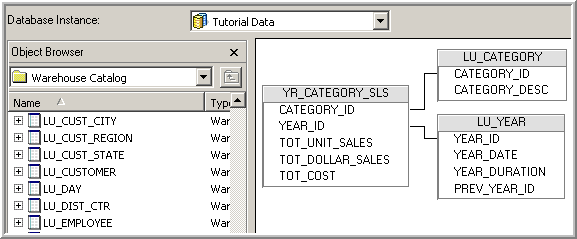
Add Columns to the Select List
- Double-click the YEAR_ID column in the
LU_YEARtable. The column expression is added to the Selections pane. Add the following additional columns to the Selections pane:CATEGORY_IDfrom theLU_CATEGORYtableCATEGORY_DESCfrom theLU_CATEGORYtableTOT_DOLLAR_SALESfrom theYR_CATEGORY_SLStable
The following figure shows all the columns after they have been added to the Selections pane:
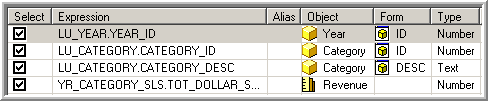
This report is created within the MicroStrategy Tutorial project, therefore the column expressions have been automatically mapped to the existing metadata objects. In a project without attribute or metric definitions, you must manually enter attribute and metric names, forms, and data types to be associated with each column expression. For more information on mapping columns to different metadata objects, see the section Map Columns to Metadata Objects.
- Right-click the YR_CATEGORY_SLS.TOT_DOLLAR_SALES column expression, point to Simple Aggregation, and select Sum. This action modifies the column expression to include a sum aggregation.
- Click OK.
You can define the Query Builder report in the same way you define a standard report, adding features such as formatting, sorting, view filters, thresholds, exporting, and so on.
- Save the Query Builder report as Query Builder Demo.
You must save the report first before you can run it.
- Run the report. The image below shows the report in grid view:
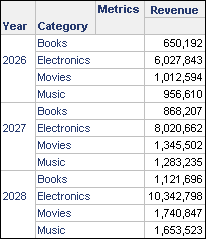
Notice that revenue data is displayed with a general format by default. You can format the Revenue metric's values to apply a currency format to the revenue data.
Create a Query Builder Report to Access Excel Files
The Query Builder feature enables you to create reports that use data from Excel files. Follow the steps below to create a Query Builder report which retrieves data from an Excel file.
Query Builder reports can be created in MicroStrategy Developer only. However, these reports can be manipulated and executed from both MicroStrategy Developer and Web. Access to the Query Builder Editor is available only to Developers with the Define Query Builder Report privilege and those with the Create schema objects privilege.
You must connect Query Builder to an Excel file, which is described in Connect to Excel Files.
To Create a Query Builder Report from an Excel File
- In MicroStrategy Developer, choose File > New > Report.
- On the Freeform Sources tab, select Create Query Builder report.
- In the Source area, select the database instance for your Excel file.
For steps to connect to and create a database instance for an Excel file, see Connect to Excel Files.
-
Click OK.
You can now use the tables created by the Excel file to build your Query Builder report using the methods described in the sections listed below:
Create a Query Builder Report to Access Text Files
The Query Builder feature enables you to create reports using data from text files. Follow the steps below to create a Query Builder report which retrieves data from a text file.
Query Builder reports can be created in MicroStrategy Developer only. However, these reports can be manipulated and executed from both MicroStrategy Developer and Web. Access to the Query Builder Editor is available only to Developers with the Define Query Builder Report privilege and those with the Create schema objects privilege.
You must connect Query Builder to a text file, which is described in Connect to Text Files.
To Create a Query Builder Report from a Text File
- In MicroStrategy Developer, choose File > New > Report.
- On the Freeform Sources tab, select Create Query Builder report.
- In the Source area, select the database instance for your text file.
For steps to connect to and create a database instance for a text file, see Connect to Text Files.
- Click OK.
You can now use the tables created by the text file to build your Query Builder report using the methods described in the sections listed below:
Select and Add Tables
Unlike a standard MicroStrategy report that queries against logical tables in the MicroStrategy metadata, Query Builder builds queries using a combination of imported database tables, columns, and joins.
Within the Query Builder Editor, you can browse both imported tables and all tables that exist for the database instance.
Tables that have been imported into the project's Warehouse Catalog are listed within the Warehouse Catalog folder in the Object Browser. These tables can be added directly to your Query Builder reports. To add tables to your Query Builder report, drag a table from the Object Browser on the left to the Tables and Joins pane (the top pane on the right), as illustrated in the image below.
Access Non-Imported Tables
The All Available Tables feature displays every table for the selected database instance. To run queries on non-imported tables, Query Builder can import tables from the data warehouse into the Warehouse Catalog. This allows you to import tables directly through Query Builder rather than using the Warehouse Catalog itself. You can import a table using the same method as adding a table to your Query Builder report.
Accessing the All Available Tables feature can be costly in terms of execution time, therefore All Available Tables should be accessed only when it is necessary to import tables for the database instance.
Define Joins
Once you have selected tables to include in your queries, you can define the joins between the columns of separate tables. Query Builder does not require knowledge of the SQL syntax for the join operation, but a knowledge of how joins combine tables in SQL queries is essential. In a SQL query a join performs a relation on one or more columns stored in two separate tables and combines them into a single table. The table created by the join provides data that answers your query and can be displayed on your report.
You can create a join by selecting a column in a table and dragging it onto another column in a separate table as shown in the image below. The Query Builder Editor represents the join by drawing a line connecting the two columns.
Query Builder can be configured to automatically join table columns by name and data type, or primary key and foreign key relationships. For more information on configuring Query Builder to automatically join the tables you include in your queries, see Automatically Join Columns.
After creating a join between two tables you can double-click the line representing the join to open the Join Editor. The Join Editor, shown in the image below, allows you to modify the join operation.
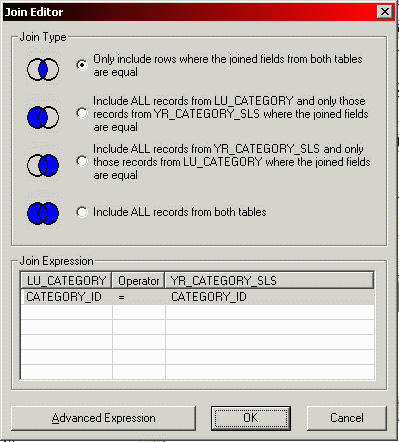
The image shown above displays the settings for a join on two columns named CATEGORY_ID. The columns reside in the tables LU_CATEGORY and YR_CATEGORY_SLS that have been added to the Query Builder Editor.
Define the Join Type
The Join Editor allows you to select the join type for the join. The different join types that are supported are the following:
- Inner join: The first radio button in the image above performs an inner join on the columns.
- Left outer join: The second radio button in the image above performs a left outer join on the columns.
- Right outer join: The third radio button in the image above performs a right outer join on the columns.
- Full outer join: The fourth radio button in the image above performs a full outer join on the columns.
Modify the Join Expression
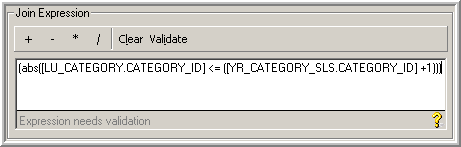
Query Builder allows you to modify the join expression at two different levels. The image above displays the simple join expression. With the simple join expression you can only modify the join operator. The Operator drop-down list allows you to apply different simple comparison operators (=, >, <, >=, <=) for the relation between the column expressions.
Within the Join Editor, you can select Advanced Expression to provide more options in which to modify the join expression. You can replace the join operator with any of the simple comparison operators described above. Arithmetic and functional expressions can be performed on the columns included in the join expression. The image below shows the Advanced Expression window containing a modified join expression.
Automatically Join Columns
In MicroStrategy version 8.0.3 and later, you can configure Query Builder to automatically join columns from the separate tables you add to your query. You can access the different automatic join options from the Options menu in the Query Builder Editor. When you click Options from the Options menu, the Query Builder Options dialog box opens, as shown in the following figure.
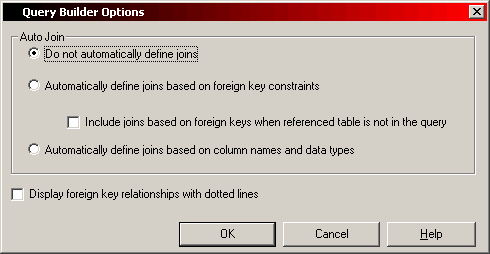
By default, Query Builder does not automatically join columns. If you keep this default, you must manually define all of the joins between tables added to your query. For more information on defining joins manually, see Define Joins.
Both automatic join options described below share the following behaviors:
- Select an automatic join option before adding tables to your query. Automatic joins are created when tables are added to your query. If you modify the automatic join option after you have added your tables to your query, no automatic joins are defined or deleted. For more information on adding tables to your query, see Select and Add Tables.
- If you enable automatic joins, you can still manually define, modify, and delete joins. For more information on manually defining joins, see Define Joins.
Automatically Define Joins Based on Foreign Key Constraints
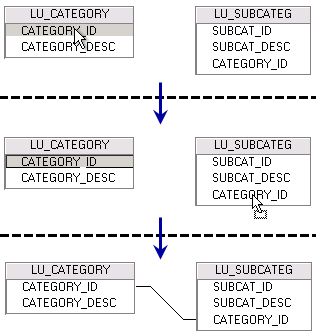
You can configure Query Builder to automatically join columns based on your database tables' primary key and foreign key constraints. When this option is selected, primary key columns are automatically joined with their associated foreign key columns.
You have two lookup tables in your database. One table is named LU_CATEGORY for the Category attribute and one table is named LU_SUBCATEG for the Subcategory attribute. You define the CATEGORY_ID column as the primary key for the LU_CATEGORY table. The LU_SUBCATEG table includes its own primary key SUBCAT_ID and the foreign key CATEGORY_ID. When you add the tables LU_CATEGORY and LU_SUBCATEG, a join is automatically created on CATEGORY_ID to join the two tables.
If you select to automatically define joins based on foreign key constraints, you also have the option to automatically create joins based on foreign keys when the table containing the primary key is not in the query. When this option is selected, the same foreign key columns in different tables are automatically joined even if the table that defines the column as a primary key is not in the query. However, the column must be defined as a primary key in at least one table in the database.
Recall the example scenario above. Along with the tables LU_CATEGORY and LU_SUBCATEG you have a lookup table named LU_ITEM for the attribute Item. The LU_ITEM table includes CATEGORY_ID as a foreign key. If you add LU_SUBCATEG and LU_ITEM to your query without adding LU_CATEGORY, a join is automatically created on CATEGORY_ID to join the two tables. Since no table is included in the query that defines CATEGORY_ID as a primary key, this join is created by searching the database tables for relevant primary keys. Once it is determined that CATEGORY_ID is a primary key, the join between LU_SUBCATEG and LU_ITEM on CATEGORY_ID as a foreign key is created. If LU_CATEGORY is included before or after the other two tables, the joins are created based on CATEGORY_ID as a primary key and any redundant joins are deleted.
You can update primary key and foreign key information for your database tables by updating the structure of your database tables in the Warehouse Catalog. For more information on updating table structure, see the Project Design Help.
Automatically Define Joins Based on Column Names and Data Types
You can configure Query Builder to automatically join columns based on column names and data types. When this option is selected, columns are automatically joined by matching columns by name and data type, as long as no primary key columns are included in the tables of your query.
You have two lookup tables in your database. One table is named LU_CATEGORY for the Category attribute and one table is named LU_SUBCATEG for the Subcategory attribute. The CATEGORY_ID column is defined as an integer in both tables. Neither of the tables have any primary key or foreign key constraints. When you add the tables LU_CATEGORY and LU_SUBCATEG, a join is automatically created on CATEGORY_ID to join the two tables.
If the table LU_CATEGORY stores CATEGORY_ID as an integer and the table LU_SUBCATEG stores CATEGORY_ID as a character, a join is not automatically created. Similarly, if the table LU_CATEGORY stores the column as CATEGORY_ID and the LU_SUBCATEG table stores the column as CATEG_ID, a join is not automatically created. The latter scenario is an example of heterogeneous mapping. For more information on heterogeneous mapping, see Warehouse Structure for Your Logical Data Model in the Project Design Help.
If primary key columns are included in at least one of the tables of your query, joins are not automatically created based solely on column names and data types. In this case, joins are only automatically created between the primary key columns and any columns that match the primary key columns' column names and data types.
Display Foreign Key Relationships with Dotted Lines
The check box at the bottom of the Query Builder Options dialog box allows you to show and hide the display of dotted lines between tables to indicate foreign key relationships.
Select Columns of Data to Return
Query Builder reports return data from columns included in the SELECT clauses of your queries. The SELECT clause chooses which columns are returned in the result set of the report. You can include columns in the SELECT clause by adding the columns to the Selections pane (the bottom pane on the right). The Selections pane is displayed in the following figure.

The Selections pane allows you to modify the column selections in the following ways:
- Include Columns in the SELECT Statement
- Define the Column Expression
- Define an Alias
- Map Columns to Metadata Objects
- Define Attribute Forms
- Define the Form Data Type
Include Columns in the SELECT Statement
The check box in the Select column of the Selections pane determines whether the table column will be included in the SELECT clause. If the check box is selected, the column will be included in the SELECT clause. If the check box is cleared, the column is not included in the SELECT clause, but if it is a non-aggregated column it still appears in the GROUP BY clause.
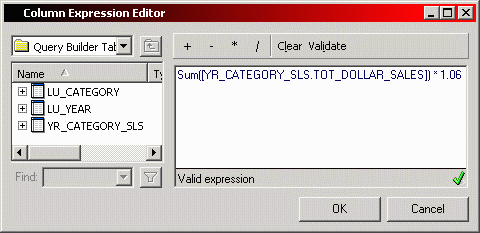
Define the Column Expression
A column expression represents the column data, as well as any modifications to the data, that is returned for your report. You can right-click a column in the Selections pane and select Edit Column Expression to modify a column expression. The Column Expression Editor allows you to include functional and arithmetic expressions in the column expression. The following figure shows the modifications available in the Column Expression Editor.
Define an Alias
You can specify a column alias to use within the SQL statement of your queries. When viewing the SQL, a descriptive alias can help identify where the column is used in your queries.
The alias of a column is not displayed on a report run in grid, graph, or grid and graph view.
Map Columns to Metadata Objects
When a column is added to the Selections pane, the column is mapped as either an attribute or metric, depending on its data type.
You can modify this default mapping in the Query Builder Editor by browsing to the Freeform Objects folder and dragging either <Add New Attribute Form> or <Add New Metric> onto the column in the Selections pane.
Query Builder supports history mapping of column expressions to simplify and improve the process of mapping column expressions to attributes or metrics. When you map a column expression to an attribute or metric in a Query Builder report, a connection between the column expression and the attribute or metric is saved. If you build another report with Query Builder and select the same column expression, the column expression is automatically mapped to the same metadata object you used in your previous Query Builder report.
In the MicroStrategy Tutorial, you can select the column REGION_ID from the LU_REGION table in Query Builder. If you map this column expression in Query Builder to the attribute Region, the REGION_ID column expression is automatically mapped to the attribute Region the next time you use the Query Builder feature and select the REGION_ID column.
Automatically mapping column expressions to attributes and metrics have the following behaviors:
- Each column expression can have multiple history mappings to choose from. For example, you can map a fact column
TOT_DOLLAR_SALESfrom theYR_CATEGORY_SLStable to two different metrics, Revenue and Sales. The next time you select theTOT_DOLLAR_SALEScolumn, the drop-down list includes the metrics Revenue and Sales to choose from. - Attributes and metrics can have only one column expression saved as a history mapping. Only the most recent column expression mapped to the attribute or metric is saved and used to automatically map attributes and metrics.
Consider the fact column
TOT_COSTfrom theDAY_CTR_SLStable. For the first Query Builder report, you map the expression asSum(DAY_CTR_SLS.TOT_COST)to the metric Cost. The next time you build a report with Query Builder, you map the expressionSum(DAY_CTR_SLS.TOT_COST*1.06)to the metric Cost. This updates the Cost history mapping to be associated with the new expression. The next time you map the expressionSum(DAY_CTR_SLS.TOT_COST), the metric Cost is not automatically mapped. However, if you change the expression toSum(DAY_CTR_SLS.TOT_COST*1.06)the metric Cost is automatically mapped. - You can choose to map a column to a different metadata object than is chosen by the automatic mapping.
If you previously defined a ROLAP schema by modeling attributes and metrics for your project, columns can be manually mapped to existing project attributes. For example, within the MicroStrategy Tutorial project, the
YEAR_IDcolumn from theLU_YEARtable can be mapped to the existing Year attribute. Mapping columns to attributes that are part of a ROLAP schema allows Query Builder reports to use the following MicroStrategy features:- Security filters
- Element list prompts
- Shortcut-to-a-report qualification. For more information on using a Query Builder report as a shortcut-to-a-report qualification, see Reporting Analysis Features.
Columns in your Query Builder reports that are mapped to metrics can be mapped only to managed object metrics. Query Builder reports cannot use metrics previously created within your project that are built from an attribute and fact schema. However, managed object metrics can be mapped to columns in multiple Freeform SQL reports.
If a column is not mapped to an existing attribute or it is mapped to a metric, a managed object is created with the name you enter into the Object field. Once a managed object is created, you can map it to columns in other Query Builder reports by specifying the name of the managed object in the Object field. For example, if there is a managed object named Year, you can map the YEAR_ID column from the LU_YEAR table to this existing object by typing "Year" into the Object field. A new managed object is created if you do not enter the exact name in the Object field, such as "Years." For more information on managed objects related to Query Builder, see Map Data to Non-Project Objects: Managed Objects.
Define Attribute Forms
Each column expression which is mapped to an attribute must be mapped to an attribute form. The Form drop-down list includes the following options:
- ID
- DESC
- Any other forms that have been defined for the attribute
Each attribute must have a column mapped to the ID form of the attribute.
You can also type in a new form name to map the column to a new attribute form.
For more information about attribute forms, see the Project Design Help.
Define the Form Data Type
Attributes and metrics must map a form data type to each column expression. The Type drop-down list includes the following options:
- Number
- Text
- Datetime
- Date
- Time
- URL
- HTML Tag
- Picture
- Big Decimal
For more information about attribute form data types, see the Project Design Help.