Strategy One
Create MDX Intelligent Cubes
Creating an MDX intelligent cube is similar to creating a report. Add data for it by including objects such as attributes, metrics, filters, and so on, as report objects or report filters. For a list of objects and features that cannot be included in the definition of intelligent cubes, see Supporting various features using Intelligent cubes.
Since intelligent cubes are used simply to share a set of data, no data or report results are displayed when you execute an intelligent cube. However, executing an intelligent cube publishes the intelligent cube, which can then be accessed as a set of data for multiple reports. See Publishing Intelligent Cubes for more information.
Required Privileges
To create an MDX intelligent cube on Workstation, the following privileges are required:
-
Use Intelligent Cube Editor
-
Either of the following:
-
Define MDX Cube Report
-
Web Define MDX Cube Report
-
Create an MDX Intelligent Cube
- Open the Workstation window.
- If the project does not already contain the MDX cube to base the intelligent cube on, import it following the steps in MDX Cube Catalog in Workstation.
-
In the Navigation pane, click
 , next to Datasets.
 -
Select the environment and project where you want to save your intelligent cube.
-
Select MDX Cube and click OK.
-
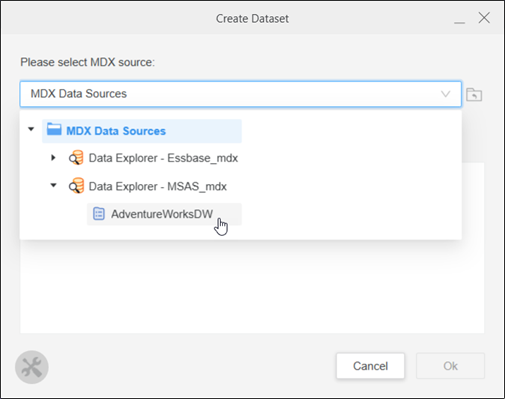
From the drop-down list, navigate to the MDX source to use. In the example below, the user navigated from MDX Data Sources to Data Explorer - MSAS_mdx and finally to the AdventureWorksDW source.
-
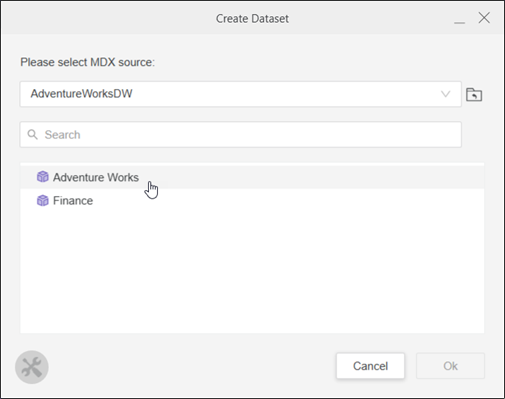
All the MDX cubes in the source display. Click the MDX cube to use, then click OK. In the example below, the user selects Adventure Works.
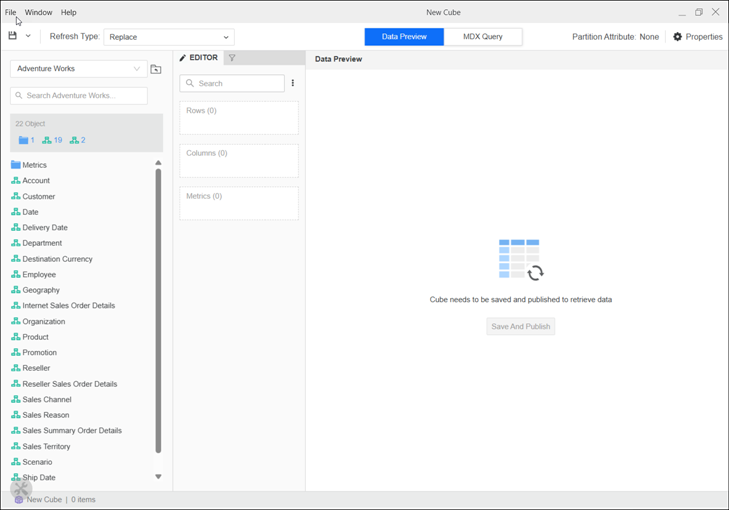
The MDX Cube Editor opens.
-
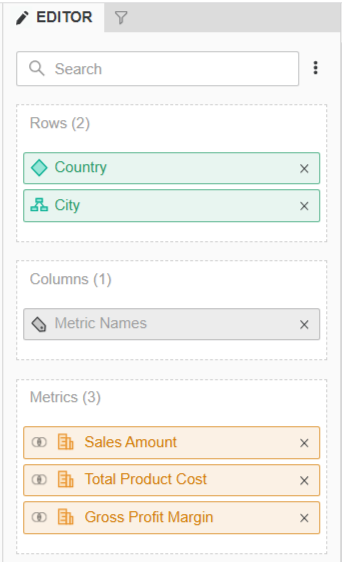
In the Objects panel, click folders or hierarchies (dimensions) to view the objects available in the MDX cube.
-
In the Objects panel, select attributes, metrics, and other objects and drag them into the Editor panel. You can add them to the rows or columns of the MDX intelligent cube.
-
To filter the MDX intelligent cube:
-
Click Filter
 to display the Filter panel.
 -
On the Filter panel, click New Qualification.
-
Drag an object from the Objects panel to the Based On box.
-
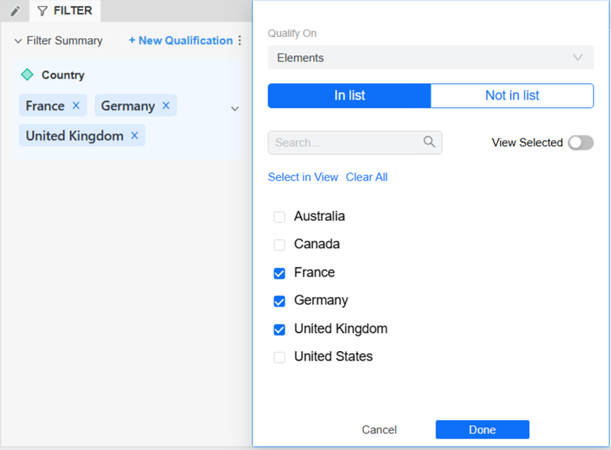
To filter on a list of elements, from the Qualify On drop-down list, select Elements. Choose whether elements In List or Not In List are included on the cube. Select the attributes and click Done.
-
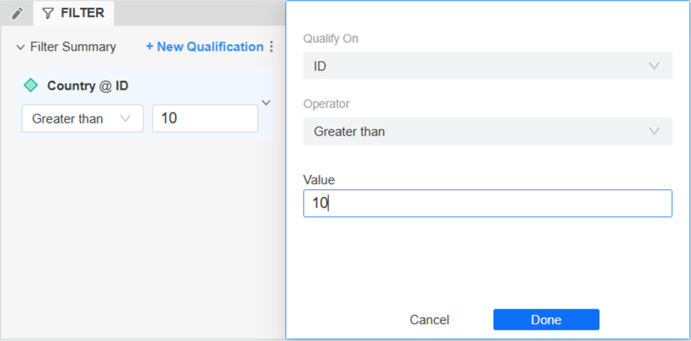
To filter on a specific attribute form instead, select it from the Qualify On drop-down list. Select the Operator from the drop-down list. In the Value box, type the text to compare to. Click Done.
-
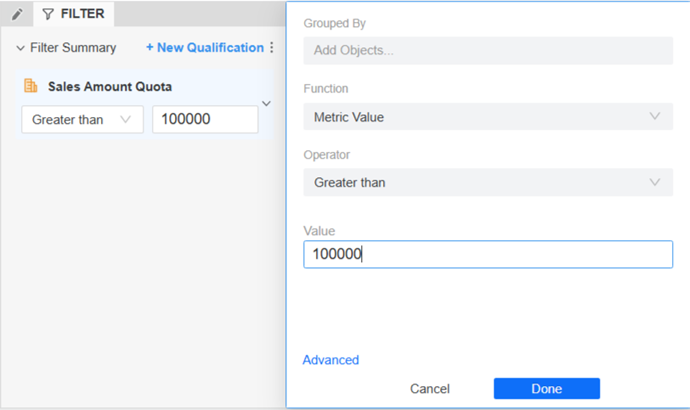
To filter on a metric, select the Operator from the drop-down list. In the Value box, type the value to compare to. Optionally, to determine the level of the metric calculation, drag an attribute to the Grouped By field. select the Click Done.
-
You can add more filters following the steps above.
Click here for more information about the other fields on this window.Toolbar Provides the most commonly used tools:
-
Save options in the Save
 menu: Save, Save As, and Save and Publish
 -
Allows you to set the cube Refresh Type:
-
Replace Old data is completely replaced with new data, retrieved by executing the current intelligent cube, using its current template and filter.
-
Upsert Inserts new rows from new data and overwrites overlapping rows between old and new data.
-
Insert Only inserts new non-overlapping rows from new data.
-
-
Define the cube Partition: the number of partitions, the partition attribute, and whether parallel data fetch is enabled
-
Use Cache
-
Enable the cache for faster, cached data access.
-
Disable the cache for the latest, real-time data preview and MDX query.
-
-
View the Properties of the cube
Use the Objects panel to search for the attributes, metrics, or hierarchy to use in the MDX intelligent cube. The Objects panel displays the objects available in the MDX cube that are supported in an intelligent cube.
The Editor panel displays objects that have been added to the cube. Drag objects from the Objects panel to the Editor panel to add them to the cube.
The Filter panel displays the filtering options for the cube. Drag objects from the Objects panel to the Filter panel and continue defining their qualifications in the qualification pane.
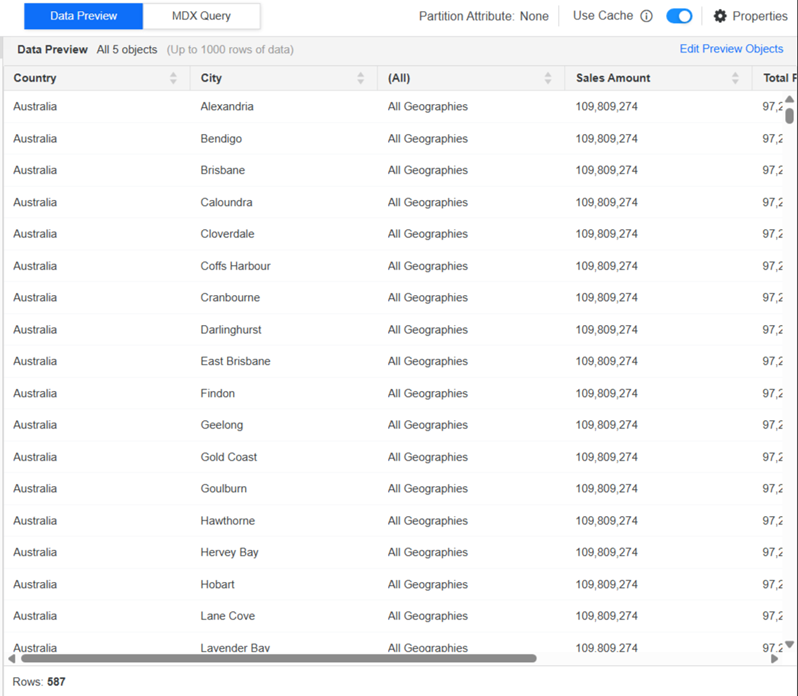
Use the Data Preview panelto quickly preview data, with a 1,000 row limit, after publishing a cube. Click Edit Preview Objects to select the objects to display in the preview. This does not affect what is included in the MDX intelligent cube.
-
You must have the Web Define Intelligent Cube Report, Define Intelligent Cube Report, Web Publish Intelligent Cube, and Publish Intelligent Cube privileges to access this panel.
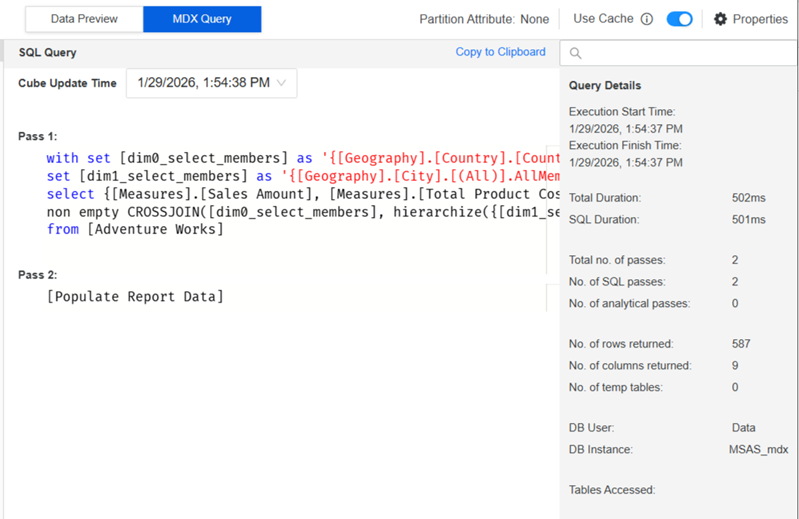
The MDX Query Panel displays the query for the current saved cube or passes of published cube caches with proper Administrator privileges.
-
You must have at least the Web Report SQL privilege to access this panel and view the SQL.
-
-
Click Save and Publish in the middle of the Data Preview panel. Navigate to the folder to save the MDX intelligent cube in. In the Save As box, type the name of the cube. Click Save.
-
If you want to save without publishing, for example to continue work later, click
-
-
Click Publish to see the data preview.
-
To view the query, click MDX Query.