Strategy One
Defining Dynamic Dates
Beginning in Strategy One (February 2026), you can define quick dynamic dates when you use a chapter filter in a dashboard.
Beginning in Strategy One (November 2025), you can define dynamic dates when you answer a prompt.
A dynamic date is either a fixed set of dates or a range of dates that are a fixed offset of the current date. For example, a dynamic date allows you to run a report that displays the sales for the past two months. This filter qualifies on a dynamic date of today with an offset of two months. Other examples of dynamic date qualifications are:
- Today minus an offset of 2 months
- Today minus an offset of 2 months and 1 day
- Monday of this week
- Monday of last week
- The second of this month
- The second of last month
- The second of the current month, for last year (for example, if the current month is January, then the second day of January of last year)
- The second day of the current quarter
- The fourth Monday of this month
- The fourth Monday of next month
- The fourth Monday of the current month, for last year
- The fourth Monday of the second month of the current quarter
- Four days from the last day of this month
- Four days from the last day of next month
- Four days from the last day of the current month, for last year
- Four days from the last day of the current quarter
While evaluating a dynamic date such as "first of this month minus seven days," the order in which these two parts are calculated is significant. The addition or subtraction of days, weeks, months, or years is always done first, before "first of this month," "this week," "this year," and so on is calculated. For example:
- If today is February 13th, then "today minus seven days" is February sixth, and "the first of the month of today minus seven days" is February first.
- However, if today is February second, then "today minus seven days" is January 26th, and "the first of the month of today minus seven days" is January first.
For an example of a dynamic date, including instructions to re-create the example, see the Advanced Reporting Help.
Access the Dynamic Date Editor
You can create dynamic dates in:
-
Stand-alone filters. See Access the Dynamic Date Editor from the Filter Editor.
-
Chapter filters (displayed in the Filter panel) and visualization filters in dashboards. See Access the Dynamic Date Editor from a Dashboard.
-
Filters created within reports. See Access the Dynamic Date Editor from a Report.
-
Prompts:
-
When defining a default answer during prompt creation. See Access the Dynamic Date Editor When Creating a Prompt.
-
When answering a prompt. See Access the Dynamic Date Editor When Answering a Prompt.
-
Access the Dynamic Date Editor from the Filter Editor
For background information on creating stand-alone filters, see Create Filters.
- Open the Workstation window.
- From the File menu, select New Filter.
- If you are connected to multiple environments, select the environment to create the filter in.
- If you are connected to multiple projects, select the project to create the filter in.
- Create a new qualification and select a date or time attribute, such as ship date or invoice date.
- In the Qualify On drop-down list, select ID or Date, depending on whether the attribute form has a Date or Datetime format.
- From the Operator drop-down list, select the operator that describes how to filter data. To use a data range in your filter, select Between.
- Click in the Value box to display the calendar.
- Click Show Dynamic Date.
Access the Dynamic Date Editor from a Dashboard
Dynamic dates are not available for filters using parameters, including value Dynamic dates are not available for filters using parameters, including value parameters and element parameters that use the calendar style.ers and element parameters that use the calendar style.
-
Open the dashboard to filter.
-
If you are viewing the dashboard and want to filter the entire chapter, complete the following steps:
-
ClickFilter
 in the toolbar.
 -
In the Filter Data panel, click the attribute to filter on.
-
Select Custom.
-
To filter on a range of dates, select Between. To filter on a specific date, select Before, On, or After.
-
Click the Calendar icon
 to select a date
from the calendar.
to select a date
from the calendar. -
Enable Show Dynamic Date.
-
-
If you are editing the dashboard and want to filter the entire chapter, complete the following steps:
-
The Editor, Filter, and Format panels are stacked together by default. Click Filter
 to open it.
 -
In the Filter panel, click the date value to filter on.
-
Select Custom.
-
To filter on a range of dates, select Between. To filter on a specific date, select Before, On, or After.
-
Click the Calendar icon
to select a date
from the calendar. -
Enable Show Dynamic Date.
-
-
If you want to filter specific visualizations, whether you are editing or viewing the dashboard, complete the following steps:
-
In a date filter on the dashboard page, click the Calendar icon
to select a date
from the calendar. -
Select the Dynamic Date check box. When you create a dynamic date in a visualization filter, you define the offset; you do not exclude weekends or adjust the date.
Access the Dynamic Date Editor from a Report
For background information, see Filtering Reports.
-
Open the report to filter. In the Navigation pane of Workstation, click Reports. Search for or navigate to the report. Double-click the report.
-
Click Filter
to display the Filter panel. -
You can create a filter within the report (see Add a Report Filter) or a view filter (see Add a View Filter to a Report). Do one of the following:
-
To create a filter, add a date or time attribute, such as ship date or invoice date, to the Filter panel.
-
To create a view filter, click View Filters
 to display the Filter Data tab on the Filter panel. Click Add
 . From the Based
On drop-down list, select the date or time attribute.
. From the Based
On drop-down list, select the date or time attribute.
-
- In the Qualify On drop-down list, select ID or Date, depending on whether the attribute form has a Date or Datetime format.
- From the Operator drop-down list, select the operator that describes how to filter data. To use a data range in your filter, select Between.
- Click in the Value box to display the calendar.
- Click Show Dynamic Date.
Access the Dynamic Date Editor When Creating a Prompt
You can create a dynamic date as a default prompt answer when you create a value prompt, an attribute qualification prompt, or a hierarchy qualification prompt that uses a date or time attribute. For background information on creating a prompt, see Types of Prompts.
- Open the Workstation window.
- From the File menu, select New Prompt.
- Begin creating:
- A value prompt that uses a date or time attribute
- An attribute qualification prompt that uses a date or time attribute
- A hierarchy qualification prompt that uses a date or time attribute
- Click None next to Default Answer.
- For a value prompt. click in the Default Answer box to display the calendar.
- For an attribute or hierarchy qualification prompt, create the default qualification. Click in the Value box to display the calendar.
- Click Show Dynamic Date.
Access the Dynamic Date Editor When Answering a Prompt
You can create a dynamic date to answer a value prompt or an attribute qualification prompt, or hierarchy qualification prompt that uses a date or time attribute. For background information on answering a prompt in a report, see Introduction to Prompted Reports.
-
Open the prompted report. In the Navigation pane of Workstation, click Reports. Search for or navigate to the report. Double-click the report.
-
The Prompts page displays. You must answer any required prompts before you see the report results.
-
For a date value prompt, a value box displays. Click the Calendar icon
to select a date
from the calendar. Enable Show Dynamic Date. -
For an attribute or hierarchy qualification prompt:
-
Select a date or time attribute, such as ship date or invoice date.
-
Create a qualification on ID or Date, depending on whether the attribute form has a Date or Datetime format.
-
In the Value box, click the Calendar icon
to select a date
from the calendar. -
Enable Show Dynamic Date.
-
Define a Dynamic Date
- Access the Dynamic Date Editor.
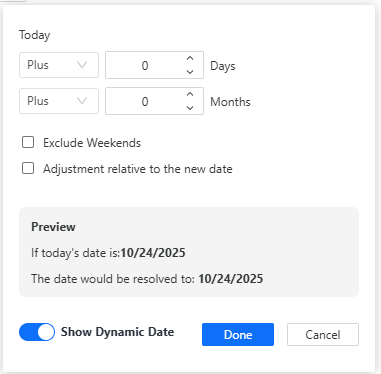
As you add date offsets or make date adjustments, the result displays in the Preview area.
Define the Offset
The offset is the value added to or subtracted from the current date. The value can be days or months. If you do not want to offset the dynamic date, continue to Adjust the Date. For example, if you want the dynamic date to be the Monday of the current week, do not define the offset date; just define a date adjustment.
-
Do one of the following.
- To offset the date by days, select Plus or Minus from the drop-down list before Days. Type the offset value in days.
- To offset the date by months, select Plus or Minus from the drop-down list before Months. Type the offset value in months.
- To offset the dynamic date by both days and months, complete both of the previous actions.
- To exclude Saturdays and Sundays
when calculating the dynamic date, select the Exclude
weekends check box.
For example, if today is Tuesday and the offset is today plus 4 days, the dynamic date would be Saturday. If this option is selected, the next day that would not be a Saturday or Sunday (in this case, Monday) is returned instead.
Excluding weekends is not available for visualization filters in dashboards.
A date adjustment is optional if you defined an offset. For example, if you want the dynamic date to be the day before the current date, define the offset but not an adjustment. Date adjustment is not available for visualization filters in dashboards.
-
Select the Adjustment Relative to the New Date check box.
-
Define the adjustment:
-
To select the day of the week to use as the adjustment, select Day of Week and Week in the first two drop-down lists. Select a day from the third drop-down list.
For example, if today is Monday, October 27th, an offset of minus 8 days is calculated as October 19th. An adjustment to Monday is calculated to Monday, October 20th. Without the offset, the date is calculated as Monday, October 27th.
-
To choose a numeric day of the month, select A Day After the Beginning and Month in the first two drop-down lists. Select the offset value in the Days from the Beginning of the Month box.
For example, if today is October 24th, an offset of plus 8 days is calculated as November 1st. An adjustment of 2 days from the beginning of the month is calculated as November 2nd. Without the offset, the date is calculated as October 2nd.
-
To choose a day of the week, select Day of Week and Month in the first two drop-down lists. Choose the ordinal number (First, Second, and so on) and the day of the week from the next drop-down lists.
For example, if today is October 24th, an offset of plus 8 days is calculated as November 1st. An adjustment of second Monday is calculated as Monday, November 10th. Without the offset, the date is calculated as Monday, October 13th.
-
To adjust from the last day of the month, select A Day Prior to the End and Month in the first two drop-down lists. Select the offset value in the Days to the End of the Month box.
For example, if today is October 24th, an offset of plus 8 days is calculated as November 1st. An adjustment of 2 days prior to the end of the month is calculated as November 29th. Without the offset, the date is calculated as October 30th.
-
To choose a numeric day of the quarter, select A Day After the Beginning and Quarter in the first two drop-down lists. Select the offset value in the Days from the Beginning of the Quarter box.
For example, if today is October 24th, an offset of plus 8 days is calculated as November 1st. An adjustment of 2 days from the beginning of the quarter is calculated as October 2nd. (The fourth quarter of the year runs from October to December.) If today is October 24th, an offset of minus 1 month is calculated as September 24th (which is in the third quarter of the year, which runs from July to September). An adjustment of 2 days from the beginning of the quarter is calculated as July 2nd. Without either offset, the date is calculated as October 2nd.
-
To choose a day of the quarter, select Day of Week and Quarter in the first two drop-down lists. Choose the ordinal number (First, Second, and so on) of the day, the day of the week, and the ordinal number of the month from the next drop-down lists.
For example, if today is Friday, October 24th, then "the second Sunday" of the "second month" is calculated as Sunday, November 9th. (November is the second month of the current quarter.) Using this adjustment, today minus 1 month is calculated as Sunday, August 10th. This is calculated by subtracting one month from the current day, resulting in September 24th. That date is in the third quarter, so the second month of the third quarter is August (the third quarter of the year runs from July to September).
-
To adjust from the last day of the quarter, select A Day Prior to the End and Quarter in the first two drop-down lists. Select the offset value in the Days to the End of the Quarter box.
For example, if today is October 24th, an offset of plus 8 days is calculated as November 1st (the fourth quarter runs from October to December). An adjustment of 2 days prior to the end of the quarter is calculated as December 30th. Without the offset, the date still is calculated as December 30th.
-
To choose the numeric day of a specific month, select A Date of the Year. Click the date, then select the month and (numeric) day.
For example, if today is October 24th, then "today minus 10 months" and "on February 1" is calculated as February 1st of the previous year. Without the offset of 10 months, it is calculated as February 1st of the current year.
-
To choose a specific day of a specific week in a specific year, select Day of Week and Year in the first two drop-down lists. Choose the ordinal number (First, Second, and so on), day of the week, and month from the next drop-down lists.
For example, if today is Friday, October 24th, then "today plus 8 days" and "the first Monday of January" is calculated as January 6th of the current year. If the offset was "minus 10 months", the date is calculated as Monday, January 1st of the previous year. Without any offset, the date is calculated as January 6th of the current year.
-
-
When creating a prompt, dynamic times are available for any attribute forms with a Datetime or Time format; the Use Dynamic Time check box will be available.
-
To define a dynamic time, select the Use Dynamic Time check box, then do one of the following:
- To offset the time by hours, select Plus or Minus from the This Hour drop-down. Type the offset value in hours. For example, if the current time is 12:40 PM, then "this hour plus one hour" is calculated as 1:40 PM.
- To offset the time by minutes, select Plus or Minus from the This minute drop-down. Type the offset value in minutes. For example, if the current time is 12:40 PM, then "this minute minus 10 minutes" is calculated as 12:30 PM.
- To offset the dynamic time by both hours and minutes, complete both of the previous actions. For example, if the current time is 12:40 PM, then "this hour plus one hour" and "this minute minus 10 minutes" is calculated as 1:30 PM.
-
To use a static time, clear the Use Dynamic Time check box. Type the static time in the Time field.
-
- Click Done.
- Finish creating the filter, as
described in
View the result of the offsets in the Preview area.
To choose a static date instead of creating a dynamic date, disable Show Dynamic Date. You are returned to the calendar to choose a date.