Strategy ONE
Reserve Nodes with Work Fences
Within a cluster, work fences allow an administrator to reserve specific nodes for use by certain users or workloads during normal operation. There are two types of fences:
- User Fence: used to process requests from a list of specified users or user groups. User fences can be further limited by specifying applicable projects.
- Workload Fence: used to run subscriptions triggered by an event or time-based schedule for specified projects. Note that on-demand event subscriptions such as run immediately, preview, or personal view are not included. For more information on subscriptions, see Scheduling Reports and Documents: Subscriptions.
For example, a user fence could be configured for users who require more processing power or high availability. Conversely, a workload fence, could be configured to limit the resources for lower priority subscriptions.
Typically, the majority of the nodes in a cluster will not be part of a fence, making them available for general use. All configured fences are defined in a single list ordered by precedence. When a request is received, the ordered list of all fences and their configurations are assessed to determine if the request matches any fence configuration. A request will be processed by the first fence found with an available node in the ordered list where the request matches the fence criteria.
When all nodes in the cluster are part of the fence list, the request will be sent to a node in the last fence in the ordered list.
Fencing is not supported with legacy clients which includes MicroStrategy Developer and administration tools such as Command Manager.
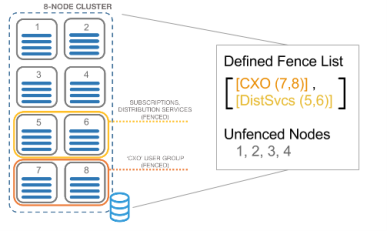
Consider the following figure which shows a clustered implementation with eight nodes:

- Nodes 7 and 8 are defined in the "CXO" user fence, meaning that these nodes are reserved for requests from users in the CXO group.
- Nodes 5 and 6 are defined in the "DistSvcs" workload fence, meaning that these nodes are reserved for processing subscriptions that are not on-demand events.
- Nodes 1, 2, 3, and 4 are not defined in a fence, meaning that they are available to process requests that do not meet the criteria of either fence.
Use Fences with Asymmetric Project Clustering
When user fences are configured with a cluster that has projects that are only loaded on specific nodes, users are always sent to a node that supports the project. The first fence found in the priority list that includes a node where the requested project is loaded will be used. For more information about asymmetric project clustering, see Distribute Projects Across Nodes in a Cluster.
Configure Fences
Using Command Manager, you can create, modify, list, and delete fences without restarting the clustered Intelligence Servers. For more information about Command Manager, see Automating Administrative Tasks with Command Manager.
- You have properly configured an Intelligence Server cluster and all nodes in the cluster must use the same server definition.
- You can log in to Command Manager as a user that has the
DssPrivilegesConfigureServerBasicprivilege, which is a default privilege for the Server Resource Settings Administrators group.
Configure Fences
Script outlines are provided in Command Manager to assist with configuring fences in the Fence_Outlines folder. For more information about these commands, see the Command Manager Help Help.
Enable User Fencing in MicroStrategy Web
After your fences have been configured, you will need to enable MicroStrategy Web to use user fences. The setting is off by default.

- On the Web Administration page open Other Configuration.
- Under Fencing select the Enable Fencing checkbox.
- Click Save.
Enable User Fencing in MicroStrategy Library
- Locate
<MicroStrategy Library Root>/WEB-INF/xml/sys_defaults.xml. -
Modify the following entry to a value of
"1"and save.Copy<pr des="whether to enable fencing" n="enableFencing" scp="system" v="1" dt="boolean"/> - Restart Library.
