Strategy ONE
Creating logical views
Logical views can be created in MicroStrategy Developer using the Table Editor, which is shown in the image below.
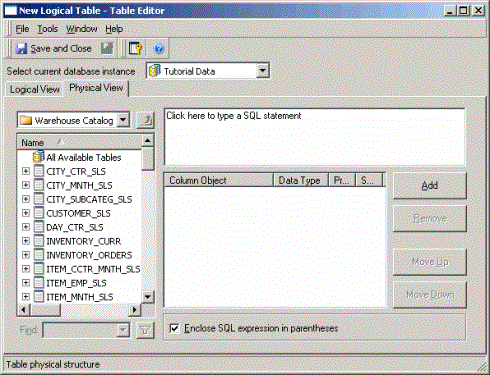
The Object Browser on the left-hand side lists all tables and columns that have been imported into the project. Any physical table in the project database instance can be used in the SELECT statement. The SQL statement panel, displayed near the top and on the right-hand side, is where you type in your SQL query. The Mapping panel, displayed just below the SQL statement panel, is where you map the columns returned by the SQL query.
Since SQL queries are required to create logical views, you should be experienced with using SQL before you use the logical view feature. It is your responsibility to ensure the accuracy and validity of your SQL statements. In addition, you should also understand that the SQL query entered for logical views is not modified in any way by MicroStrategy. Therefore, make sure that your RDBMS is optimized to answer the query that you create.
Because the MicroStrategy Engine does not parse through the SQL syntax, the statistics log does not contain any information about the actual physical tables accessed; the logical view is logged instead. The same holds true if you use a view in the database, in which case table objects accessed are not logged either.
In the SQL generated for a report, logical views are generated as either a derived table or a common table expression (CTE) depending on the type of database that you use. It is recommended that you use derived tables to define logical views, although CTEs are also supported by some databases. Derived tables are advantageous because they are nested in the SQL generated by the Engine. CTEs, however, are not nested in the SQL because this would result in invalid SQL syntax. Refer to your third-party database documentation for any applicable SQL syntax requirements.
When the MicroStrategy Engine needs to use a logical table that maps directly to a physical database table, it inserts the name of the table into the FROM clause. For a logical view, which maps to a SQL statement, the MicroStrategy Engine inserts the SQL syntax in the FROM clause. The Engine generates derived table syntax to represent the logical view.
The results of logical views are not cached. Instead, the logical view appears as additional syntax in the report SQL generated by MicroStrategy.
The steps on how to create a logical view are described below.
Prerequisite
You must have the MultiSource Option to create logical views on data sources other than the data source for the primary database instance. If you do not have the MultiSource Option, then you can only create logical views for the data source that belongs to the primary database instance.
To create a logical view in the Table Editor
-
From the File menu, select New and then Logical Table. The Table Editor is displayed with the Physical View tab selected by default.
-
If you have the MultiSource Option, from the Select current database instance drop-down list, select which data source to retrieve the data from for the logical view. Select a database instance for the data source to use for the logical view.
If you do not have the MultiSource Option, then you can only create logical views for the data source that belongs to the primary database instance. This means that there is no drop-down list to select a database instance.
When choosing a database instance, if you select the database instance listed as the project's primary database instance, the database instance for the logical view is changed anytime the project's primary database instance is changed. For examples of when to use each option, see Adding data into a project.
-
In the SQL Statement panel, type your SQL statement. You can drag and drop columns from the Object Browser to insert them into the statement.
It is recommended that you use derived tables to define logical views because the logical view SQL syntax becomes nested inside SQL statements generated by the Engine. Although common table expressions (CTEs) are also supported for some databases, these expressions cannot be nested in the SQL because this would result in invalid SQL syntax. Refer to your third-party database documentation for any applicable SQL syntax requirements.
-
By default, the Enclose SQL statement in parentheses check box is selected. This encloses the entire SQL statement that you typed in the SQL statement panel in parentheses when the SQL statement is executed, which is valid if the SQL statement uses a standard select clause.
However, if you include SQL functions to create tables, the parentheses can cause invalid SQL syntax. Table creation syntax in a SQL statement can be of the form
TABLE (arg1, arg2, ..., argN). If you include table creation SQL functions or other SQL functions that cannot support parentheses that enclose the entire SQL statement, clear this check box. Refer to your third-party database documentation for any applicable SQL syntax requirements. -
Click Add to map columns returned by the SQL statement.
-
Type in the column name under Column Object. This creates a new column.
Alternatively, you can also drag and drop columns from the Object Browser to the Column Object cell. By doing this, you map an existing column to the logical view.
The names of the columns must match exactly the column aliases defined in the SQL statement. However, the order of the columns does not have to match the order in which the column aliases appear in the SQL statement.
-
Select a Data Type for the column by using the drop-down list.
If you used an existing column in the mapping in this step, the data type of that column is inherited. If you change the data type, the change will affect all the tables with that column.
-
Modify the Precision and Scale of the column, if applicable:
-
Precision: The total number of digits used to define a number. For example, the number 1234.56789 has a precision of nine and a scale of five.
-
Scale: The number of digits to the right of the decimal point used to define a number. The scale of a data type must be less than or equal to the precision for the data type. For example, the number 1234.56789 has a scale of five and a precision of nine.
-
-
From the toolbar, click Save and Close to save the logical table and close the Table Editor.
-
From the Schema menu, select Update Schema to ensure that the new logical view is loaded into the project.
Based on the logical view that you just created, you can now create new attributes and facts, as you would with any other logical table (see Creating attributes and Creating facts). You can also map the columns of the logical table to existing attributes and facts. This can be done by modifying the attributes or facts to include the logical table as a source table.