MicroStrategy ONE
高スループットまたは詳細アーキテクチャの構成
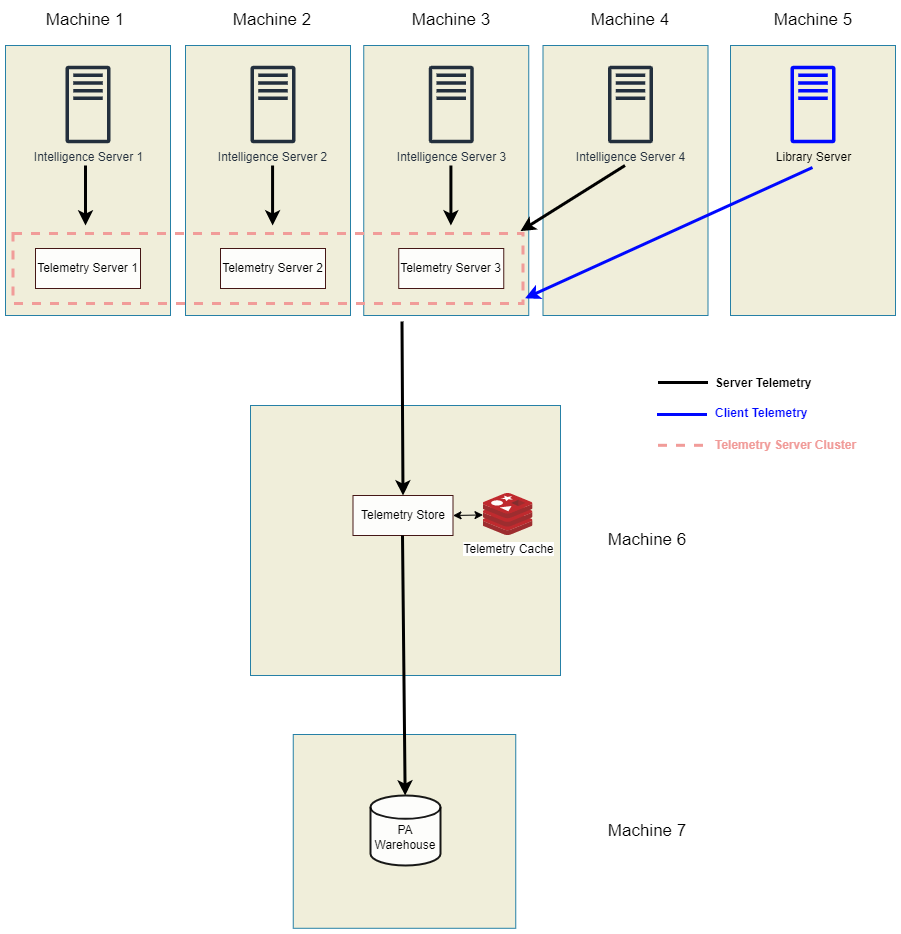
このトピックでは、Kafka ノード (Telemetry Server) のクラスターを使用して高スループット アーキテクチャを構成する方法について説明します。1 つの Telemetry Store (Platform Analytics) は、単一の Kafka ノードまたは Kakfa クラスターのデータのみを使用できます。
すべての Kafka ノードがクラスター内に存在している必要があり、複数の Kafka クラスターはサポートされていません。
最初に以下のトピックを参照してください。
4.4.Platform Analytics Consumer の構成
1.コンポーネントのインストール
最初に、対応する環境でコンポーネントをインストールします。
-
インストール ウィザードで、マシン 1、2、3 用に以下のコンポーネントを選択します。
-
MicroStrategy Intelligence
-
MicroStrategy Telemetry Server
-
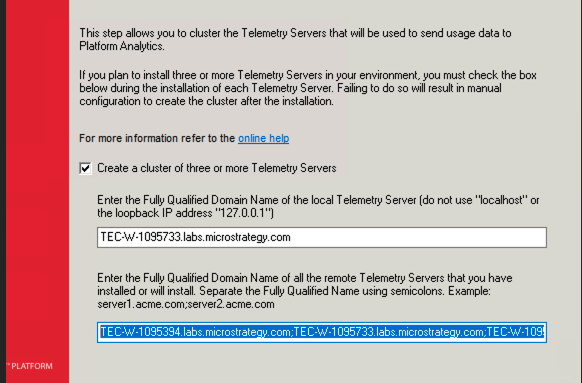
[クラスターを作成...] を選択し、テレメトリー用のクラスター環境を作成しながら、テレメトリーをインストールした、またはインストール予定の他のノードまたはマシンのアドレスを指定します。マシン 1、2、3 でこの手順を繰り返します。
-
-
インストール ウィザードで、マシン 4 および 5 用に以下のコンポーネントを選択します。
-
MicroStrategy Intelligence
-
MicroStrategy Telemetry Server
-
- インストール後、MicroStrategy Telemetry Server (Kafka および Zookeeper サービス) をオフにします。
-
インストール ウィザードで、コンピューター 6 用の次のコンポーネントを選択します:
-
Platform Analytics
-
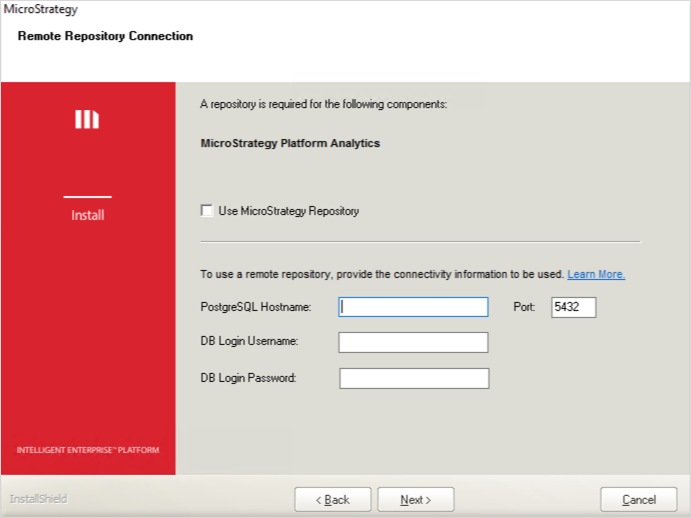
コンポーネントのインストール時に、リポジトリ (マシン 7) の接続情報を入力する必要があります。
-
-
Platform Analytics Repository をマシン 7 にインストールします。MicroStrategy Repository は、すぐに利用できるものを選択することも、組織から提供される PostgreSQL データベース サーバーの独自のインスタンスを選択することもできます 。
-
Windows の場合は Platform Analytics Service を作成するための Windows 固有の変更、Linux の場合は2.Telemetry Server の構成に進みます。
Platform Analytics Service を作成するための Windows 固有の変更
Windows マシンでは、サービスがダウンしないように、Platform Analytics サービスを再作成する必要があります。
-
[サービス] に移動します。
-
MicroStrategy Platform Analytics Consumer を停止します。
-
MicroStrategy Platform Analytics In-Memory Cache を停止します。
-
-
MicroStrategy Platform Analytics Consumer サービスを削除します。
-
管理権限で Windows コマンド プロンプトを起動します。
-
次のコマンドを実行します。
コピーsc delete MSTR_PlatformAnalyticsConsumer -
[サービス] を閉じます。
-
-
Platform Analytics Consumer サービスを再作成します。
-
Platform Analytics ディレクトリに移動します。
-
始値
MSTR_PlatformAnalyticsConsumer.config編集用です -
Delete
--DependesOn =Redis従属サービス (Kafka および Zookeeper) を削除できます。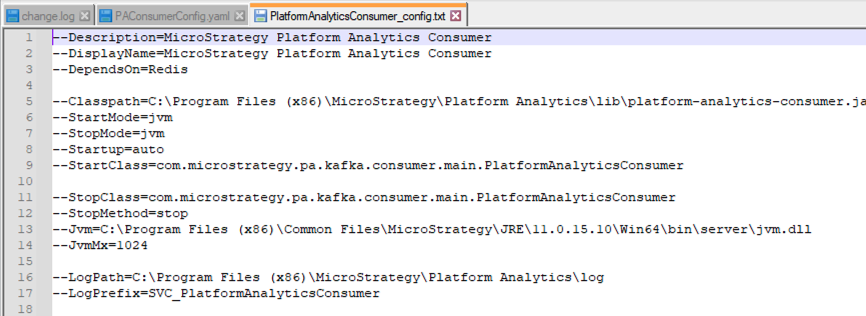
-
-
管理権限で Windows コマンド プロンプトを起動します。
-
Platform Analytics ディレクトリに移動します。
-
次のコマンドを実行します。
コピーPlatformAnalyticsConsumer.exe install MSTR_PlatformAnalyticsConsumer --Config PlatformAnalyticsConsumer_config.txt
-
-
[サービス] に移動します。
-
MicroStrategy Platform Analytics Consumer を起動します。
-
必要に応じて Service Manager を更新します。
-
2.Telemetry Server の構成
すべての Telemetry Server ノードに対して以下の手順を実行します。この例ではマシン 1、2、3 を使用します。
Server.properties を編集
-
始値
server.properties編集用ですWindows の場所:
C:\Program Files (x86)\MicroStrategy\Messaging Services\Kafka\kafka_x.x.xx\configLinux の場所:
/opt/MicroStrategy/MessagingServices/Kafka/kafka_x.x.x./config -
下
##### Server Basics ####、ノード フェイルオーバーの望ましい順序で、各 Telemetry サーバー マシンに一意の業者 ID を提供します。この例では、以下の通りです。
コンピューター 1:
broker.id=1
コンピューター 2:broker.id=2
コンピューター 3:broker.id=3コピー# Set the broker id to a unique value for each node.
# Do not change it on the machine configured during single node set up, i.e. your main node. It should be left at the default value and referred to by the other nodes.
# For example,
broker.id=1 -
下
##### Internal Topic Settings ####、クラスター内のノード数に対するオフセットとトランザクション状態係数の両方を設定します。この例では 3 です。コピー# offsets.topic.replication.factor= set to the number of nodes in your cluster
# transaction.state.log.replication.factor= set to the number of nodes in your cluster
# For example,
offsets.topic.replication.factor=3
transaction.state.log.replication.factor=3 -
下
##### Zookeeper #####、のすべての Telemetry サーバー ノード IP アドレスまたは FQDN を追加zookeeper.connectパラメーター。ノードの順序は業者 ID と一致する必要があります ステップ 2 のパラメーターですコピー# Set zookeeper.connect= to a comma separated list of <IP address:2181> for all nodes in the cluster.
# For example,
zookeeper.connect=10.27.18.73:2181,10.27.18.224:2181,10.27.36.168:2181
Zookeeper.properties を編集
-
始値
zookeeper.properties編集用ですWindows の場所:
C:\Program Files (x86)\MicroStrategy\Messaging Services\Kafka\kafka_x.x.xx\configLinux の場所:
/opt/MicroStrategy/MessagingServices/Kafka/kafka_x.x.x./config -
ファイルの最後に以下の改行を追加:
server.node_id=ip:2888:3888。この例では、ノードごとの新しい 3 行があります。コピー# To allow Zookeeper to work with the other nodes in your cluster, add the following properties to the end of the zookeeper.properties file.
# initLimit=5
# syncLimit=2
# server.X= <IP address of the node>:2888:3888
# When adding this property, replace X above with the broker.id for the node being referenced. A separate entry must be made for each node in the cluster.
# For example,
initLimit=5
syncLimit=2
server.0=10.27.18.73:2888:3888
server.1=10.27.18.224:2888:3888
server.2=10.27.36.168:2888:3888
Myid を編集
-
始値
myid編集用ですこのファイルが存在していない場合は作成します。Windows の場所:
C:\Program Files (x86)\MicroStrategy\Messaging Services\tmp\zookeeperLinux の場所:
/opt/MicroStrategy/MessagingServices/tmp/zookeeper -
次を確認します
myidファイルの内容ではない表示されない拡張機能があります。ファイル エクスプローラーで、[表示] > [表示] > [ファイル名拡張子] に移動して拡張子を表示します。ファイルに拡張子が付いている場合は削除します。 -
次を確認します
broker.id一致するノードがで設定した値server.properties。コピー# Make sure the broker.id is the same as it appears in server.properties.
# For example,
broker.id=1
3.必要なサービスの再起動
クラスター内のすべてのノードで Kafka と Zookeeper の構成を更新した後、Intelligence Server を含むサービスを再起動する必要があります。
実際に再起動する前に、設定ファイルの変更をすべて済ませておいてください。たとえば、既存の 1 ノードに加え、さらに 2 つの Kafka ノードを追加する場合、3 つのノードすべてについてインストール、設定を終えてから、サービスを再起動することになります。
他のサービスに依存しているものもあるので、以下に示す順序で起動してください。この順序で起動しないと、サービスに不整合が生じることがあります。
-
まず主ノードで Zookeeper と Kafka を起動し、それから他のノードを起動してください。
-
残りのノードで Zookeeper を起動します。
-
残りのノードで Kafka を起動します。
4.Platform Analytics Consumer の構成
Platform Analytics Consumer を実行しているノードで以下の手順を実行します。この例ではマシン 6 です。
-
始値
PAConsumerConfig.yaml編集用ですWindows の場所:
C:\Program Files (x86)\MicroStrategy\Platform Analytics\confLinux の場所:
/opt/MicroStrategy/Platform Analytics/conf -
以下の形式で、すべてのテレメトリー ノードの IP アドレスをファイルに追加します。
zookeeperConnection:IP1:port,IP2:port,IP3:portbootstrap.servers: IP1:port,IP2:port,IP3:portコピー# Set kafkaTopicNumberOfReplicas: number of nodes in cluster
# Set zookeeperConnection: <ipAddress:2181> for all nodes in cluster
# Set bootstrap.servers: <ipAddress:9092> for all nodes in cluster
# For example,
kafkaTopicNumberOfReplicas: 3
zooKeeperConnection: 10.27.18.73:2181,10.27.18.224:2181
bootstrap.servers: 10.27.18.73:9092,10.27.18.224:9092 -
次を確認します
kafkaTopicNumberOfReplicasパラメーターは、Telemetry サーバー ノードの数と一致します。この例では 3 です。 -
以下のサービスを再起動します。
-
MicroStrategy Platform Analytics Consumer
-
MicroStrategy Platform Analytics In-Memory Cache
-