Strategy ONE
Including interactive tables of contents in PDFs
A table of contents allows a user to quickly access specific areas of the PDF. In the exported PDF, users can click a label or page number to jump to that area. An entry is created in the table of contents for each element of each grouping field and, if the document contains multiple layouts, each layout.
You can create a table of contents only if a document has multiple layouts and/or is grouped. For steps to group a document, see Grouping records in a document. For details on multi-layout documents, see Creating multi-layout documents.
Tables of contents are displayed in exported PDFs in MicroStrategy Web and in PDF View in MicroStrategy Developer.
Examples are provided below for a table of contents in a grouped document, in a multi-layout document, and in a grouped multi-layout document.
The table of contents in a grouped document: Example
For example, a document is grouped by region and includes a table of contents. When you view the document as a PDF, the first page of the PDF is the table of contents. The entries in the table of contents are the regions, as shown below. A user can click a region (such as Central) or a page number to jump to that region in the PDF.
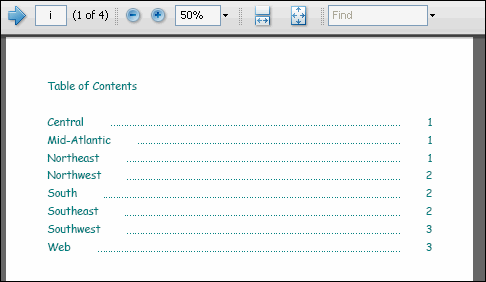
The page number is displayed as the Roman numeral i (in the toolbar at the top of the image), while the data begins on page 1. The table of contents is inserted at the beginning of the document and is not included in the page numbering of the document itself.
In the above example, the title "Table of contents" was added and the font was formatted. (Steps to add a title and change the font are included below.) The example below shows the default appearance of the table of contents:

The table of contents in a multi-layout document: Example
For example, a document contains the following three layouts, listed in order:
-
Revenue by Category (1)
-
Regional Revenue (2)
-
Yearly Revenue (3)
This document contains a table of contents. By default, it is displayed on the first page of the PDF, as shown below:
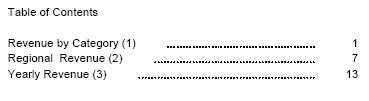
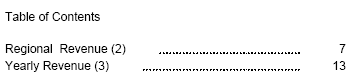
Each of the three layouts is listed in the table of contents. Change the table of contents to display before the second layout, Regional Revenue (2). Now the PDF displays the Revenue by Category (1) layout, followed by the table of contents shown below, which contains information for the last two layouts only:
Changing the location of the table of contents is useful when you want to include a cover page before the table of contents.
The table of contents in a grouped multi-layout document: Example
If your document contains layouts and groups, the table of contents displays both, as shown in the PDF below. The layouts are the top level entries, while the groups are shown within each layout.

Creating a table of contents
To include an interactive table of contents in a PDF
-
In MicroStrategy Web, open the document in Design or Editable Mode.
-
From the Tools menu, select Document Properties. The Properties dialog box opens.
-
On the left, select Table of Contents.
-
Select the Include Table of Contents check box.
-
To display a title for the table of contents, enter the text in the Title field. If the Title field is blank, the title will be displayed as Table of Contents.
-
From the Align drop-down list, specify the text alignment to use to display the title. The options are Left (default), Center, and Right.
-
To format the title of the table of contents using the formatting options selected for the entries in the table of contents, select the Inherit Formatting From Body check box.
-
To format the font that is used to display the title, in the Font section, click the Format icon. The Font Formatting dialog box opens. Select the appropriate font formatting options such as the font type, font size, color, and so on. A preview of your selected font formatting is shown in the Sample area. Click OK when you have made your selections. This option is only available if the Inherit Formatting From Body option is selected.
-
From the Fill Color palette, select a color to apply to the background of the title. To access additional colors, click More Colors. This option is only available if the Inherit Formatting From Body option is selected.
-
To format the font used to display the entries in the table of contents, in the Body section, click the Format icon. The Font Formatting dialog box opens. Select the appropriate font formatting options such as the font type, font size, color, and so on. A preview of your selected font formatting is shown in the Sample area. Click OK when you have made your selections.
-
From the Fill Color palette, select a color to apply to the background of the entries. To access additional colors, click More Colors.
-
You can specify the amount of indentation to apply to entries in the table of contents. In the Left and Right fields, type the amount of space to display between the left and right borders of the table of contents and the entries.
-
From the Style drop-down list, select the line style to use to display the border around the table of contents.
-
From the Color palette, select the line color to use to display the border around the table of contents. To access additional colors, click More Colors.
-
In the Weight field, type the line thickness to use to display the border.
-
By default, tab leaders are shown. Tab leaders are a series of dots connecting the item with the page number. To disable them, clear the Show tab leader check box.
-
To include the page header and footer on the table of contents page in the exported PDF, select the Include Page Header/Footer check box. This check box is cleared by default.
-
If the document contains multiple layouts, the Before layout drop-down list is available. By default, the table of contents is displayed before the first layout, but you can select a different layout from the list.
-
Click OK to return to the document.
-
To view the PDF, click the PDF icon on the Standard toolbar.