Strategy ONE
Configuring auto text codes
You can configure the content of any of the following auto text codes:
-
Filter details, which display the report filter and report limit by default. You can also configure user filter details and view filter details. See Configuring the filter details auto text code.
-
Report limit details, which displays the report limit. Report limits are minimum and maximum values for a metric that you specify at the report level. They determine the rows for a dataset that are displayed in the final report. See Configuring the filter details auto text code.
-
Prompt details, which display the prompt information for all prompts in the report. See Configuring the prompt details auto text code.
-
Report details, which display the report description, prompt details, filter details, and template details. See Configuring the report details auto text code.
-
Template details, which display attribute details and metric details. See Configuring the template details auto text code.
You can configure different options for different types of auto text codes. For example, you can select whether to include view filter information or the attribute name in a report filter details auto text code. For report details, you can choose whether to include information on prompts or filters. See Configuring the display of object name delimiters for auto text codes
To format the text field that contains the auto text code (such as the font name or background color), see Formatting text fields.
Levels of auto text code configuration
-
The auto text codes in a specific text field in a document, from the Properties and Formatting dialog box (the text field level)
-
All the auto text codes in a specific document, from the Document Properties dialog box (the document level)
-
The Report Details in the Report Editor, from the Report Details Properties option (the report level)
-
All the auto text codes in a project, using the Project Configuration Editor (the project level)
The list above shows the order of precedence. The configuration of a particular text field in a document overrides the configuration at the document level, which overrides the configuration in the related dataset report, which overrides the project configuration. For example, if an option is set one way for a document and another for the report, the document setting takes precedence.
Configuring the display of object name delimiters for auto text codes
One setting, Use delimiters around report object names, is used in all the auto text codes. Report objects include attributes and metrics. Delimiters are the characters around these objects which set them off from other text. In the executed document, braces { } are used as delimiters. You can select whether to:
-
Display delimiters for all report objects
-
Omit delimiters for all report objects
-
Automatically display delimiters only for those objects that contain a special character
For example, the following filter details auto text code displays delimiters:

You can choose to inherit the setting instead. If you are configuring the auto text codes in a specific text field, the setting is inherited from the document setting. If you are configuring all the auto text codes in the document, the setting is inherited from the report setting. For a list of the levels of inheritance, see Levels of auto text code configuration.
To configure the display of object name delimiters for auto text code
-
In MicroStrategy Web, open the document in Design Mode.
-
Expand the section where you want the auto text code by clicking the plus sign next to the section name.
-
Perform one of the following:
-
To select the auto text code from a list, from the Insert menu, select Auto Text, then select the auto text code to insert. You can move the text field to any desired position.
For a list of auto text codes, see Displaying document and dataset information: Auto text codes
-
To add an auto text code to an existing text field, double-click the text field to edit it, and then add the auto text. You may need to resize the text field to view the auto text.
-
To type the auto text code manually, insert a blank text field and type the code within braces { }. If an object's name contains spaces or special characters, enclose it in square brackets [ ] within the braces.
-
-
Right-click the auto text code and then click Report Details Properties. The Report Details Properties dialog box opens.
-
Right-click the auto text code and then click Report Details Properties. The Report Details Properties dialog box opens.
-
Right-click the auto text code and then click Report Details Properties. The Report Details Properties dialog box opens.
-
Select one of the following from the Use delimiters around report object names drop-down list:
-
To display delimiters for all report objects, select Always.
-
To omit delimiters for all report objects, select Never.
-
To automatically display delimiters only for those objects that contain a special character, select Only when the name contains special characters.
To inherit the document or report setting, as described in Levels of auto text code configuration, select Inherit.
-
-
Click OK to save your changes and return to the document.
Configuring the report details auto text code
The report details auto text code can be used to display the complete report details, including report description, prompt details, filter details, and template details of the specified dataset. Steps are below to add auto text code to a document, as well as to edit existing auto text.
You can choose whether to include or omit the following:
-
Report description (the short description of the report)
-
Prompt details (the prompts on the report)
-
Filter details (the report filter, view filter (for view reports based on Intelligent Cubes only), and report limits)
-
Template details (the objects on the report and the metric definitions)
You can also choose to inherit the setting instead. If you are configuring the auto text codes in a specific text field, the setting is inherited from the document setting. If you are configuring all the auto text codes in the document, the setting is inherited from the report setting. For a list of the levels of inheritance, see Levels of auto text code configuration.
The following document sample shows the report details, as well as a portion of the grid report within the Grid/Graph container, displayed as a PDF. Notice that the report description, report filter, report limits, and template information are displayed.
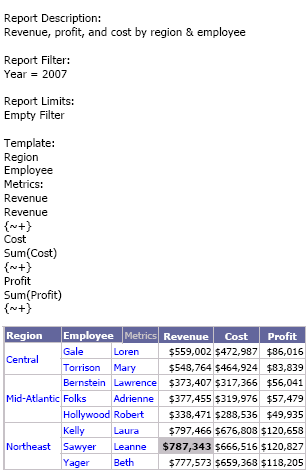
Based on the information provided by the auto text code in the sample above, you may decide that the template information is not valuable to you, but that you do need to know how the dataset is filtered, to know how the metrics are calculated, and which employees are included on the grid report. In addition, the report description is not very informational in this case. The image below shows the same document, but the Report Details auto text code has been configured to display only the information you need.

To configure the report details auto text code or edit auto text
-
In MicroStrategy Web, open the document in Design Mode.
-
Expand the section where you want the auto text code by clicking the plus sign next to the section name.
-
Perform one of the following:
-
To select the auto text code from a list, from the Insert menu, select Auto Text, then select the auto text code to insert. You can move the text field to any desired position.
For a list of auto text codes, see Displaying document and dataset information: Auto text codes
-
To add an auto text code to an existing text field, double-click the text field to edit it, and then add the auto text. You may need to resize the text field to view the auto text.
-
To type the auto text code manually, insert a blank text field and type the code within braces { }. If an object's name contains spaces or special characters, enclose it in square brackets [ ] within the braces.
-
-
Right-click the auto text code and then click Report Details Properties. The Report Details Properties dialog box opens.
-
Click the General tab and choose whether to include the features listed in the Report Details area.
-
Modify options in the Miscellaneous area of the General tab.
Configuring the template details auto text code
The template of a report contains:
-
The group of objects (attribute, metrics, custom groups, and so on) that defines the columns of data to be included in the report
-
The layout and format of these objects
The template details auto text code displays the complete template details, including attribute details and metric details, unless the template details have been configured differently at the report or project level. For a list of the different levels and their order of precedence, see Levels of auto text code configuration. Steps are below to add auto text code to a document, as well as to edit existing auto text.
You can:
-
Determine whether the template name of the dataset is displayed. You can also select how to identify an embedded template.
-
Determine whether the short description of the template is included. If the template is embedded or does not have a description, the template description line is not displayed.
-
Determine whether dataset objects other than metrics (such as attributes and consolidations) are listed.
-
Determine whether the metrics on the dataset are listed.
-
If metrics are displayed, select whether or not to display each of the following:
-
Conditional metrics only
-
Metric formulas
-
Metric dimensionality
-
Metric conditionality
-
Metric transformation
-
If you choose to inherit whether metrics are displayed, these settings are also inherited.
Use the Units from View or Base setting to choose whether to include the report objects from either the base report or the view report. If you move objects from the grid of a report to the Report Objects pane, or you use a view filter or create a derived metric, you have created a view report. The report before you made these kinds of modifications is referred to as the base report. The template details can show all the objects on the report, regardless of whether they are on the report grid, if you select Base. If you select View, only those objects on the report grid are included in the template details.
To configure the template details auto text code or edit auto text
-
In MicroStrategy Web, open the document in Design Mode.
-
Expand the section where you want the auto text code by clicking the plus sign next to the section name.
-
Perform one of the following:
-
To select the auto text code from a list, from the Insert menu, select Auto Text, then select the auto text code to insert. You can move the text field to any desired position.
For a list of auto text codes, see Displaying document and dataset information: Auto text codes.
-
To add an auto text code to an existing text field, double-click the text field to edit it, and then add the auto text. You may need to resize the text field to view the auto text.
-
To type the auto text code manually, insert a blank text field and type the code within braces { }. If an object's name contains spaces or special characters, enclose it in square brackets [ ] within the braces. To see all template details, type the following text into the text field:
{&TEMPLATEDETAILS}
-
-
Right-click the auto text code and then click Report Details Properties. The Report Details Properties dialog box opens.
-
Click the Template Details tab and choose whether to include the features listed.
By default, each setting on this tab inherits the document or report setting, as described in Levels of auto text code configuration. You can return to this default by selecting Inherit from the drop-down list for the specific setting.
Configuring the prompt details auto text code
The prompt details auto text code displays the prompt information for all prompts in the document. Steps are below to add auto text code to a document, as well as to edit existing auto text.
-
Whether the prompt title and index (a number indicating the order of the prompts in the dataset) are displayed.
-
The text to display when a prompt is unanswered. The options are:
-
Use the default document or report setting for unanswered prompts
-
Display nothing
-
Display "Prompt Not Answered"
-
Display "No Selection"
-
Display "All/None"
Whether the word "All" or "None" displays depends on the type of prompt. For example, an unanswered object prompt displays as "None" because no objects are selected. An unanswered filter definition prompt displays as "All" because the report is not filtered and therefore all the objects appear on the report.
-
-
Whether and how to display the attribute name for any attribute element list prompts in the document. The options are:
-
Use the default document or report setting for attribute element prompts
-
Display the attribute name (for example, Region)
-
Omit the attribute name
-
Repeat the attribute name for each prompt answer (for example, Region = North, Region = South)
The browse form of the attribute, which is displayed when a user answers the prompt, is used to display the attribute elements in the prompt details auto text code. For information on browse forms, see the Project Design Guide.
-
-
Whether to include unused prompts. An unused prompt occurs when you drill on a grid or graph report in a document, and the grid or graph report contains a prompt. The resulting report, which you can use as a dataset, can display or omit the prompt details from the original report (the report that you drilled on).
For example, a document contains two datasets, which are displayed as grid reports in the document:
-
Customers per Employee contains the Region attribute and the metrics Count of Customers, Employee Headcount, and Customers per Employee. It is prompted for Region.
-
Regional Revenue contains the Year and Region attributes, and the Revenue metric. It is prompted for Region and Year.
The document also contains a prompt details auto text code, which is configured to display the prompt titles and index. The prompt title is specified when the prompt is created (Region prompt and Year in the example below), and the index is a number indicating the order of the prompts in the datasets (Prompt 1 and Prompt 2 below).
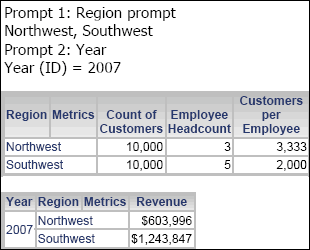
Although the datasets contain three prompts, only two are displayed. Since both datasets contain the same prompt on Region, that prompt is only displayed once.
If you change the prompt details auto text code to omit the prompt titles and index, only the prompt answers are displayed, as shown below:
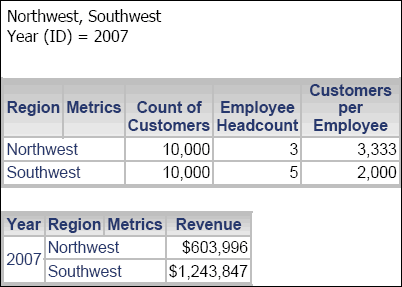
The Region prompt is an attribute element list prompt, so you can also specify whether and how to display the attribute name. In the example above, the attribute name is not displayed; the auto text code lists the selected attribute elements only. In the following document sample, the remaining options are shown. The prompt details auto text code on the left displays the attribute name, while the one on the right repeats the attribute name for each prompt answer.

Sometimes users do not answer all the prompts. You can choose what to display when a prompt is not answered. You can select pre-defined text, or you can choose to display nothing at all.
-
To configure prompt details auto text codes or edit auto text
-
In MicroStrategy Web, open the document in Design Mode.
-
Expand the section where you want the auto text code by clicking the plus sign next to the section name.
-
Perform one of the following:
-
To select the auto text code from a list, from the Insert menu, select Auto Text, then select the auto text code to insert. You can move the text field to any desired position.
For a list of auto text codes, see Displaying document and dataset information: Auto text codes
-
To add an auto text code to an existing text field, double-click the text field to edit it, and then add the auto text. You may need to resize the text field to view the auto text.
-
To type the auto text code manually, insert a blank text field and type the code within braces { }. If an object's name contains spaces or special characters, enclose it in square brackets [ ] within the braces.
-
-
Right-click the auto text code and then click Report Details Properties. The Report Details Properties dialog box opens.
-
Click the General tab and choose whether to include the features listed in the Prompt Details area.
Configuring the filter details auto text code
The filter details auto text code displays information about the report filter and report limit used in the specified dataset by default, although other types of filters can be displayed. Steps are below to add auto text code to a document, as well as to edit existing auto text.
You can configure the following:
-
You can configure the content of the filter details auto text code, by selecting which filter types to include (report filter, view filter (for view reports based on Intelligent Cubes only), report limits, and so on) and how the filters are displayed. For example, you can select whether to include the name of the filter type and whether to display the report limits before or after view filters.
-
For filters that contain attribute element list qualifications, you can configure how those lists are displayed. For example, you can specify whether to show the attribute name (such as Region or Year) and the separator between attribute names.
-
You can configure how attribute form and set qualifications in filters are displayed. For example, you can select whether to use names or symbols for the operators.
-
You can configure how logical operators, which join multiple qualifications or filters, are displayed. For example, you can choose whether or not to display operators. You can select to display only the AND operator or only the OR operator.
-
You can configure whether aliases replace object names in the filter details.
For an introduction to filters, see the Basic Reporting Guide.
To configure the filter details auto text code or edit auto text
-
In MicroStrategy Web, open the document in Design Mode.
-
Expand the section where you want the auto text code by clicking the plus sign next to the section name.
-
Perform one of the following:
-
To select the auto text code from a list, from the Insert menu, select Auto Text, then select the auto text code to insert. You can move the text field to any desired position.
For a list of auto text codes, see Displaying document and dataset information: Auto text codes.
-
To add an auto text code to an existing text field, double-click the text field to edit it, and then add the auto text. You may need to resize the text field to view the auto text.
-
To type the auto text code manually, insert a blank text field and type the code within braces { }. If an object's name contains spaces or special characters, enclose it in square brackets [ ] within the braces.
-
-
Right-click the auto text code and then click Report Details Properties. The Report Details Properties dialog box opens.
-
Click the Filter Details - Contents tab and the Filter Details - Other tab and choose whether to include the features listed below:
-
You can choose whether or not to include each type of filter.
-
You can configure how the filters are displayed in the filter details auto text code by specifying the following settings:
-
Whether to include the names of the filter types (Report Filter, View Filter, and so on). If the filter type names are omitted, the auto text code displays as:
(Local Filter): Year=2006, 2007Region=Northeast, Mid-Atlantic, Southeast -
If the filter type name is included, specify whether to include empty expressions. An empty expression is a filter type that is not included on the dataset.
-
Whether to add a new line after each filter type name, before the definition of the filter.
For example, if the new line is omitted, the auto text code displays as:
Report Filter (Local Filter): Year=2006, 2007Security Filter: Region= Northeast, Mid-Atlantic, Southeast -
Whether to add a new line between the different filter types to help differentiate between them.
For example, if the new line is omitted, the results are:
Report Filter (Local Filter): Year=2006, 2007 Security Filter: Region= Northeast, Mid-Atlantic, Southeast -
Whether to show the report limits before or after the view filter.
-
Whether to display details about shortcut filters, which are stand-alone filters used in the report filter.
For example, Filter 1 is created as a stand-alone filter in the Filter Editor. The filter is defined as Region = Northeast. A report contains the Year and Region attributes, as well as the Revenue metric. A local filter (a filter defined in the Report Editor, not the Filter Editor) is created in the report, filtering on 2005. Then Filter 1 is added to the report filter, so Filter 1 becomes a shortcut filter in the report.
This report is used to create the document shown below, which contains three filter details auto text codes, one for each of the shortcut filter options. The definition of the local filter (Year = 2005) is displayed in each auto text code.
-
The first auto text code shows just the filter name, Filter 1.
-
The second auto text code shows the filter definition, Region = Northeast.
-
The third auto text code shows both the name and filter.

-
-
-
The drill filter is displayed on the report that is created by drilling on a grid or graph report in a document. The drill filter is the attribute element(s) that you selected when you drilled on the grid or graph report.
For example, a Grid/Graph in a document contains the Year and Region attributes, as well as the Revenue and Profit metrics. The document uses a filter details auto text code which is configured to display only the drill filter. A portion of the document is shown below in Interactive Mode in MicroStrategy Web. The filter details auto text code displays as "Empty Filter," since the only filter displayed is a drill filter, and no drilling has occurred.
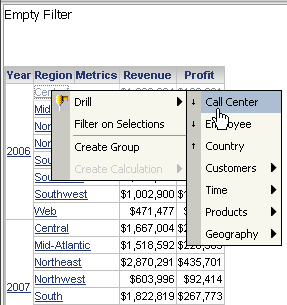
Drill on the Grid/Graph from 2006 Central down to Call Center, as shown above. The following report is displayed, with a Report Details pane that displays the drill filter information, that 2006 and Central were selected when the drill was performed.

If the drill filter was disabled, the Report Details pane would be blank in the drilled-to report.
If you drill from an attribute (as opposed to drilling from attribute elements), a drill filter is not created. The resulting report is not filtered; it is just displayed at a different level from the grid or graph report in the document.
-
A filter can contain an attribute element list qualification, which qualifies on a list of attribute elements. For example, you can use an attribute element list qualification on the attribute Customer, in a report, to return data only for those customers that you specify in your list.
For these filters, you can configure how the lists are displayed using the following settings.
-
Show attribute name for In List conditions: Determines whether or not the name of the attribute in the filter's attribute element list is displayed. The name can also be repeated for each attribute element (for example, Region = Northeast, Region = Mid-Atlantic).
-
Separator after attribute name: Specifies the characters that separate the attribute name from the attribute element.
-
New line after attribute name: Determines whether or not the attribute name and its element display on separate lines.
-
Separator between last two elements: Specifies the text that separates the last two attribute elements in the list. The choices are:
-
or
-
and
-
comma (the character is used, not the text)
-
custom (in the Custom separator field, type the characters to use as the separator)
-
-
New line between elements: Determines whether or not each attribute element displays on a separate line.
-
Trim elements: Determines whether extra spaces in the attribute elements are deleted. For example, an element of an account attribute is PSI2415 : 10 : COMMERCIAL. If Trim elements is enabled, the attribute is displayed as PSI2415:10:COMMERCIAL, omitting the extra spaces.
-
-
A filter can contain:
-
An attribute form qualification, which is based on attribute forms (such as First Name and Last Name for the Customer attribute)
-
A metric set qualification, which is based on metric value or rank
-
A relationship set qualification, which is based on relationships between attributes
For these types of filters, you can configure how the qualifications are displayed using the following settings:
-
Use names or symbols for operators: Determines whether names (such as Equals or Greater Than) or symbols (such as = or >) are displayed.
The following document sample shows two filter details auto text codes. The one on the left uses a symbol to indicate the operator, while the one on the right uses a name.

-
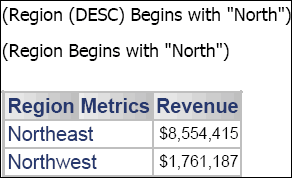
Include attribute form names in qualification conditions: For conditions in attribute qualification filters, determines whether or not to display attribute form names (such as DESC or ID).
The following document sample shows two filter details auto text codes. The first one includes the attribute form name (DESC), while the second does not.
-
Dynamic dates: Determines whether dynamic dates are shown as the date or as the expression that calculates the date.
The following document sample shows two filter details auto text codes. The top one displays the dynamic date as a date, while the bottom one shows the expression.

-
-
Filters can have multiple qualifications, which are the conditions (such as Revenue > 6,000,000) that the data must meet to be included in a report. A dataset can also contain multiple filters in its report filter.
Use the following settings to configure how to display the logical operators that join multiple conditions:
-
New line between conditions: Determines whether or not each condition is placed on a separate line. You can also select Automatic, which inserts a line only when conditions are joined by different logical operators.
For example, a report is filtered for revenue greater than 10 million and profit greater than 2 million and the Mid-Atlantic region. A second report uses the same filter conditions, except the second logical operator is replaced by or, which filters the report for revenue greater than 10 million and either profit greater than 2 million or the Mid-Atlantic region. These two reports are used in the following document. A filter details auto text code is displayed for each dataset; both use the Automatic option for New line between conditions. In the first filter details auto text code, the text wraps within the text field. In the second filter details, a new line is started at the logical operator AND, and again before the second condition. Using the new lines helps to distinguish between the conditions.

If you select Yes or Automatic, you can specify whether to Single space or Double space the conditions.
-
Parentheses around conditions: Determines whether or not parentheses are placed around each condition, such as (Region = Northeast). If a new line is inserted between conditions, you can often omit the parentheses since the conditions are already differentiated from each other.
You can also select Automatic, which displays parentheses only when they resolve ambiguity in the expression. Parentheses are not included around conditions that are joined by the same logical operator. When conditions are joined by different operators, the parentheses are necessary to ensure that the conditions are grouped correctly.
-
Logical operator between conditions: Specifies whether or not to display the logical operator between conditions. The options are:
-
Yes to display all operators
-
No to omit all operators
-
AND only to display only the AND operator
-
OR only to display only the OR operator
The first filter details auto text code in the following document sample displays all the logical operators. The second one displays "and" only; notice that the "or" before the Region condition is replaced by a comma.

-
-
-
You can rename an object on a report, to display a more meaningful description in the context of that particular report, for example. An alias does not change the name of the object, only the name displayed on the report. A filter uses the name of the object, not the alias. You can determine whether aliases replace object names in a filter details auto text code.
-
By default, each setting on these tabs inherits the document or report setting, as described in Levels of auto text code configuration. You can return to this default by selecting Inherit from the drop-down list for the specific setting.
