Strategy ONE
Adding sections in documents
You can add other sections to the predefined document sections. This allows you to customize a section without affecting another section. For example, you may want one section that repeats before the Detail section and after any Group Headers, and a second section that does not repeat. You can add an additional section within the Detail Header, which divides the Detail Header into two sections, and set the options for each section.
As shown in the following example, the Detail Header of the document has two sections in it.
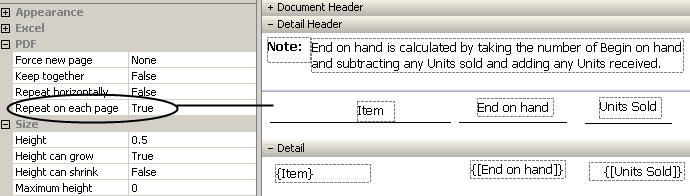
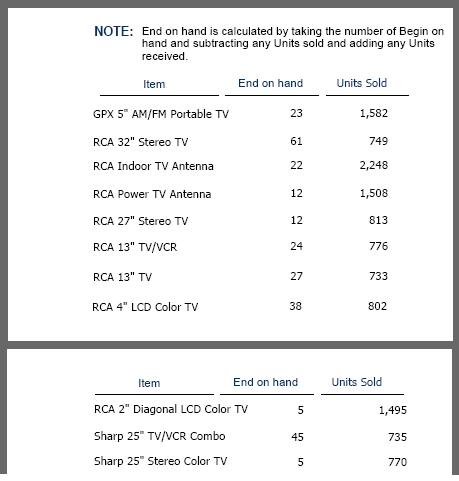
The first Detail Header section contains an explanation of how the metrics are calculated. It does not repeat on every page in the document because the explanation is needed only once. The second Detail Header section contains column headers and repeats on each page in the document. When viewed as a PDF, the sample document appears as follows.
The formatting of the new section is copied from the section in which it is added.
Sections can be added to existing sections that are either horizontally or vertically displayed. Examples are below, followed by steps to add a section.
Adding sections to horizontally displayed sections
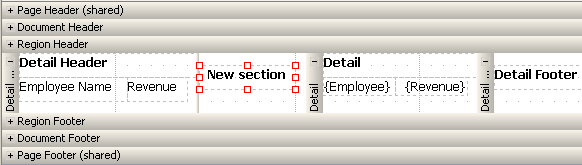
If a section is displayed horizontally, it is printed horizontally across the page. For example, the Detail Header, Detail, and Detail Footer in the following document sample, shown in Design Mode, are displayed horizontally.
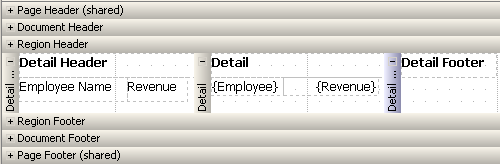
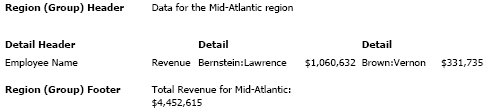
When viewed as a PDF, the Detail section is displayed next to the Detail Header, beneath the Region Header, as shown in the document sample below. (The remaining employees in the Detail section, and the Detail Footer that follows, are not shown in the sample, for space reasons.)
You can add a section to a horizontally displayed section. You insert the section to the left or right of the original section. The new section is displayed horizontally. For example, a section has been added to the previous document, to the right of the Detail Header. The new section is shown below, in Design Mode.
For an expanded example, reasons to use horizontal display, and steps, see Displaying sections horizontally.
Controlling vertical positioning of sections
Another reason for inserting additional sections is relative vertical positioning. If you have one report placed above another in a section, the reports can overlap when the PDF is generated. Inserting a new section and placing each report into its own section allows them to grow without overlapping.
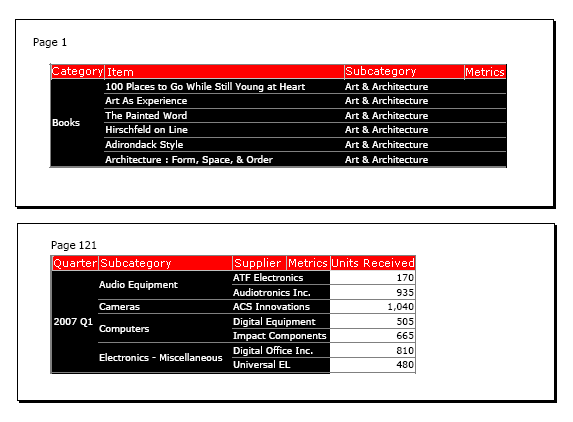
For example, a document contains two datasets: Cost, Price, and Profit per Unit, and Inventory Received from Suppliers by Quarter. A grid report is created from each dataset. In Design Mode, it appears as if the grids are positioned well, as shown below:

When you view the document as a PDF, the grids overlap because of the amount of information they contain, as shown below:

To resolve this problem, you can insert a new section into the Detail Header. This creates two Detail Headers, named Detail Header 1 and Detail Header 2. Place the second Grid/Graph into the new section. When you generate the PDF, the resulting grid reports are separated as shown in the following image:
To add a section to a document
-
In MicroStrategy Web, open the document in Design Mode.
-
In the Layout area, right-click in the section above or below where you want to add the new section, and then select either Insert Section Above or Insert Section Below. A line appears in the Layout area to divide the sections.
If the selected section is displayed horizontally, the options are Insert Section Left and Insert Section Right. For instructions to specify that a section displays horizontally, see Displaying sections horizontally.
-
You can size the sections by clicking the line divider and dragging it.
The new section is automatically formatted like the section it was added to. You can format the new section and the original section independently.