Strategy ONE
Using a PHP-based Trusted Authentication Provider
The trusted authentication providers that are supported out-of-the-box are Java-based. However, you can also implement SSO to MicroStrategy Web in a UNIX environment using a PHP-based trusted authentication provider. The example in this topic uses simpleSAML on an Apache HTTP server—both of which comply with open standards. You can tailor this example to your environment, or you can use it as a guide to integrating your own PHP-based authentication module with MicroStrategy Web.
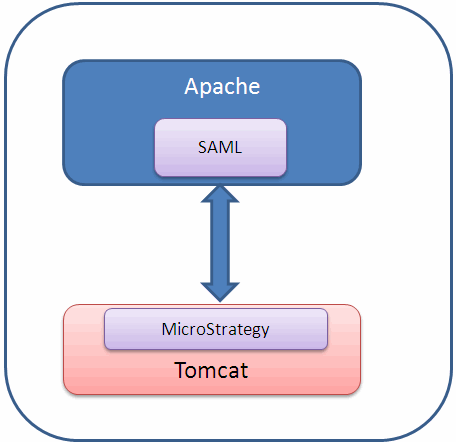
As shown in the diagram below, with Java-based SAML authentication, nothing else needs to be installed on the Apache server in order to use SAML for trusted authentication to MicroStrategy Web sitting on a Tomcat server.

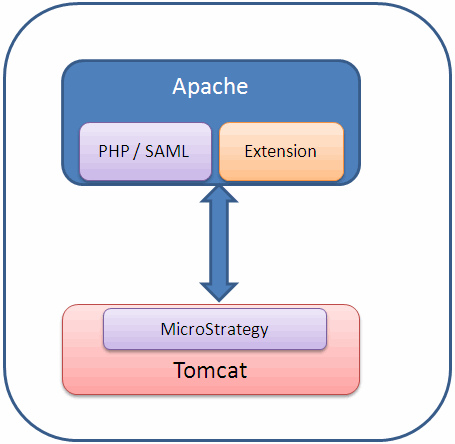
However, with PHP-based SAML authentication, you need to install PHP on Apache, install the PHP-based authentication mechanism (simpleSAML in this example), and install an extension that acts as a translator between PHP and Java (authMemCookie in this example). The extension is needed because the SAML component used is based on PHP; the extension allows this component to interface with a Java-based application server.
It is important to note that although some configuration changes are made to the PHP-based SAML component, no changes are made to the MicroStrategy platform. The diagram below illustrates these configuration changes.

When you enable trusted authentication with MicroStrategy Web (with no other authentication modes enabled), the only way that users are allowed to connect to MicroStrategy Web is directly through the application server. Refer to your Apache and Tomcat documentation to configure Tomcat so that it only allows users that come from Apache to access MicroStrategy Web.
For this example, you need root privileges to set up the Unix environment for SAML authentication.
You must first install and configure the necessary software.
Then, you set up the environment to perform the steps required for SSO.
Finally, you configure MicroStrategy to use simpleSAML as the trusted authentication” provider.
-
Establishing a trust relationship between MicroStrategy Web and Intelligence Server
-
Configuring MicroStrategy Web to use simpleSAML as the trusted authentication provider
An explanation of each step is provided below.
-
Prerequisites for using simpleSAML
The steps below assume that you have already done the following:
-
-
Download tomcat-connectors-1.2.31-src-unix.tar.gz
-
Install and configure mod_jk
-
-
-
Get zip file
-
Run compile instructions (to compile PHP as an Apache 2 shared module)
-
Once you have fulfilled these prerequisites, you are ready to set up your environment so that it uses simpleSAML to authenticate users for SSO to MicroStrategy Web.
-
Designating MicroStrategy Web as protected by simpleSAML
You must make the Apache HTTP server aware that MicroStrategy Web is protected by simpleSAML—the PHP-based authentication mechanism used in this example—so that it will redirect any user request for a MicroStrategy Web page to simpleSAML. To do this, you add MicroStrategy Web to the list of applications protected by SAML.
Make the following changes to httpd.conf (located where you installed Apache) and save it. You will make additional changes to this file in the next step.
<IfModule>
...
<Location "/MicroStrategy">
require valid-user
</Location>
</IfModule>
-
Configuring Apache to authenticate MicroStrategy users withsimpleSAMLauthentication
To use simpleSAML—the open-source PHP-based authentication mechanism used in this example—to authenticate users, you must install both the simpleSAML module itself and the extension that allows it to work with non-PHP-based applications. To do this, perform the following steps:
-
Install and configure simpleSAMLphp (the PHP-based module)
-
Install authmemcookie (the extension) and other dependent modules, in the order listed below:
-
libevent (used by memcached)
-
memcached (the cache daemon itself)
-
libmemcache (the C client API needed to compile the Apache Module)
-
memcache (holds the cookie that passes authentication information in header variables)
To install memcache, use phpize.
phpize
./configure --with-php-config=/usr/bin/apache2/php/bin/php-config
Make
Make install
-
authmemcookie (the extension)
-
-
Compile the authmemcookie module, which generates memcache.so.
-
Copy php.ini and save it in the path you set during the PHP configuration.
-
Make the following changes to httpd.conf (located where you installed Apache) and save it.
-
Add the code shown in bold for LoadModule.
# LoadModule foo_module modules/mod_foo.so
LoadModule php5_module modules/libphp5.so
Include conf/mod_jk.conf
LoadModule mod_auth_memcookie_module modules/mod_auth_memcookie.so
<IfModule mod_auth_memcookie.c>
<Location />
#Auth_memCookie_CookieName AuthMemCookie
Auth_memCookie_Memcached_AddrPort "127.0.0.1:11211"
# to redirect unauthorized user to the login page
ErrorDocument 401 "/simplesaml/authmemcookie.php"
# to specify if the module are autoritative in this directory
Auth_memCookie_Authoritative on
# This adjusts the maximum number of data elements in the
# session data. The default is 10, which can be to low.
Auth_memCookie_SessionTableSize "40"
# must be set without that the refuse authentication
AuthType Cookie
# must be set (apache mandatory) but not used by the module
AuthName "My Login"
Auth_memCookie_SetSessionHTTPHeader on
Auth_memCookie_SetSessionHTTPHeaderEncode off
</Location>
#<Location "/simplesaml">
# require valid-user
#</Location>
# to protect access to user in group1
#<Location "/myprotectedurlgroup1">
# require group group1
#</Location>
#
# ExtendedStatus controls whether Apache will generate "full" status
-
Add the code shown in bold for <Directory>.
</Directory>
<Directory /home/SAML1/simplesamlphp/www>
Options All ExecCGI FollowSymLinks Includes Indexes
Allow from All
Order Allow,Deny
AllowOverride All Options
</Directory>
#
# UserDir: The name of the directory that is appended onto a user's home
-
Add the code shown in bold for <VirtualHost>.
#</VirtualHost>
<VirtualHost *>
ServerNamemy_machinename:9090
Options All ExecCGI FollowSymLinks Indexes
#DirectoryIndex index.php index.html index.hml index.phtml index.shtml
#DocumentRoot /home/SAML1/simplesamlphp/www
Alias /simplesaml /home/SAML1/simplesamlphp/www
</VirtualHost>
JkMountCopy All
-
-
Copy mod_jk.conf to the conf folder (referenced by the following line of code in httpd.conf:Include conf/mod_jk.conf). Modify the appropriate values in the code to reflect your environment.
-
Copy workers.properties to the conf folder (referenced by the following line of code in mod_jk.conf:JkWorkersFile conf/workers.properties). Modify the appropriate values in the code to reflect your environment.
-
-
Establishing a trust relationship between MicroStrategy Web and Intelligence Server
Open the MicroStrategy Web Admin application and do the following:
-
In the left-hand pane, choose WEB SERVER -> Intelligence Server -> Default properties and do the following under Login in the right-hand pane:
-
Check “Trusted authentication request” to enable it. All other authentication modes must be disabled for this MicroStrategy Web deployment.
-
In the drop-down for “Trusted Authentication providers”, select Custom SSO.
-
Click Save.
-
-
In the left-hand pane, choose WEB SERVER -> Intelligence Server -> Servers and do the following in the right-hand pane for the Intelligence Server with which you want to establish the trust relationship:
-
Click the edit icon under Properties for the selected Intelligence Server.
-
Under Connection Properties, click the Setup button for “Trust relationship between Web Server and MicroStrategy Intelligence Server”.
-
On the setup page, enter the User name and Password that will be used for the trusted relationship and click the Create Trusted relationship button. (A checkmark will appear next to “Trust relationship between Web Server and MicroStrategy Intelligence Server”, indicating that the relationship has been established.)
-
Click Save.
-
-
-
Navigate to Tools -> Project Source and add the Intelligence Server with which you established the trust relationship.
-
Right-click the project source and choose Configure MicroStrategy Intelligence Server.
-
On the MicroStrategy Intelligence Server Configuration dialog, select Web Single Sign-on in the left-hand pane. Under “Trusted Web Application Registration” in the right-hand pane, confirm that the status of the Intelligence Server with which you established a trust relationship is “Enabled”.
-
Configuring MicroStrategy Web to usesimpleSAMLas the custom trusted authentication provider
Use the Web Customization Editor to configure the information that MicroStrategy Web needs to use simpleSAML as a custom trusted authentication provider (that is, specify the header name and value that MicroStrategy Web will use to authenticate the user for login to a MicroStrategy project).
-
Click on MicroStrategy Web Configuration inside the Application Settings view to expand the hierarchical tree. The expanded list comprises the different settings that can be modified to perform customizations.
-
Click on Property Files to gain access to the property files used in MicroStrategy Web.
-
Under Property Files, navigate to WEB-INF -> classes -> resources and double-click the custom_security.properties file to launch the Web Properties Editor.
-
On the Web Properties Editor, provide the values for the header variables that will be used by simpleSAML for authentication.
-
In the Property/Value panel, right-click the LoginParam property and choose Edit from the context menu. The Edit dialog displays.
-
On the Edit dialog, use X_MCAC_USERNAME (that is, the name of the header variable that has the SAML user ID) as the name of the header variable that simpleSAML will use for authentication.
-
Click OK to close the Edit dialog. X_MCAC_USERNAME is now displayed as the Value for the LoginParam property.
-
If synchronization with LDAP is needed, enter DistinguishedName in the field below the properties pane. (You may need to scroll down to see this field.)
-
Click the Add button and DistinguishedName is listed below the LoginParam property in the properties pane.
-
Click in the Value column for the DistinguishedName property and enter the name of the header variable that will supply the Distinguished Name of the user for LDAP synchronization.
-
-
Save your changes.
You can confirm that the trust relationship has been established in MicroStrategy Desktop by doing the following:
