MicroStrategy ONE
How to Connect to Exasol
Use the following steps to connect to Exasol if you are using MicroStrategy ONE (June 2024) or later. If you are using a version prior to MicroStrategy ONE (June 2024), see How to Connect to Exasol Prior to MicroStrategy ONE (June 2024).
via DSN (Driver)
MicroStrategy ONE ships Exasol Native ODBC Driver for analytical requests. The following driver configurations and settings are known to enhance performance of MicroStrategy when connecting to Exasol.
For Linux
- Open the file odbc.ini. By default, this is located in /opt/mstr/MicroStrategy.
- Define the ODBC Data Source under the [ODBC Data Sources].
For example, Exasol=Exasol DRIVER
- In the file, add the following:Copy
[[Exasol]
DRIVER=<ODBCLIBPATH>/exasol_odbc/libexaodbc.so
DESCRIPTION=Exasol Driver
EXAHOST=ip_address:port
EXAUID=uid
EXAPWD=pwd
EXASCHEMA=schema - Save the file.
For Windows
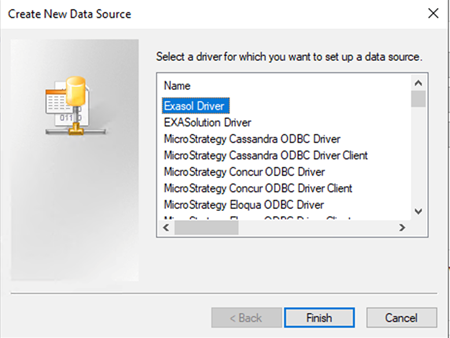
- Open the ODBC Data Source Administrator.
- In System DSN, click Add.
- Select Exasol Driver and click Finish.
- Enter the required information in the Connection tab including Data source name, Connection string, User name, Password, and Default schema.
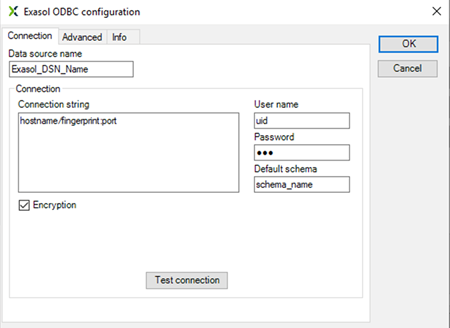
- Click OK.
Connect to Exasol From Workstation and Web
DSN-less connections to Exasol are supported using Data Import via Workstation and Web. The following steps detail configuration.
DSN-less connection is supported for both ODBC driver and JDBC driver.
JDBC is only supported using a DSN-less connection.
- Workstation
- Web
- Add an environment connection and log in to Workstation.
- Click Data Source under Administration.
-
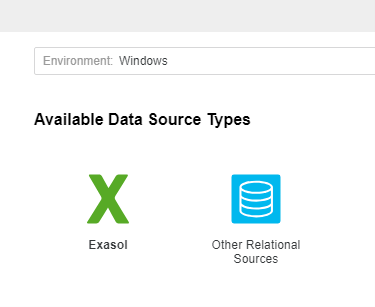
Find and choose Exasol.
- Expand Default Database Connector and choose Add New Database Connection.
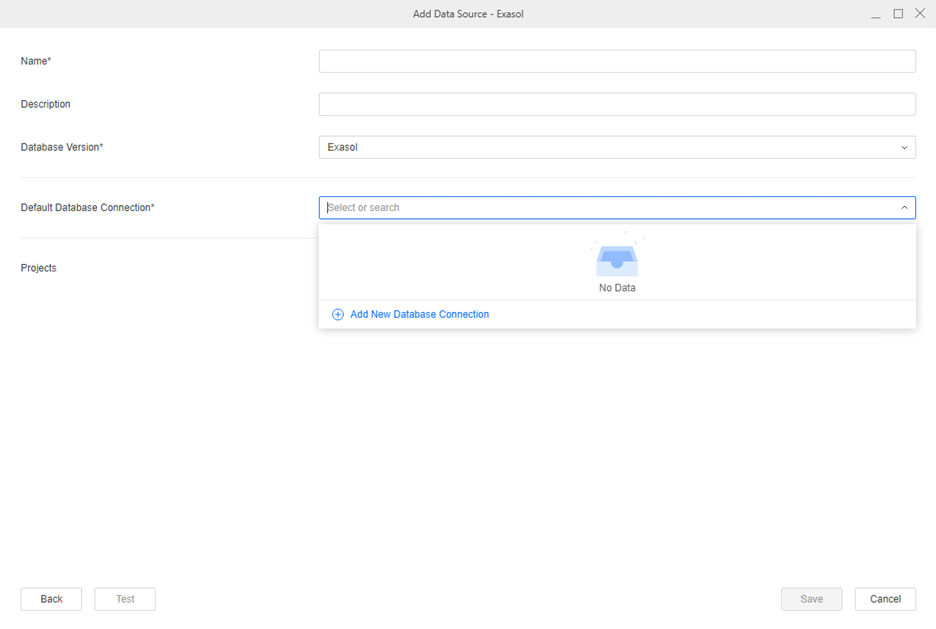
- Choose a JDBC or ODBC driver and enter the required information.
- Click Save.
- Enter the required data source information using your new database connection. You can choose any project to the data source for further data manipulation.
- Click Save.
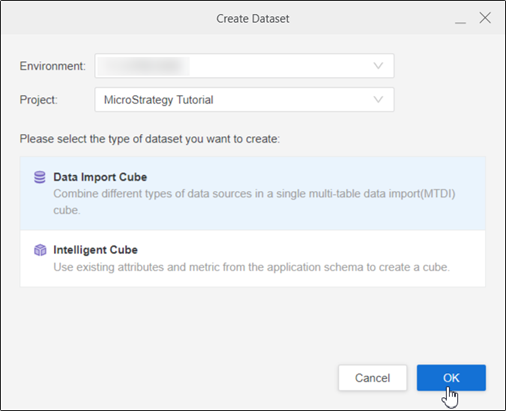
- In the Navigation pane, click
 next to Datasets.
 - Choose Data Import Cube and click OK.
- In Database Sources, choose the Exasol data source you created, select a namespace, and click Connect.
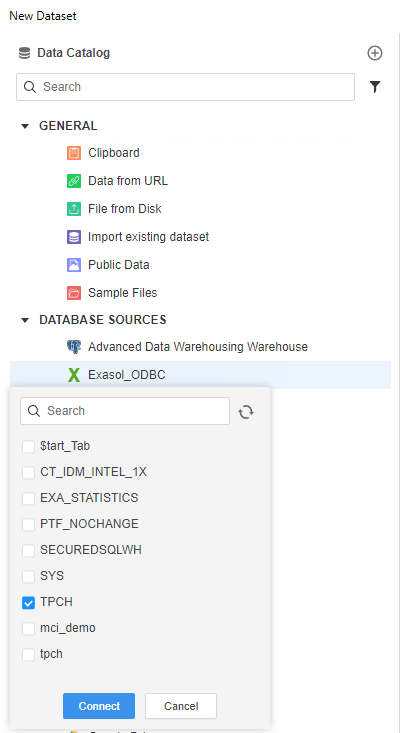
- Expand the drop-down next to the namespace and double-click any table to add it to the right pane.

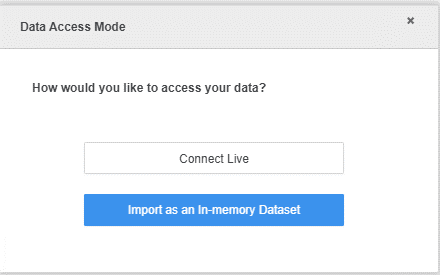
- Click Prepare data to manipulate the data or click Save to publish the cube as a Connect Live or In-memory dataset.

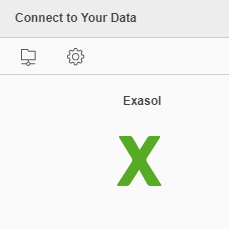
- Click Create > Add External Data.
- Find and choose Exasol.
- Choose Select Tables, Type a Query, or Build a Query to import data.

- Next to Data Source, click New Data Source .
- Enter values in the Connection dialogue based on your connection type:
DSN-less connection: Select DSN-less Data Sources and enter values in the required fields Name, Host, Port, User, and Password.
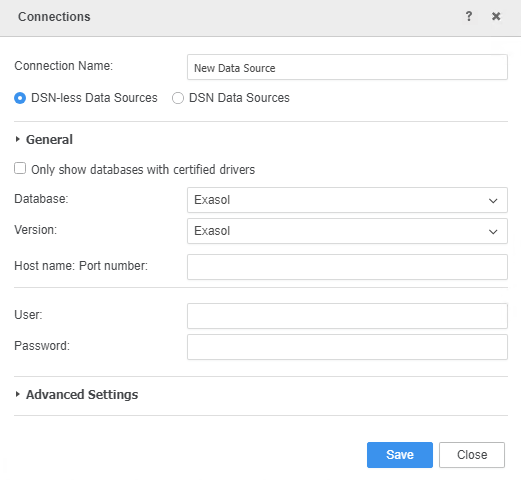
- DSN connection: Select DSN Data Sources, choose a DSN from the drop-down and enter the required fields Name, User, and Password.
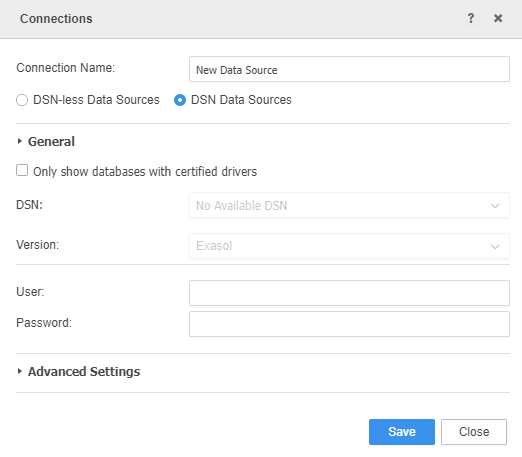
- Click Save.
- Click on the new Data Source to connect.

How to Connect to Exasol Prior to MicroStrategy ONE (June 2024)
Add a connector to EXAsolution 6 to MicroStrategy to enable MicroStrategy Web based connectivity workflows and enhance the Relational Engine with support for EXAsolution 6.
This page applies to the follow:
-
MicroStrategy Secure Enterprise 10.4 (with Hotfix 5 or later applied)
-
MicroStrategy Secure Enterprise 10.9 or later
-
Unified Quoting is supported as of MicroStrategy 2021. See KB483540 for more information.
Prerequisites
The required EXAsolution6.zip file can be found attached to this KB article.
-
Download and copy the connector file (
EXAsolution6.zip) onto the machine hosting the MicroStrategy Secure Enterprise installation. - Extract the zip file to its own directory, separate from the existing MicroStrategy installation files. For example,
/tmp/exasolorC:\exasol.This directory is referred to as
<MSTR_CONN_PATH>on this page. -
MicroStrategy Secure Enterprise must be installed and configured, including an instance of MicroStrategy Developer, MicroStrategy Web, and the MicroStrategy Intelligence Server.
Installation
Use the files attached to this KB article to complete the following three part installation.
-
Install the database object.
-
Install the driver.
-
Install the connector in MicroStrategy Web.
Install the Database Object
The required database.pds file can be found attached to this KB article.
-
Copy the
database.pdsfile onto a machine with MicroStrategy Developer installed. -
Load the database object in the
database.pdsfile into the MicroStrategy metadata, as described in KB43537.
Install the Driver on Each Intelligence Server in the Cluster
-
Download the EXAsolution JDBC driver files to all the Intelligence Server machines in the cluster.
- Copy the JDBC files to the following default MicroStrategy JDBC folder location:
- On Windows:
C:\Program Files (x86)\Common Files\MicroStrategy\JDBC - On Linux:
/opt/mstr/MicroStrategy/install/JDBC
Alternatively, you can use 64-bit ODBC drivers on both Windows and Linux. You must create Data Source Names (DSN) and test connectivity using the MicroStrategy Database (DB) Query tool.
Use the Exasol
config_odbctool to create theodbc.inifile containing all required information.Copycd EXASolution_ODBC-*
./config_odbc --host=10.0.0.1 --port=1234 --user=doe --password=test --odbcini=exasolodbc.iniThe
config_odbctool requires Perl and Digest.MD5 perl module. If these are not installed, please run the following command.Copysudo yum install perl
sudo yum install perl-Digest-MD5 -y - On Windows:
- Restart the Intelligence Server.
- Validate the installation.
- Open MicroStrategy Developer.
- Create a new database instance with the new connector.
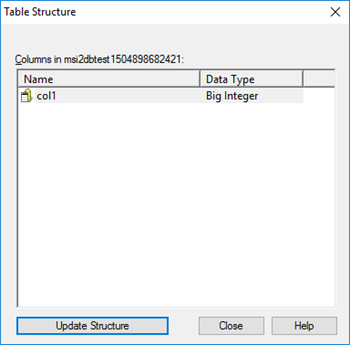
- Open the Warehouse Catalog and select the newly created database instance.
A list of tables from the database instance is listed in the left panel.
Right-click on a table > Table Structure. A dialog displays all columns from the table with the correctly mapped data types. The "unknown" data type does not appear.
Install the Connector in All MicroStrategy Web Machines in the Cluster
-
Copy the
dbproperties.xsltandAddConnector.jarfiles to all machines running MicroStrategy Web.Use the location of the files to replace
<location1>for the command in step 3. -
Find the location of the
DBProperties.xmlfile. The file can be found in the directory where MicroStrategy Web is deployed. This path is different depending on the application server used. The following are common examples:-
Microsoft IIS:
C:\Program Files (x86)\MicroStrategy\Web ASPx\WEB-INF\xml\DBproperties.xml -
Tomcat (on Windows):
C:\Program Files (x86)\Common Files\MicroStrategy\Tomcat\apache-tomcat-8.0.30\webapps\MicroStrategy\WEB-INF\xml\DBProperties.xml -
Tomcat (on Linux):
/opt/apache/tomcat/apache-tomcat-8.0.43/webapps/MicroStrategy/WEB-INF/xml/DBproperties.xml
Use this location to replace
<location2>for the path to theDBProperties.xmlfile in the command in step 3. -
-
Run the following command replacing
<location2>with the folder where theDBProperties.xmlfile is located.Copyjava -jar <location1>AddConnector.jar --target <location2>DBProperties.xml --file <location1>dbpropertiesRunning the command requires the privileges to copy and modify the existing
dtmapping.pdsfile.On Windows,
locationmust end with a backslash (\).On Linux,
locationmust end with a forward slash (/).The command will create a backup of the original
DBPropereties.xmlfile in the location of<location2>.
Validate Correct Installation
- Open MicroStrategy Web and select a project.
- Click Create > Add External Data.
- Select an import option and click Next.
- Next to Data Sources, click New Data Source
 .
. - From the Database drop-down, choose Exasol.
Uninstall the Connector
You must reverse the installation step to remove the connector.
- Remove the database object.
- Open MicroStrategy Developer.
- Remove any dependency on the connector. This may require modifying or deleting any database instance that uses this connector.
- Open any database instance to edit it.
- Click Upgrade.
- From the lower right panel, select the database object from the list of available database objects.
- Click the left arrow to remove the database object.
-
Remove the driver.
Delete the JDBC driver files from all Intelligence Server machines.
-
Remove the data type mapping.
-
Remove the connector or from MicroStrategy Web.
-
Connect to the MicroStrategy Web machine and locate the backup file created as part of the installation. For example,
DBProperties.xml.bak2017913185806. -
Remove the
DBProperties.xmlfile. -
Rename the backup file to
DBProperties.xml. -
Restart the application server.
-