MicroStrategy ONE
How to Connect to Cloudera Impala
This page contains information on how to connect to Cloudera Impala via Web and DSN, as well as how to enable authentication modes.
Connecting with Web
- Open a new dashboard and click New Data from the Datasets pane.
- Search for Impala in the Connect to Your Data dialog and select either the Cloudera Impala or Cloudera Impala (JDBC) connector.
- From the Select Import Options dialog, select the action best suited to your dataset (Build a Query, Type a Query, or Select Tables).
- Click the
 icon next to Data Sources.
 - Fill out the data source information by creating DSN-less data source.
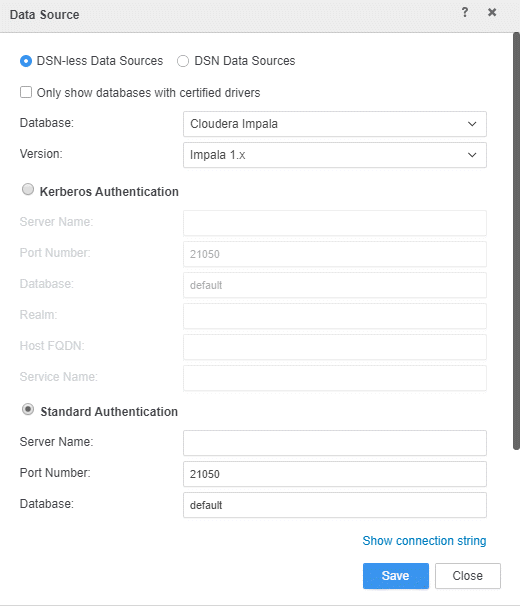
- Click Save.
Connectivity via DSN
- Create a new database instance.
- Select Impala 2.x in the Database connection type drop-down.
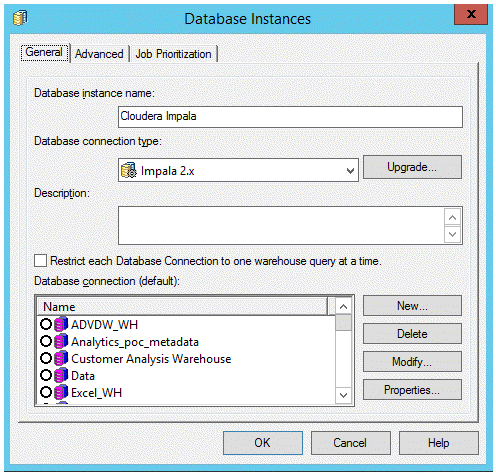
- Click New next to Database connection.
- Create a databse connection that points to the correct DSN.
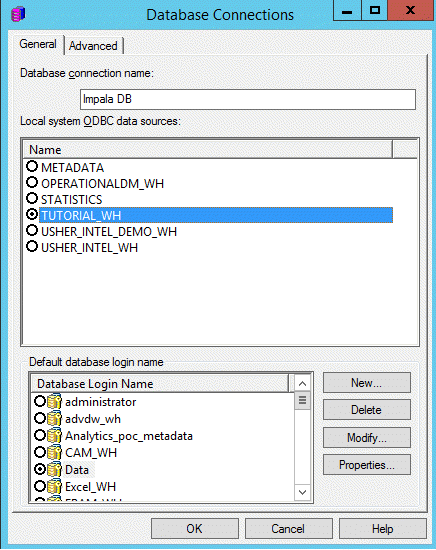
- Click New next to Default database login name.
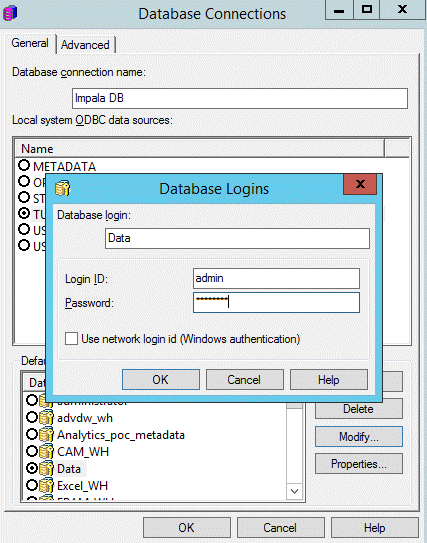
- Configure and save your login credentials.
Authentication Modes
There are three modes of authentication available for Impala:
- Username and password authentication
- LADP authentication
- Kerberos authentication
Use the drop-downs to learn how to set up each type.
If you have a non-secure Cloudera Data Platform set up with no authentication, use "No authentication" mode while connecting.
SASL encryption and Windows authentication are currently unsupported.
Username and password authentication is the default authentication mechanism for MicroStrategy users when connecting to Impala. The instructions below outline how to set up this authentication mode in the ODBC driver, and for DSN and DSN-less connection.
- ODBC Driver Connection:
- Select the MicroStrategy Impala ODBC from 64-bit ODBC Administrator.
Select the username and password as the authentication mechanism:
This username and password can be the LDAP user.
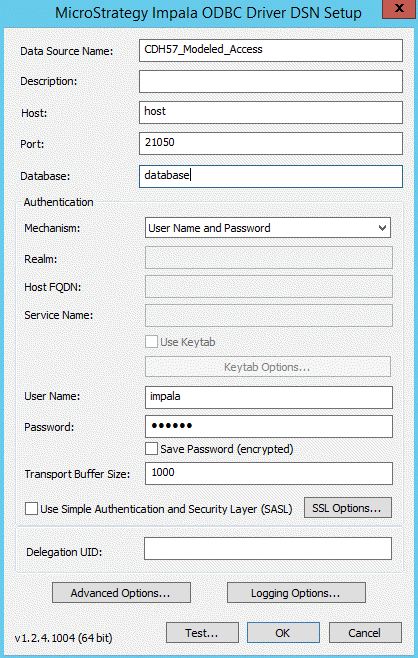
- Click OK.
-
DSN Connection:
When using an existing DSN in MicroStrategy Web, there is no option to choose the type of authentication. This is because the underlying DSN determines the authentication mechanism.
-
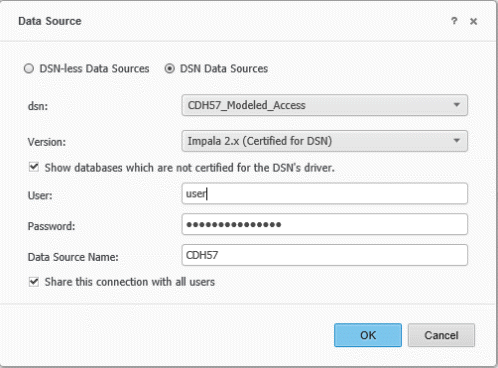
DSN-Less Connection:
When using a DSN-less connection in MicroStrategy Web, the default is username and password authentication.

If the Cloudera Impala Server is configured to use the LDAP server for authentication, you can enable Impala-LDAP integration. The same user credentials will be passed through for authentication when connecting to the database during report execution.
LDAP support must be configured on the Impala server, ODBC driver, and Intelligence Server.
- Impala Server Configuration Settings:
Through Cloudera manager, enable LDAP authentication undeer Impala. You'll also need to add a parameter for the URL of the LDAP server.
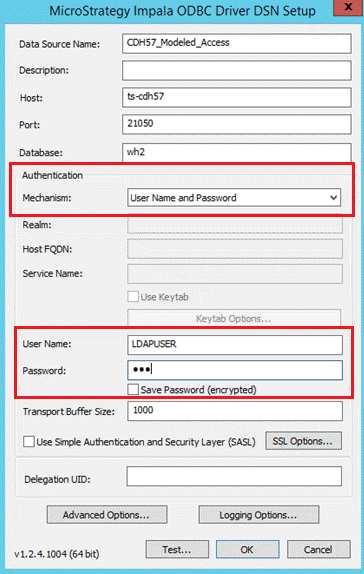
- ODBC Driver:
- Select the MicroStrategy Impala ODBC from 64-bit ODBC Administrator.
- Select User Name and Password in the Authentication Mechanism drop-down, and enter the LDAP username and password.
- Intelligence Server:
- Open the Intelligence Server Configuration Editor > LDAP settings.
- Edit your project's warehose by clicking DB Instance > DB Connection > DB Login.
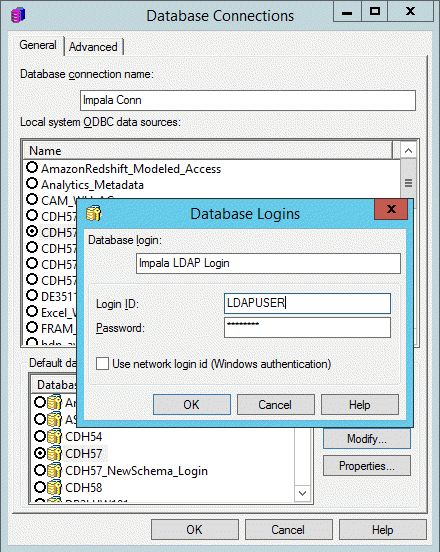
- Enter the username and password for the domain user.
To learn how to pass separate credentials to the warehouse for particular LDAP users, navigate to this KB article.
The following Kerberos flavors are supported:
- MIT Kerberos
- Active Directory Kerberos
Signle sign-on (SSO) access to Impala is supported using Kerberos when the Intelligence Server resides on a Windows or Linux operating system.
- Create a user on Active Directory and assign the SPN.
- Setup the database server to allow Kerberos authentication
This action is a database side configuration configured outside of MicroStrategy. Work with your database administrators to finish configuration.
- Configure the Intelligence Server:
- Set up Kerberos (integrated) authentication for the Intelligence Server.
- Add a trusted user ID in the User Editor dialog.

- Create an ODBC DSN and set the Authentication Mechanism to Kerberos

-
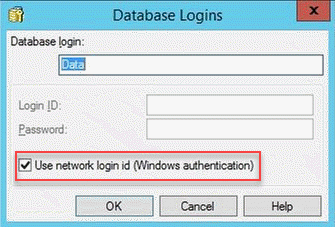
Configure the database instance under Project Configuration > Database Instances > Impala Data warehouse and enable Use network login id (Windows Authentication).
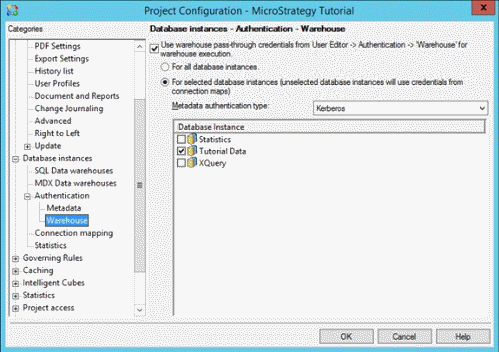
- Configure Kerberos authentication for the warehouse by navigating to Project Configuration > Database instances > Authentication > Warehouse.
- Select the check box for Use warehouse pass-through credentials from User Editor > Authentication > 'Warehouse' for warehouse execution.
- Select the For selected database instances button.
- Set the Metadata authentication type to Kerberos.
-
Select the database instance(s) you want to use Kerberos on.
For steps on enabling the Delegation feature or Integrated Authentication, see this KB article.