Strategy ONE
Applying Custom Logic during Page Execution
Page-specific custom logic can be applied both before and after data is retrieved from MicroStrategy Intelligence Server. The means to apply such logic is provided by add-ons, which are simply Java classes that serve as containers for custom code. After the events in the request have been processed but before data is collected, the application applies all add-ons designed to modify data collection logic. After data is collected but before the WebBean data is rendered, the application applies post-collection custom logic.
Click on any box in the diagram to see a detailed explanation of that step in page execution. Click here to return to the Overview of Page Execution.
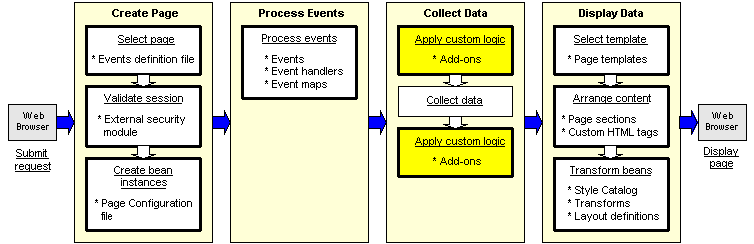
MicroStrategy Web itself uses add-ons to perform a number of tasks, such as setting execution and result flags and applying rules for incremental fetch on grids and graphs. In addition, you can create custom add-ons of your own, which contain logic to be applied either before or after the data is collected.
Customization
Adding custom logic for a specific page requires both Java programming and the customization of an XML parameter file. First, you must create a custom Java class, called an add-on class, that contains the logic that you want to apply. This class implements the AddOn interface, typically by extending the AbstractAppAddOn class and overriding one of the following methods:
-
preCollectData: Used to specify that custom logic should be applied before data is collected from Intelligence Server. Generally used to set flags on the bean and set how data is collected.
-
postCollectData: Used to specify that custom logic should be applied after data is collected from Intelligence Server. Generally used to modify the state of a bean or perform an action based on the status of a bean (ready, processing, error).
In some rare cases, you may want the add-on class to tell the application not to collect data at all for a specific bean. In this case, you would use the isCollectDataRequired method to specify that the application should not call collectData for a given bean.
After you have created your custom add-on class and saved it in your custom classes folder, you must modify the definition of a page in the Page Configuration file, pageConfig.xml, to tell the application to use that class.
<page desc="Report Writing Documents" desc-id="" feature-id="" login-required="true" name="rwd" persist-mode="8" track="true">
      <addons>
        <addon name="com.microstrategy.web.app.addons.RWDWizardAddOn" />
        <addon name="com.microstrategy.web.app.addons.RWDesignModeAddOn">
          <properties>
            <property name="BeanName" source="const" type="string" value="rwframe" />
          </properties>
</addon>![]() Click here to see important classes and files used by the application at this step of page execution.
Click here to see important classes and files used by the application at this step of page execution.
Problem solving during customization
The most common problems that occur during this step in page execution are the result of not placing the Java add-on class under the custom classes folder or not having well-formed XML in the Page Configuration file (for example, misspellings or incorrect syntax used when the when the add-on was defined). Errors can also occur because of problems with the logic in the custom add-on class you wrote. In this case, no exception is thrown, but you know there is a problem because you don't see what you expect to see. To track what is going on and troubleshoot this type of problem, you can send messages to the console using print line commands in the code.
If an exception is thrown and caught in the process of applying custom logic, the default action is for an error message to be sent to the screen while the stack trace is sent to the HTML source as a comment. Depending on the debug flags that are set, other information is also written to the HTML source. This action is defined by both the default template file for the generic "error" page (Error_Template.jsp/aspx) and the file used by the “error” page section (JSP or ASP.NET), whether it is inherited from the default page, the "error" page, or local to a specific page executing an event-based request. The "error" page section on the default template (mstrWeb.jsp/aspx) uses Generic_Error.jsp/aspx, which renders an error message between horizontal bars on the page. If extra validation needs to be done on the error object (such as determining if and how the error should be displayed to the user), each page can provide its own custom file for the “error” page section in its templates. Depending on whether the error is the result of a runtime exception or a checked exception, execution either continues on the current page (with or without displaying a message related to the error condition) or is redirected to the generic "error" page. You can use all of this information to help resolve problems that you encounter when you perform customizations. In addition to error messages that display on the screen, logging information can be viewed in the log file, and the stack trace and debugging information can be viewed in the HTML source for the page. See Error Handling for a more detailed discussion of error handling in MicroStrategy Web products, and see Logging Architecture for more information about error logging.
It is a good practice to validate XML configuration and layout definition files before starting MicroStrategy Web. Eclipse and other IDEs provide a way to validate these files.
Next step in page execution
The next step in page execution depends on whether this add-on was applied before or after data was fetched from Intelligence Server:
-
If your custom add-on was applied before data was fetched from Intelligence Server, the next step in page execution is collecting data.
-
If your custom add-on was applied after data was fetched from Intelligence Server, the next step in page execution is selecting the template for the page.
Related Scenarios
-
Answering a Prompt Question by Supplying Custom Parameters in the URL
-
Using a Custom Web Feature to Provide Special Functionality for a User Group
See also
-
Best practices for minimizing the impact of upgrades: Upgrades automatically overwrite configuration files, as well as JSP and ASP files. Any customization changes to these files will be lost during an upgrade unless you follow these best practices.