Strategy ONE
Including interactive tables of contents in PDFs
Steps to include a table of contents
A table of contents allows a user to quickly access specific areas of the PDF. In the PDF, users can click an entry or page number to jump to that area. An entry is created in the table of contents for each element of each grouping field and, if the document contains multiple layouts, each layout. (For example, if the grouping field is Regions, elements include North and South.)
You can create a table of contents only if a document has multiple layouts and/or is grouped. To fully interact with a table of contents, export the document to a PDF, in either MicroStrategy Developer or MicroStrategy Web.
The table of contents in a grouped document
A document is grouped by region and includes a table of contents. When you switch to PDF View, the first page of the PDF is the table of contents. The entries in the table of contents are the regions. A user can click either a region (such as Central) or a page number to jump to that region in the PDF.
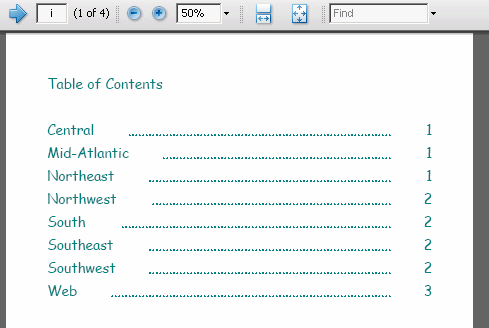
Notice that the page number is displayed as the Roman numeral i (in the toolbar at the top of the image), while the data begins on page 1. The table of contents is inserted at the beginning of the document and is not included in the page numbering of the document itself.
The table of contents shown in the above example has been formatted. The text "Table of Contents" was added as the title. If you do not add a title, the table of contents starts at the top of the page, without a title.
For more examples, see the Document Creation Help.
The table of contents in a multi-layout document
A document contains the following three layouts, listed in order:
-
Revenue by Category (1)
-
Regional Revenue (2)
-
Yearly Revenue (3)
This document contains a table of contents. By default, it is displayed on the first page of the PDF, as shown below:
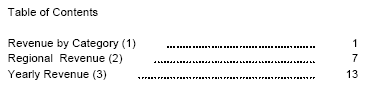
Each of the three layouts is listed in the table of contents. If you change the table of contents to display before the second layout, Regional Revenue (2), the PDF displays the Revenue by Category (1) layout, followed by the table of contents shown below, which contains information for the last two layouts only:
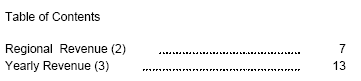
Changing the location of the table of contents is useful when you want to include a cover page before the table of contents.
The table of contents in a grouped multi-layout document
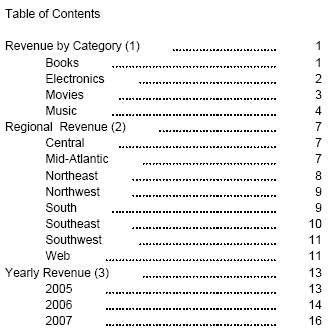
If your document contains layouts and groups, the table of contents displays both, as shown in the PDF below. The layouts are the top level entries, while the groups are shown within each layout.
Bookmarks and tables of contents
A document that is grouped or has multiple layouts generates and displays bookmarks in the PDF automatically. If a PDF has bookmarks, the table of contents is listed in the bookmark panel. (For an example, see the Document Creation Help.) If a PDF includes a table of contents, the bookmarks may be redundant. You can prevent bookmarks from being generated for the PDF. For instructions, see Specifying that bookmarks are not generated for PDFs.
To include a table of contents in a PDF
This procedure affects the entire document, including all layouts of a multi-layout document. For more information on multi-layout documents, including which properties apply to the document as a whole or to individual layouts, see Creating multi-layout documents.
-
Open the document in the Document Editor. (How?)
-
From the Format menu, select Document Properties. The Document Properties dialog box opens.
-
Click Table of Contents.
-
Select the Include Table of Contents check box.
-
If the document contains multiple layouts, the Before layout drop-down list is available. By default, the table of contents is displayed before the first layout, but you can select a different layout from the list.
This setting is useful when you want to include a cover page before the table of contents.
-
To display a title for the table of contents, type the text in the Title field. If the Title field is blank, the table of contents starts at the top of the page.
-
To format the font, click Format. The Font dialog box opens. You can select the font, size, color, and so on. Click OK when you have made your selections. Your selected font formatting is shown in the preview area below the Format button, and is applied to the entire table of contents.
-
By default, tab leaders are shown. Tab leaders are a series of dots connecting the entry with the page number. To remove tab leaders, clear the Show tab leader check box.
-
Click OK to return to the document.
-
To view the PDF, do the following:
-
Click PDF View on the toolbar.
-
From the File menu, select Export to PDF.
-
For a multi-layout document, the Export to PDF dialog box opens. Select whether to export All layouts or only the Current layout.
-
For a grouped document, the Export to PDF dialog box opens. Clear the Expand page-by check box to export the entire document, or clear it to export only the selected group element.
-
The PDF opens in another instance of the Acrobat Reader.