MicroStrategy ONE
Creating projects using Architect
Rather than using the Project Creation Assistant that provides a step-by-step process to create a project, you can use Architect to visually perform the initial creation of a project. However, before you can begin using Architect, you must first create the project object with the Project Creation Assistant and define various Architect project creation options.
Prerequisites
-
Before creating a project, you must connect to a metadata repository and to a data source, as described in the sections listed below:
You should also review the information in Creating and Configuring a Project before creating a project using Architect.
To create a new project using Architect
-
Log in to a project source in MicroStrategy Developer.
To create a project source which connects to your data through Intelligence Server, see the Configuring and Connecting Intelligence Server chapter of the Installation and Configuration Help.
-
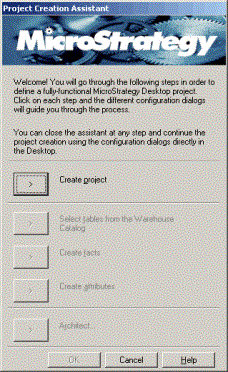
From the Schema menu, select Create New Project. The Project Creation Assistant opens, as shown below:

-
Click Create project. The New Project page opens.
-
Define the project configuration settings listed below:
-
Name: A name for the project. This name is used to identify a project within a project source.
-
Description: An optional description for the project. This description can give a brief overview of the purpose of the project as compared to your other projects.
-
Default document directory: The directory location to store all HTML documents. For more details on how to set up HTML documents for a project, see the Installation and Configuration Help.
-
Enable the guest user account for this project: Select this check box to allow users to log in to a project without any user credentials. Users can then to connect to Intelligence Server with a limited set of privileges and permissions (defined by the Public group).
-
Enable Change Journal for this project: Select this check box to enable the Change Journal for the project. An entry is automatically included in this journal when any object in a project is modified, allowing you to keep track of any changes to your project. For information on the Change Journal, see the System Administration Help.
-
Languages: Click this button to define languages that are available for metadata objects in this project. The languages that you select are also languages that are available for the internationalization of your metadata objects. If a language is available for a project, you can provide object names, descriptions, and other information in various languages. For example, in a project you can provide the names of attributes, metrics, folders, and other objects in multiple languages. For information on how to provide internationalized data for metadata objects such as attributes, metrics, folders, and so on, see the System Administration Help.
MicroStrategy provides internationalized data for common metadata objects in the available, default languages listed. For example, data is available for the name and description of the Public Objects folder as well as other common objects for each language listed as available by default. If you add other languages, you must supply all internationalized data for common metadata objects.
When you create a new project, a language check ensures that the language settings of the user profile of the local machine (the
CURRENT_USERregistry key), the language of the local machine (theLOCAL_MACHINEregistry key), and the Project locale property match. If these properties do not match, it can lead to inconsistencies in the language display. The language check prevents these inconsistencies and ensures that the language display is consistent across the project.These language options are not related to supporting the integration of internationalized data from your data source into MicroStrategy. Information on defining your data source to support data internationalization is provided in Supporting data internationalization.
If you plan to use internationalized data from your data source with attributes in a project, you must define how data internationalization is enabled before creating attributes. Enabling data internationalization is described in Enabling data internationalization for a project.
-
-
Click OK to create the project object.
-
Click the arrow for Architect. The Warehouse Database Instance dialog box opens.
To continue creating the project with the Project Creation Assistant, see Creating a new project using the Project Creation Assistant.
-
Select a database instance from the drop-down list. The database instance selected in this dialog box determines which data source is accessed.
-
Click OK. MicroStrategy Architect opens.
-
From the Architect Button, select Settings. The MicroStrategy Architect Settings dialog box opens.
-
Define the various options for how Architect displays data, automatically creates and maps schema objects, loads the Warehouse Catalog, and updates the project's schema.
Reviewing and defining these options before using Architect can save you a lot of time when creating and modifying projects. For information on all the options available, see Creating and modifying projects.
-
Click OK. You can now begin to add tables to your project, and create attributes, facts, user hierarchies, and so on. These tasks are listed below:
