Strategy One
Set Up Single Sign-On for Power BI
Set Up SSO for Power BI in the Library Admin Control Panel
Strategy One (March 2026) adds an improved workflow to set up single sign-on for Power BI.
-
Open the Library Admin control panel. For more information on accessing the panel, see Library Administration Control Panel.
-
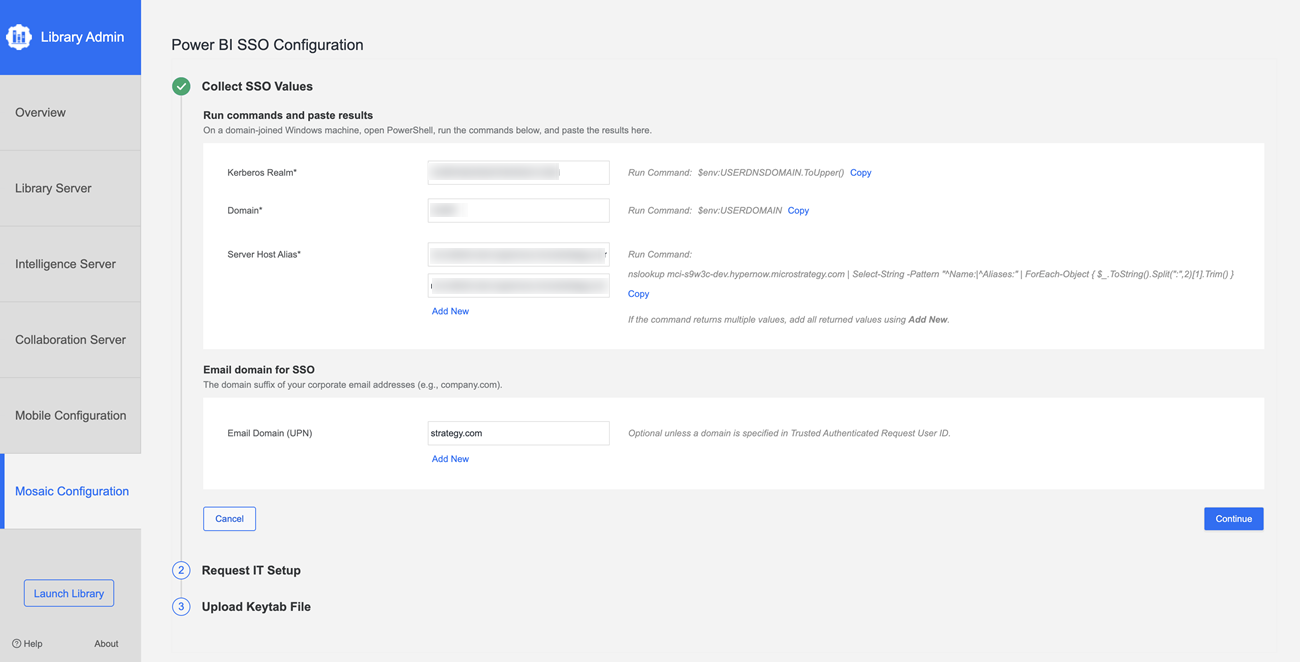
In the left pane, click Mosaic Configuration.
-
Open PowerShell in a domain-joined Windows machine to collect SSO values.
-
In 2. Collect SSO Values, copy the commands next to Kerberos Realm, Domain, and Server Host Alias and run them in PowerShell.
-
Paste the results in the corresponding fields in the Library Admin control panel.
-
In Email domain for SSO, type the only domain that is specified in Trusted Authenticated Request User ID when editing a user in Workstation (for example,
strategy.com). If there is no domain specified, leave the Email domain for SSO field blank and skip this step.To check the Trusted Authenticated Request User ID field:
-
Open the Workstation window with the Navigation pane in smart mode.
-
In the Navigation pane, click Users and Groups.
-
Select an Environment from the upper-left drop-down.
-
In the left pane, click All Users.
-
Right-click a user and choose Edit.
-
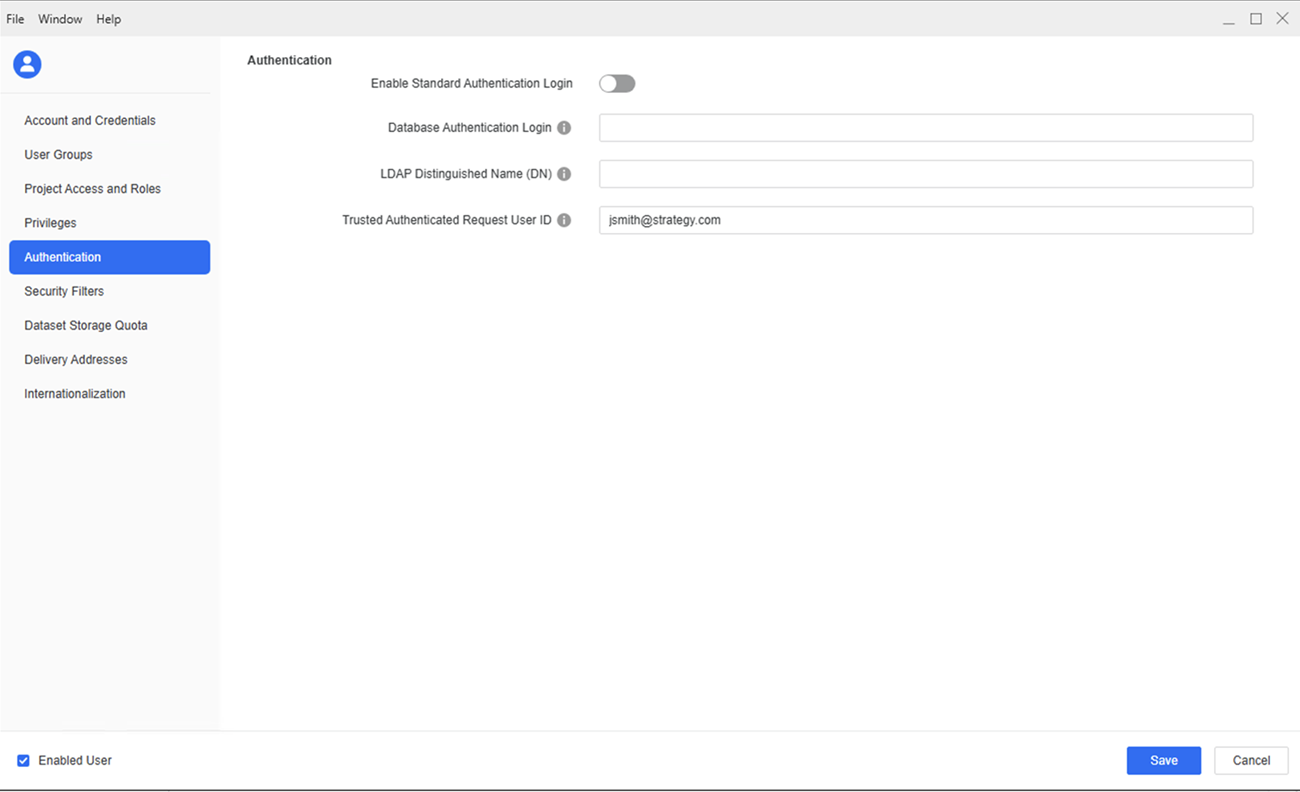
In the left pane, click Authentication.
-
Note the Trusted Authenticated Request User ID field and click Cancel.
-
-
Click Continue.
-
In 2. Request IT Setup, click Copy All and click Continue.
-
Paste and submit the instructions in your company's IT support help desk system.
Your IT department will send you a keytab file.
-
If needed, open the Mosaic Configuration tab in the Library Admin control panel.
-
In 3. Upload Keytab File, upload the keytab file provided by your IT department.
-
Click Save.
-
Your configuration is saved. Follow the link to ensure the trust relationship is established.
-
Restart the Universal Semantic Layer service.
-
Ensure Trusted authentication mode is enabled. To check this, see Library Configuration.
Use SSO for Power BI DAX
After you enable SSO, use it in Power BI. For more information, see Connect to Power BI DAX Using Single Sign-On.
Prior to Strategy One (March 2026): Set Up Single Sign-On for Power BI
Only perform the following steps if you are using a version prior to Strategy One (March 2026).
Remove the Token Based Feature Flag
The following section should be performed by Strategy Cloud Support or environment administrators, if you manage your own deployment.
If you are using token based authentication and want to use SSO instead, use the following steps to remove the token based feature flag:
-
Modify the
configOverride.propertiesfile that can be found in a similar path to the following:/usr/local/tomcat/webapps/0/WEB-INF/classes/config. -
Remove the following line:
features.usl.universalAccess.showPowerBI=true -
Restart the Library server.
Set Up the Universal Semantic Layer Service Account in Active Directory
Work with your IT administrator to create a service account for your Mosaic environment and generate a key tab.
The following steps should be performed by the customer's IT department.
-
Create a user account in Active Directory that will serve as a service account for Mosaic.
-
Enable AES128 and AES256 Encryption for the service account.
-
Add service principal names to the service account for both the environment URL and the external load balancer URL, if applicable, using the following format:
-
HTTP/<Hostname>, HTTP/<External Load Balancer URL> -
For example,
HTTP/abc.company.com@COMPANY.COM, HTTP/xxxxx.us-east-1.elb.amazongaws.com@COMPANY.COM
-
-
Generate the keytab file using a tool such as ktpass.exe from Microsoft.
Generate Keytab
The following steps should be performed by the customer's IT department.
universal-semantic:/etc/trino/abc.company.keytab
Use the following format:
ktpass -princ HTTP/abc.company.com@COMPANY.COM -mapuser mosaic-svc@company.com -pass plain_text_pwd -ptype KRB5_NT_PRINCIPAL -out abc.company.keytab -kvno {keyVersionNumber} -crypto AllConfiguration Update Files
The following files require configuration changes. See the sections below for details on the updates.
The following sections should be performed by Strategy Cloud Support or environment administrators, if you manage your own deployment.
Instance Based Configuration Files Path
-
<MSTR_INSTALL_PATH>/UniversalSemantic/etc/krb5.conf -
<MSTR_INSTALL_PATH>/UniversalSemantic/etc/usermapping.json -
<MSTR_INSTALL_PATH>/UniversalSemantic/etc/config.properties
Container Based Configuration Files Path
-
/etc/trino/krb5.conf -
/etc/trino/usermapping.json -
/etc/trino/config.properties
universal-semantic:/etc/trino/krb5.conf
A sample krb5.conf is included with the installation:
# Kerberos configuration file for
# Set the default_realm for your environment.
[libdefaults]
default_realm = EXAMPLE.COM
Set the default_realm for your environment and save the file:
# Kerberos configuration file
# Set the default_realm for your environment.
[libdefaults]
default_realm = COMPANY.COM
universal-semantic:/etc/trino/config.properties
The configuration properties required for Kerberos are commented out by default. These properties have to be uncommented and modified for your environment. The required properties with sample values are shown below for guidance.
For containers, administrators should copy the properties from etc/trino/krb5.properties.example and modify, as needed.
http-server.authentication.type=HEADER, KERBEROS
http-server.authentication.krb5.service-name=HTTP
http.authentication.krb5.config=etc/krb5.conf
http-server.authentication.krb5.principal-hostname=abc.company.com
http-server.authentication.krb5.keytab=etc/abc.company.keytab
http-server.authentication.krb5.user-mapping.file=etc/user-mapping.json

header-authenticator.config-files=etc/jwt-authenticator.properties, etc/oauth2-authenticator.properties, etc/ldap-authenticator.properties, etc/basic-authenticator.properties
universal-semantic:/etc/trino/user-mapping.json
In the following example, the realm name shows company.com. Update the realm name with the name from your IT administrator.
{
    "rules": [
        {
            "pattern": "(?<user>.+)@(?<realm>.+)",
            "user": "${user}@company.com"
        },
        {
            "pattern": "(?<realm>.+)\\(?(?<user>.+)\\)?",
            "user": "${user}@company.com"
        }
    ]
}
Restart the Universal Semantic Layer service after making changes.
universal-semantic:/etc/trino/jwt-authenticator.properties
If you are using an instance based environment, ensure mstr.jwt.signing.key is the same value as the identity token from configOverrideproperties from the Library service.
If you are using a container based environment, you can skip this section.
hear-authenticator.name=mstr-jwt
mstr.jwt.library.url=${ENV:MSTR_LIBRARY_URL}
mstr.jwt.signing.key=
Restart the Universal Semantic Layer server if you make any changes.
Library Configuration
The following section should be performed by Strategy Cloud Support or environment administrators, if you manage your own deployment.
-
Open the
configOverride.propertiesfile located in the following path:/usr/local/tomcat/webapps/0/WEB-INF/classes/config/configOverride.properties. -
Add authorization mode
67108864to Library by appending it to the following path:Copyauth.modes.available=1,67108864 -
Open the Library Admin control panel. For more information on accessing the panel, see Library Administration Control Panel.
-
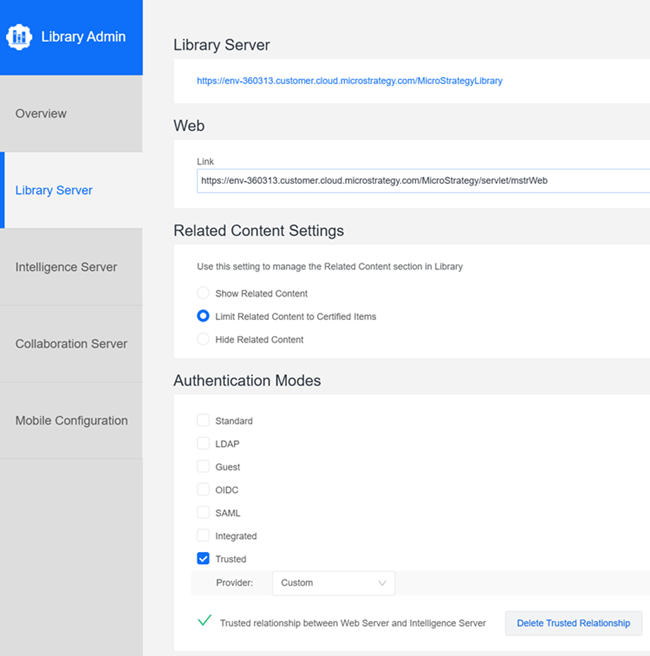
In the left Navigation pane, click Library Server.
-
Under Authentication Modes, select the check box next to Trusted.
-
Expand the Provider drop-down list and choose Custom.
-
Restart the Library service.
Trusted Authenticated Request User ID
To ensure the correct email is assigned for SSO access:
Only user emails that are defined in Trusted Authenticated Require User ID and match their principal name in Entra ID will be able to use single sign-on.
-
In Workstation, click Users and Groups in the Navigation pane.
-
Select an Environment from the upper-left drop-down.
-
Next to All Users, click Create a New User
 .
. -
Enter values in the following fields:
-
Full Name
-
Email Address
-
Username (Login)
-
Password
-
-
In the left pane click Privileges and select the check box next to the following privileges:
-
Use Universal Access
-
Use Application PowerBI
-
-
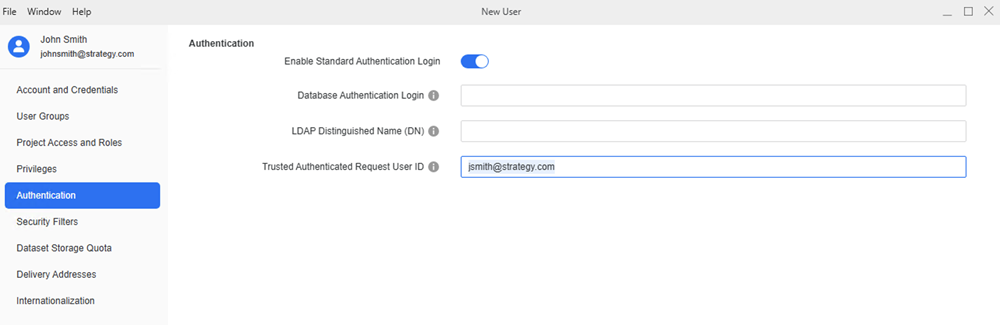
In the left pane click Authentication.
-
In Trusted Authenticated Request User ID, type the email you want to access SSO.
The email domain should match the domain added in universal-semantic:/etc/trino/user-mapping.json.
-
Click Save.
Use SSO for Power BI DAX
After you enable SSO, use it in Power BI. For more information, see Connect to Power BI DAX Using Single Sign-On.