MicroStrategy ONE
Signing in to G Suite by Scanning a QR Code
To enable users to sign in to G Suite (formerly called Google Apps) using MicroStrategy Identity, perform the following procedures.
The following steps contain only the information required to configure or use G Suite with MicroStrategy Identity. See Google's documentation for the latest information.
The steps below assume that you have administrative privileges for the G Suite environment to which you want to allow MicroStrategy Identity login access.
You must configure your MicroStrategy Identity system with the information necessary to connect with G Suite. For requirements and steps, see MicroStrategy Identity Configuration.
To display a custom image on the G Suite login page, you must create the image to display. Supported image formats are .png, .jpeg, and .jpg file types.
To Register Your G Suite Site with MicroStrategy Identity
Do not register G Suite with MicroStrategy Identity using the Import from Google Apps option on the Users and Badges screen. This workflow is no longer supported by MicroStrategy Identity due to modifications made by Google.
- Log into MicroStrategy Identity Manager.
- Click Logical Gateways.
- Under Web Application Login, click More, then click Google Apps.
- You can change the image that is displayed on your G Suite login page. Next to the image preview, click Import An Icon. Select an image to display, then click Open.
- In the Enter Display Name field, enter a name to display on your G Suite login page. The name can be up to 30 characters long.
- Assuming the users in your Identity Network are added from Microsoft Active Directory (see Synchronizing Users from Microsoft Active Directory), you can enable users to sign in to G Suite by typing their Active Directory user name and password, rather than scanning a QR code. For example, if not all users in your network have access to a smartphone, you can enable users to sign in with their user name and password. To do this, select the Enable user name and password as a login option check box.
- In the Enter Your "Google Apps Domain" URL field, enter the URL for your organization's custom Google domain name, such as
https://google.com/a/yourdomain. - Click Next.
- To specify the web page that you want to send users to when they log out of G Suite, click Advanced Settings, then enter the URL in the Redirect on Logout URL field. By default, users are directed to your organization's custom Google domain name.
- If the users in your network log in to G Suite through the MicroStrategy Identity single sign-on web portal, you can provide additional SAML parameters to support this. See Google's documentation for information about required parameters for identity-provider-initiated logins.
Click Advanced Settings, then select from the following:- To specify the URL that users are directed to when they log in (the SAML 2.0
RelayStateparameter), enter the URL in the Relay State field. By default, users are directed to your organization's custom Google domain name. - If your service provider requires an
SPNameQualifierattribute for theNameIDparameter, enter this value in the Assertion Subject NameID field. - By default, MicroStrategy Identity specifies an authentication context (
AuthnContext) value ofPassword. To specify a different value, select the value from the Assertion AuthnContext drop-down list.
- To specify the URL that users are directed to when they log in (the SAML 2.0
- Click Next.
-
You can define additional Assertion Consumer Service URLs to be included in the SAML assertion. To do this, click Add Assertion Consumer Service URL again, then enter an additional Index and Assertion Consumer Service URL. Then select one Assertion Consumer Service URL as the default to use.
- If the SAML request is signed, do the following:
- Select the Service Provider requests are signed check box.
- Click Upload Security Certificate.
- Upload the certificate (
.crtor.cer) file that is used to sign the SAML request.
- Click Next.
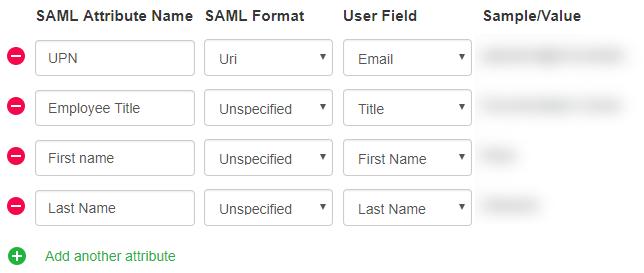
- If your service provider requires attributes to be included in the SAML assertion, you can specify which MicroStrategy Identity user attributes are included. Each group of attributes is called an Attribute Consuming Service. You can include multiple attributes in an Attribute Consuming Service. To add a group of attributes, click Add Attribute Consuming Service. For each attribute, specify the following:
- SAML Attribute Name: The unique name of the attribute that the web application needs as part of the assertion. For example, a web application can require an attribute called UPN that contains a user's email address. See your web application's documentation for the required attribute names.
- SAML Format: The format of the attribute name in the SAML assertion. Select from the following:
- Unspecified (default): The attribute name is formatted as
urn:oasis:names:tc:SAML:2.0:attrname-format:unspecified - Basic: The attribute name is formatted as
urn:oasis:names:tc:SAML:2.0:attrname-format:basic - URI: The attribute name is formatted as
urn:oasis:names:tc:SAML:2.0:attrname-format:uri
- Unspecified (default): The attribute name is formatted as
User Field: The user field in the MicroStrategy Identity profile to share when authenticated by the web application. After you select a value, sample information is displayed.
Below is an example of a SAML Attribute Consuming Service with several attributes.
- Click Next.
- In another browser tab, log in to the Google Administration Console for your domain. (Typically, the URL is
https://admin.google.com/.)domain_name - In the Google Admin Console, click Security.
- Click Set up single sign-on (SSO).
- Select the Setup SSO with third party identify provider check box.
- In the following fields, copy and paste the URLs from the Step 5/5 page.
- Sign-in page URL
- Sign-out page URL
- Select the Use domain specific user check box.
- Click Save.
- From the Step 5/5 page, download the MicroStrategy Identity Security Certificate.
- In the Setup SSO with third party identity page, upload the Identity Security Certificate in the Verification certification section (above the Use domain specific issuer check box).
-
Click Save.
To import G Suite users into you Identity Network, contact Technical Support for instructions.
Related Topics
Signing in to MicroStrategy Identity-Enabled Web Applications from a Centralized Website
Categorizing MicroStrategy Badge Resources
Editing and Deleting Web Applications from Your MicroStrategy Identity Network