Strategy One
Specify Allowed Import URLs and Email Domains
You can control:
-
Whether users can import files using a URL and which URLs they can use
-
Starting in Strategy One (September 2025), which email domains are allowed for email subscriptions
The ability to view or edit certain settings is determined by a user's privileges. All necessary privileges are included in the Administrator role by default. You must belong to the System Administrators group to use this feature.
Allow and Configure URL File Import
- Open the Workstation window.
- In the Navigation pane, click Projects.
- Right-click a project and choose Properties.
- In the left pane, click Security Settings.
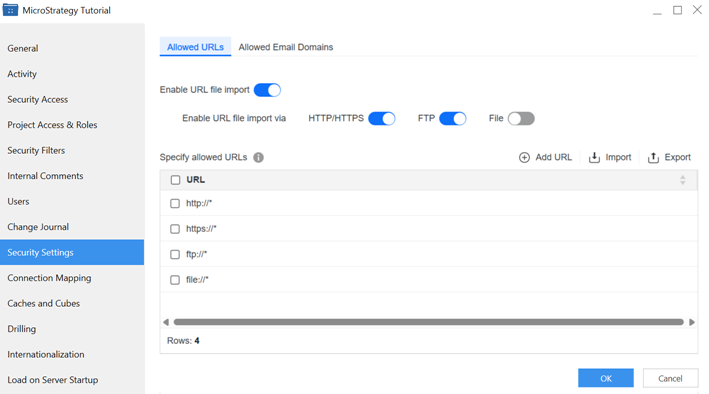
- Click the Allowed URLs tab.
-
By default, enabling URL file import is disabled. Enable URL file import to allow users to import files from the internet using a URL. The rest of the settings on the tab become available.
-
To allow users to import data from the Internet by connecting to an HTTP or HTTPS URL, enable HTTP/HTTPS.
-
To allow users to import data from the Internet by connecting to an FTP (File Transfer Protocol) Server, enable FTP.
-
To allow users to import data from files on your Intelligence Server machine, enable File.
-
Allowing File import poses the greatest threat to security by allowing user access to specified portions of the Intelligence Server file system.
-
-
You can specify a list of allowed URLs, also called a whitelist, for importing data. The whitelist should be as restrictive as possible, listing the minimal set of URLs needed to import data.
-
By default, the whitelist includes entries that allow all URLs that you use the http, https, and ftp protocols. You can delete any you do not want to include.
-
By default, the whitelist also includes the file URL. You must enable File importing for this URL to be used.
-
To add a new URL, click Add URL. In the new row that displays, type the URL, using the asterisk (*) wildcard to indicate that all URLs starting with the specified string are allowed.
-
To edit an existing URL, double-click it and make your changes.
-
To delete an existing URL, right-click it and select Delete. On the pop-up notification, click Delete.
-
To delete multiple URLs at the same time, select their check boxes, right-click them, and select Delete. On the pop-up notification, click Delete
-
To import a CSV file of allowed URLs, click Import. Navigate to the file and double-click it.
-
To export a CSV file of the URL whitelist, click Export. Navigate to the folder to save the file in. By default, the file is named allowed-urls.csv, although you can change it. Click Save.
-
- Click OK to save your changes and close the Properties dialog box.
Specify Allowed Email Domains for Email Subscriptions
Specify a list of allowed email domains, like a whitelist, for email subscriptions. You can set this at the project, folder, and object level.
If the subscription contains a single piece of content, the email is sent if recipient's domain is allowed at any level (project, folder, or object).
If the subscription contains multiple pieces of content, each piece is resolved separately.
-
If some pieces are allowed and others are blocked, the email includes only the permitted content. Each blocked piece displays as an error message in the email body.
-
If all pieces are blocked, the email is not sent. A failed email notification is sent to the Administrator.
For example, the Administrator creates a subscription in Workstation that contains a dashboard as an attachment.
-
At the project level, @Company1.com is allowed as an email domain.
-
At the folder level, @Company2.com is allowed.
-
At the object level, @Company3.com is allowed.
The subscription is sent to the following users:
-
Al@Company1.com
-
Betty@Company2.com
-
Charlie@Company3.com
-
Della@Company4.com
Della does not receive the subscription because their email address is not in the allowed domain list.
- Open the Workstation window.
- In the Navigation pane, click Projects.
- Right-click a project and choose Properties.
- In the left pane, click Security Settings.
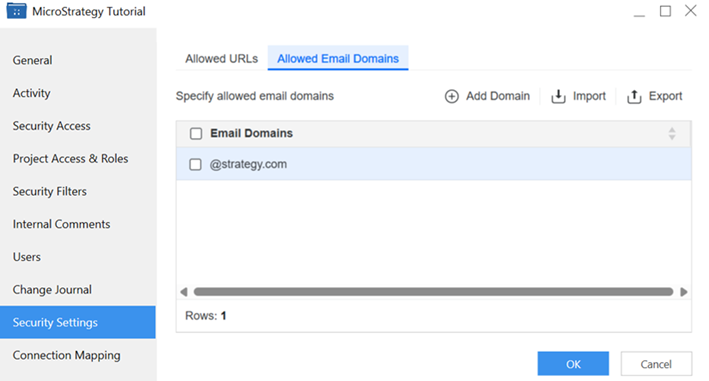
- Click the Allowed Email Domains tab.
-
To add an email domain, click Add Domain. In the new row that displays, type the email domain, such as @strategy.com.
-
To edit an existing domain, double-click it and make your changes.
-
To delete an existing domain, right-click it and select Delete. On the pop-up notification, click Delete.
-
To delete multiple domains at the same time, select their check boxes, right-click them, and select Delete. On the pop-up notification, click Delete
-
To import a CSV file of allowed domains, click Import. Navigate to the file and double-click it.
-
To export a CSV file of the domain whitelist, click Export. Navigate to the folder to save the file in. By default, the file is named allowed-email-domains.csv, although you can change it. Click Save.
-
Click OK to save your changes and close the Properties dialog box.