MicroStrategy ONE
Use Bots
Bots are only supported in MicroStrategy Cloud environments. You can only use Bots in MicroStrategy Library.
Starting in MicroStrategy ONE (March 2024), you can use Bots to gather insight on a selected dataset in Library Mobile. You can also use the Snapshots panel to save Bot responses as snapshots for future use and embed Bots on your site.
Check out the following topics to get started:
- Prerequisites
- Using a Bot
- Understanding the Response
- Using Snapshots
- Chat History
- Question Limit
- Troubleshooting Errors
- Related Topics
Prerequisites
There are two new privileges that are introduced with Bots:
- Create and Edit AI Bots
- Run AI Bots

You must have the Create and Edit AI Bots and Run AI Bots privileges to ask a Bot questions and create, edit, and save a Bot.
A user that is granted the Create and Edit AI Bots privilege, is automatically granted the Run AI Bots privilege. If the Run AI Bots privilege is revoked, the Create and Edit AI Bots privilege is automatically revoked.
You must have the Run AI Bots privilege to run and message a Bot.
Using a Bot
- Find a Bot in one of the following locations and click to open the Bot you want to use:
- The Library Home page
- In the Library Navigation pane, expand All and click Bots.
- In the Library Navigation pane, click Content Discovery.
- In the Library Navigation pane, click Content Groups.
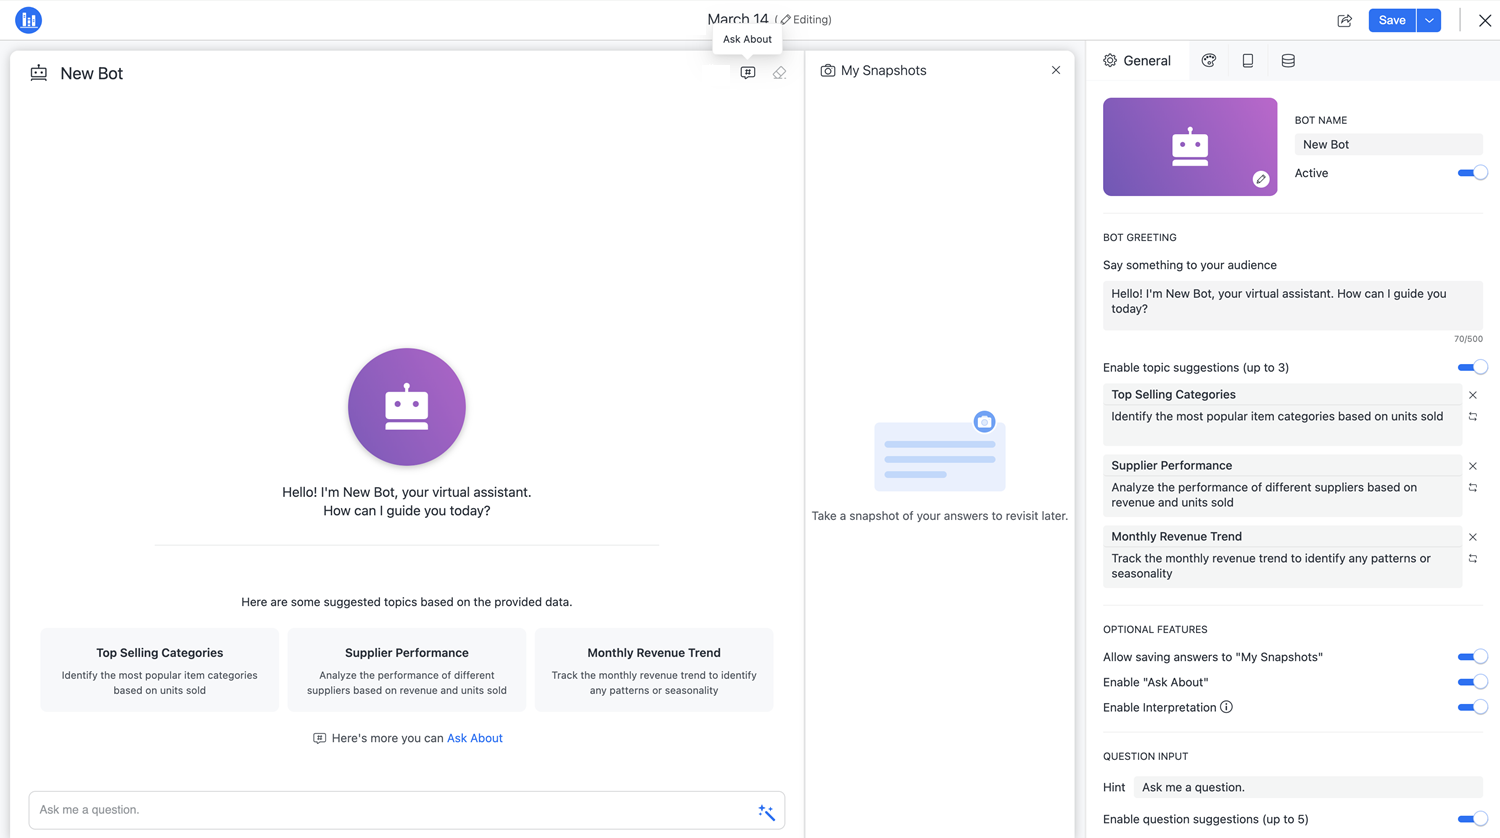
- A welcome page appears that includes greeting messages and some suggested questions based on the dataset provided or questions defined in General Settings.
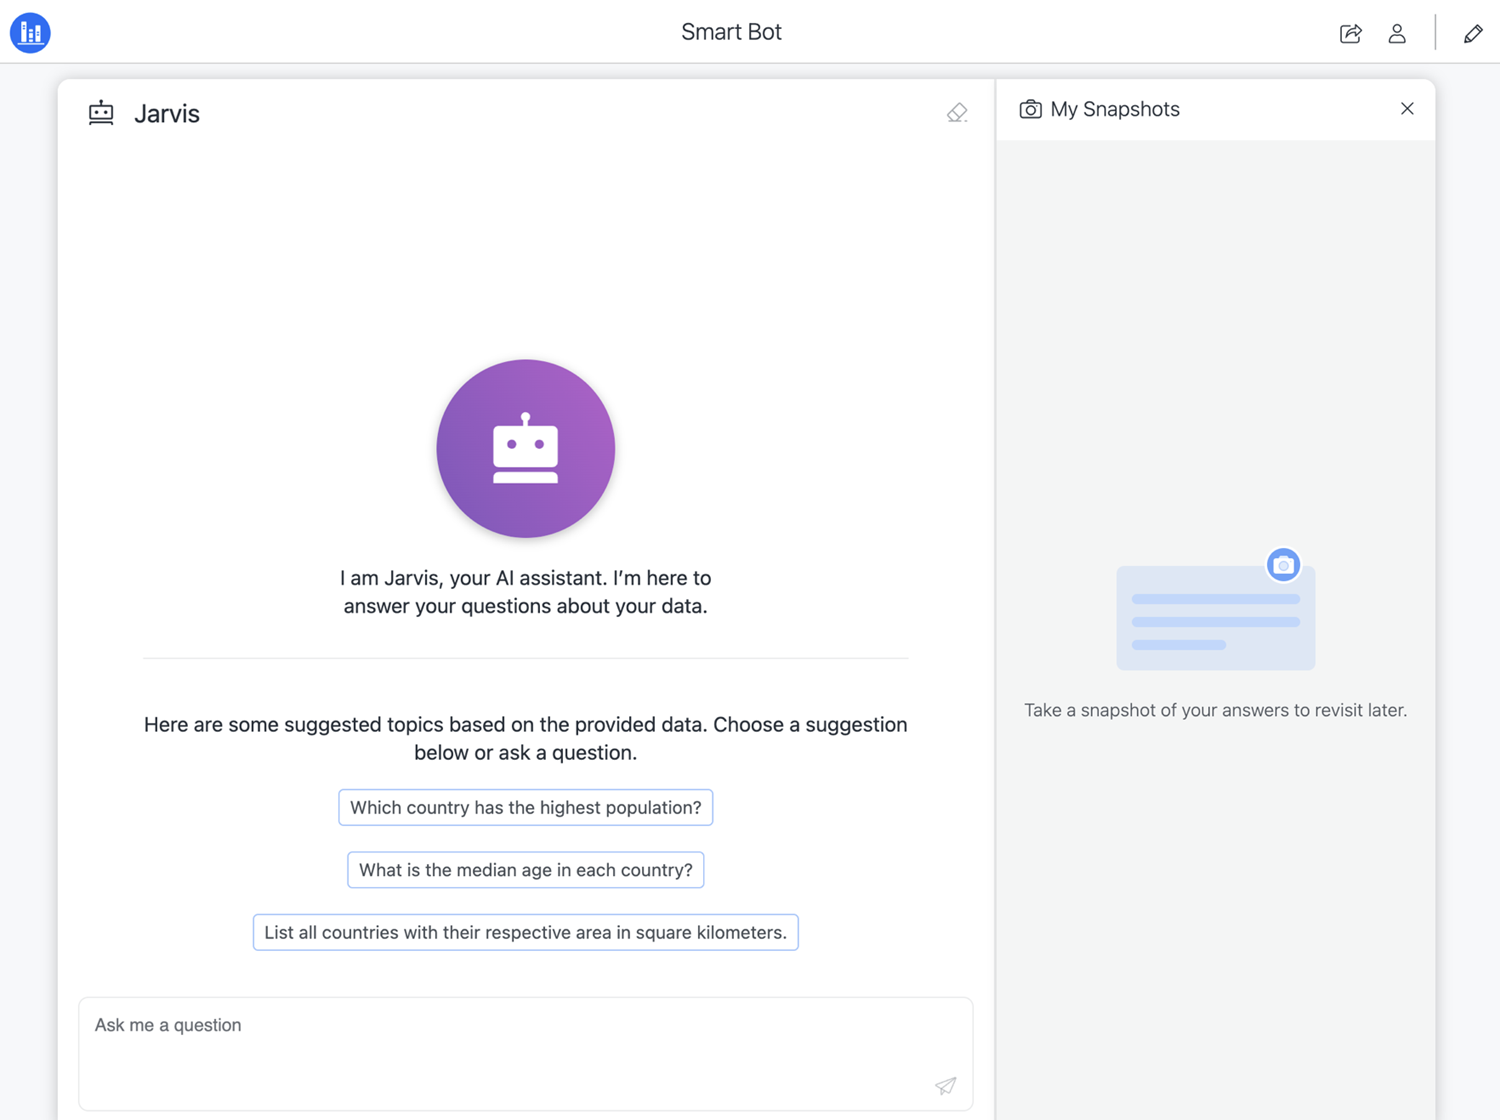
- You can type a question or click a suggested question and use Enter or click the blue envelope icon.
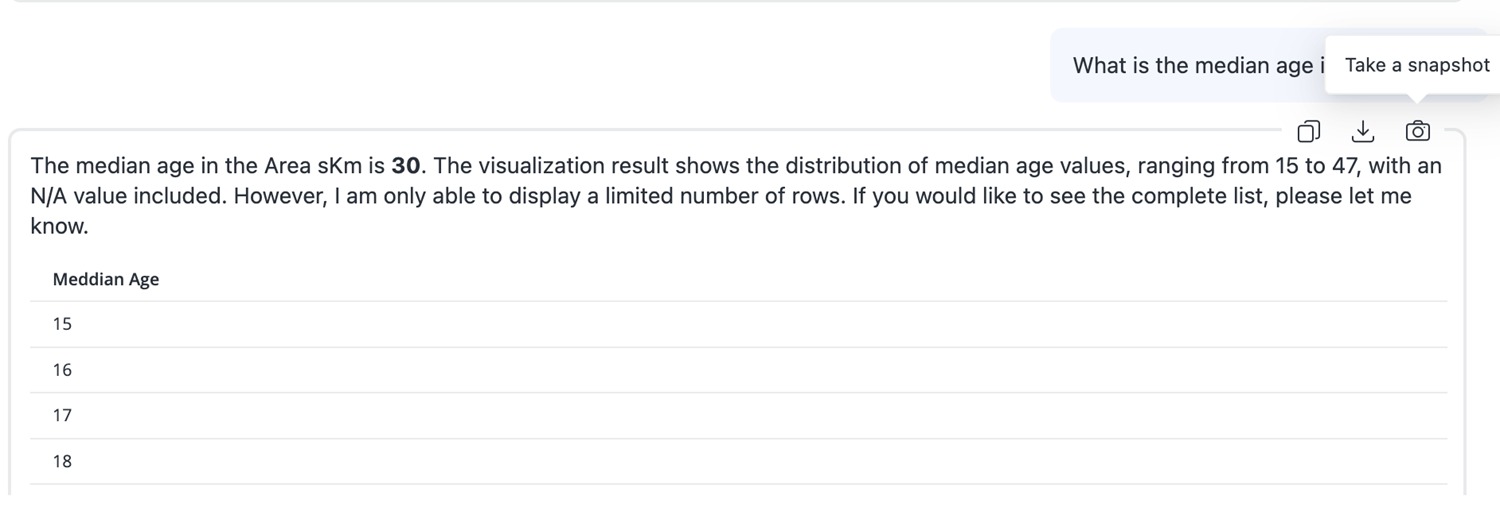
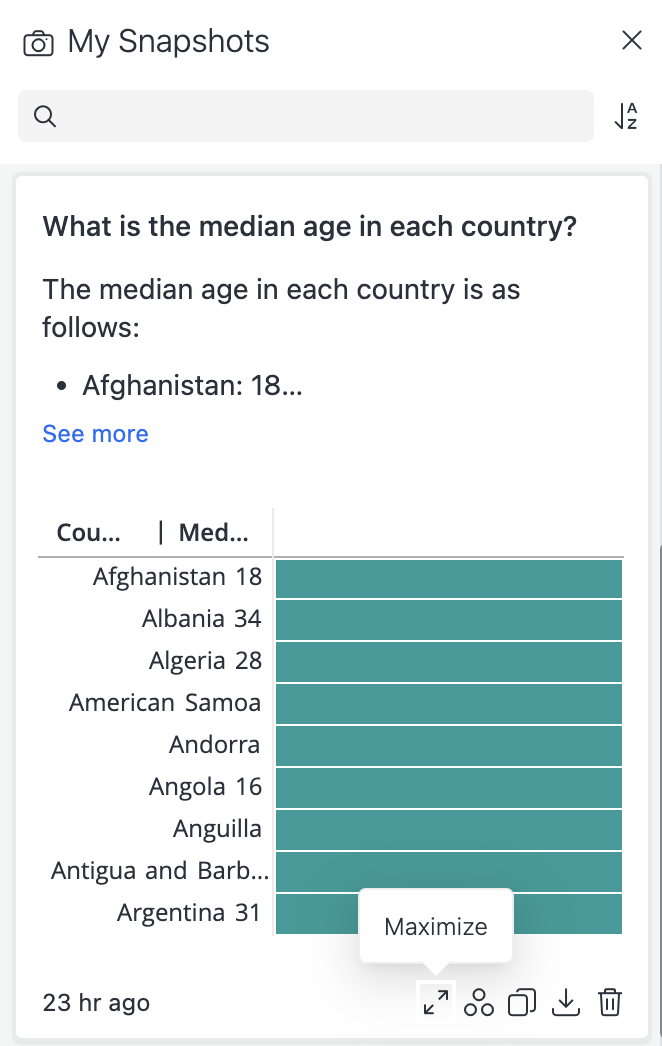
- Once the Bot responds, hover over the message to copy or download the message or add the message to My Snapshots.

- To use a previous message with edits:
- Hover over the question in the chat history and click Copy to query box.

- Edit the message.
- Hover over the question in the chat history and click Copy to query box.
In any of the above locations, you can use search and filter to find a Bot.
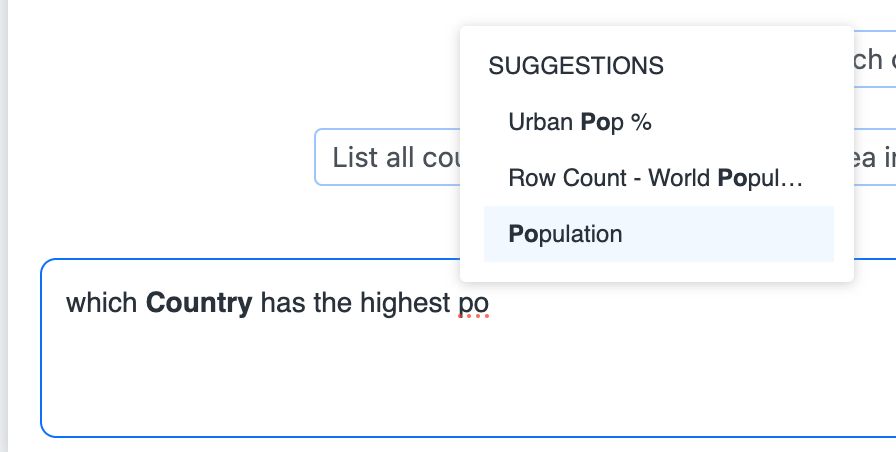
As you type a question, a Suggestion list appears to understand the available attributes or metrics. You can click a suggestion or use your arrow keys to navigate the list and use Tab or Enter to select an attribute or metric.
Understanding the Response
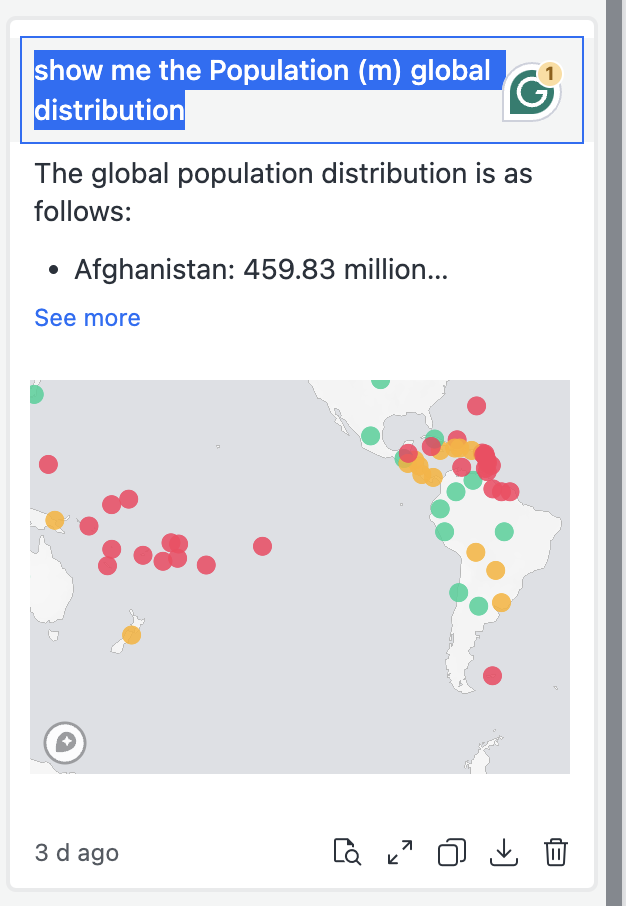
Bot responses are comprised of natural language text and visualizations. Bot supports a range of visualization types. If you ask a question that requires specific visualizations, ensure that the chosen visualization type is one of the following supported types:
- Grid
- Vertical bar chart
- Pie chart
- Line chart
- KPI
- Heat map
- Mapbox
- Key Driver Analysis
- Insight line chart for trend and forecasting analysis
Only one metric is supported.
Ring chart is not supported.
Some line chart subtypes are not supported.
Attributes are not supported.
Response Limitations
Responses include the following limitations:
- The Bot displays only the most recent 30 messages.
-
If the response includes many data points, the visualization displays limited data (up to 1,000 rows) to focus on clarity and readability.
-
A visualization can have a maximum size of 50 MB (around 10 MB post-compression).
-
A visualization that exceeds 200M will not be displayed once you reopen the Bot.
-
-
External storage is limited to 2TB.
-
Updates to themes in the Appearance panel are not applied to previous visualization results.
Response Troubleshooting
Use the following troubleshooting guidelines for Bot responses:
- If a map request returns a missing Mapbox key error, configure the key in the Library server and restart the Library server.
- To view Insight line charts and Key Driver Analysis, ensure the Python service is active.
Using Snapshots
Allow saving answers to "My Snapshots" is enabled by default. To disable Snapshots, turn off Allow saving answers to "My Snapshots" in General Settings.
Access the My Snapshots Panel
- Find a Bot in one of the following locations and click to open the Bot you want to use:
- The Library Home page
- In the Library Navigation pane, expand All and click Bots.
- In the Library Navigation pane, click Content Discovery.
- In the Library Navigation pane, click Content Groups.
- Click the Snapshots icon to open the Snapshot panel.
Add, Delete, and Clear All Messages
You can add messages to the snapshot panel, with messages remaining static despite any changes to the dataset. The snapshot does not clear automatically and each Bot can store a maximum of 50 snapshots.
- In the Bot panel, hover over a message and click the Take a snapshot icon. The message is added to the Snapshot panel and the icon updates to green.
- Use one of the following options to delete a snapshot:
- Click the Take a snapshot icon, again.
- In the Snapshot panel, click Delete > Yes.

- To clear all snapshots in the snapshots panel, click the Clear All icon > Yes.

Copy and Download a Message
Snapshots can be copied or downloaded as PNG image files in the chat panel message menu, the Snapshot panel message menu, or the Snapshot focus mode menu.
Copy is only supported on HTTPS environments.
- Hover over a message and click the Copy or Download icon.
- Your message is then copied to your clipboard or downloaded to your machine.
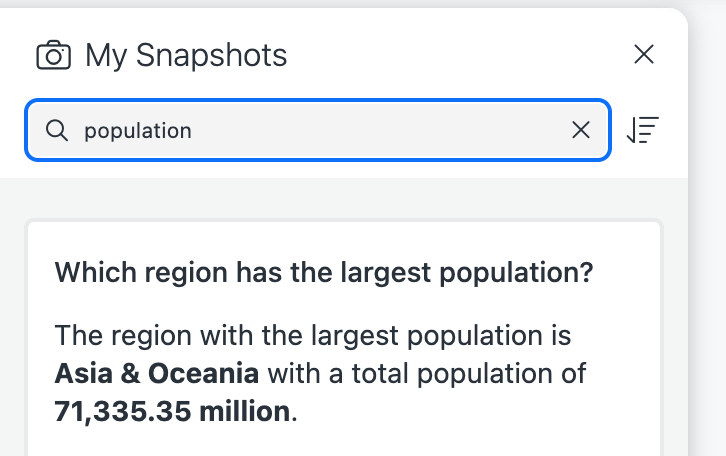
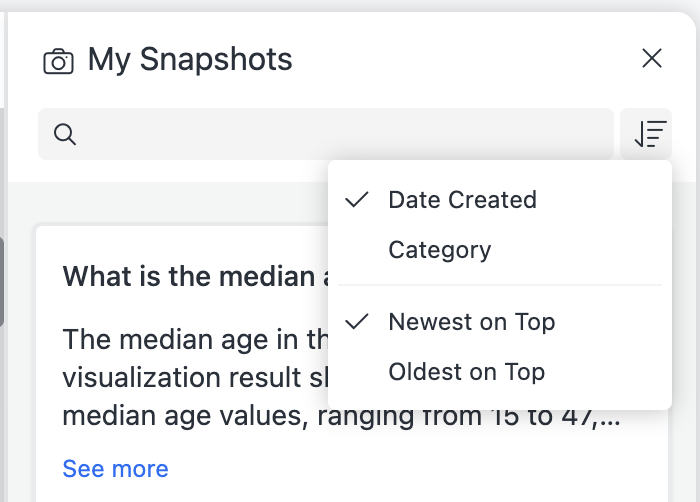
Sort and Search
Use the search box at the top of the My Snapshots panel to search for messages. The keyword is used to match the question or answer summary. However, it will not be used to search for data in a visualization.
To sort messages, click the Sort  icon. You can sort snapshots by Date Created or Category.
The timestamp for Date Created refers to when the answer was generated, not when the snapshot was added.
Rename and Reassign a Category
Five categories are automatically generated for each Bot when a dataset is inserted, in addition to an Others category. When you add to the Snapshot panel, a category is automatically assigned to each message.
To rename a category:
- In the Snapshot panel, click the Sort icon and choose Category.
- Click the Category menu on the top right and click Rename.

- Enter a new name.
To reset a category for a snapshot:
- In the Snapshot panel, click the Move to icon on the bottom of a message.
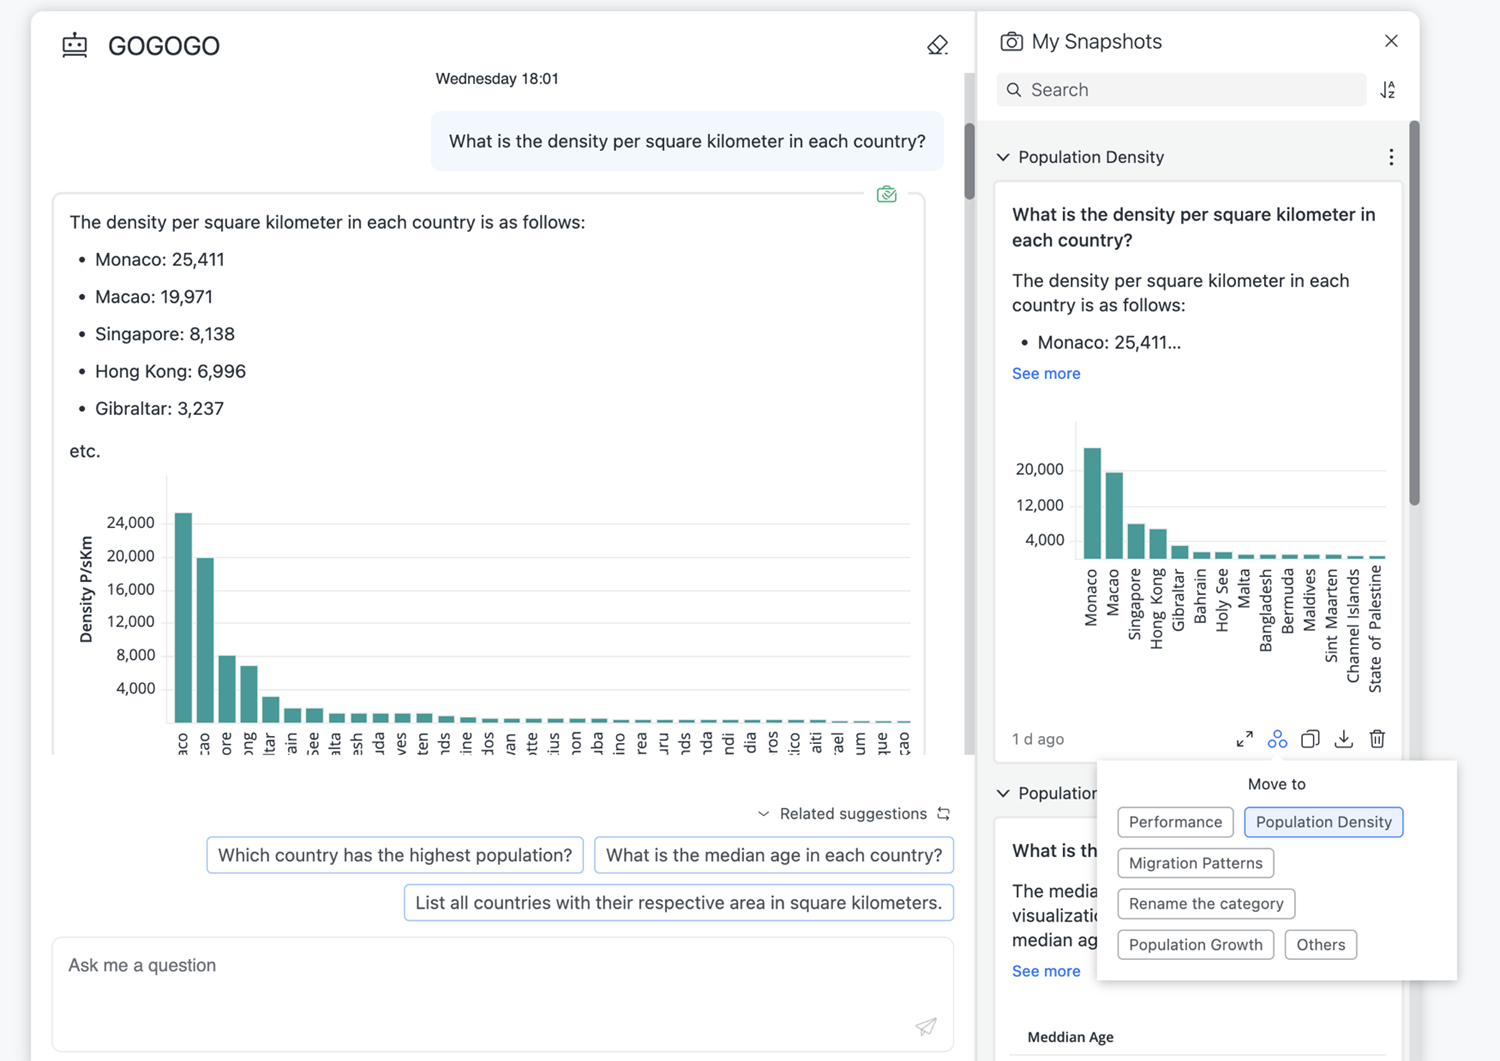
- Choose a new category.
Ask Again
- Click the Ask Again icon at the top of a message.
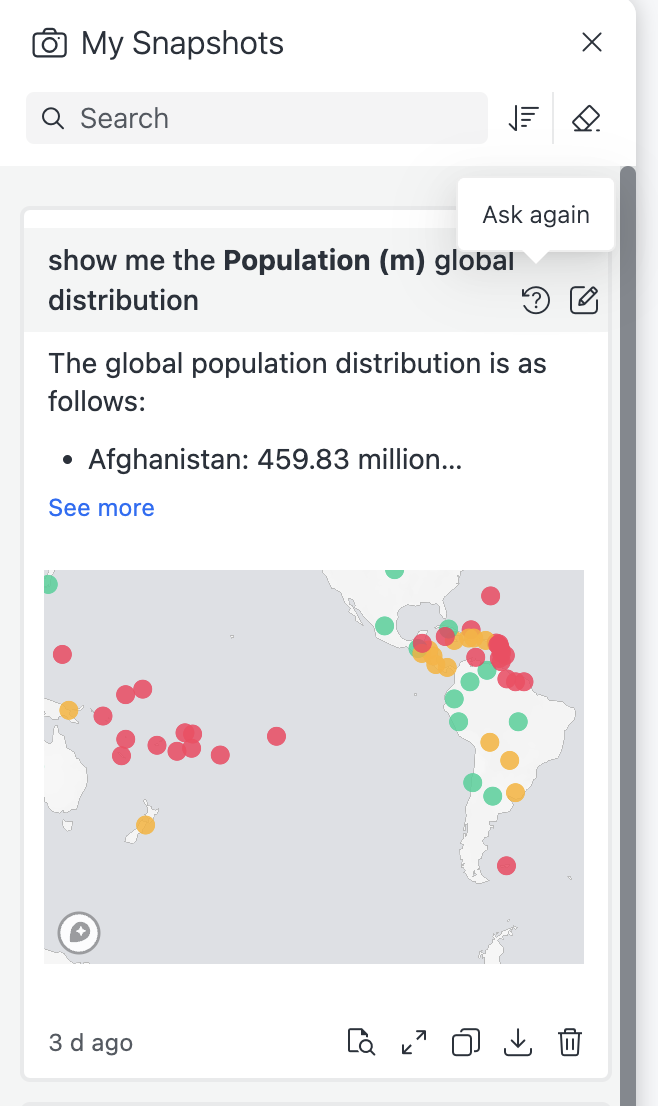
- The query copies to the query box where you can enter to view the results.
Rename a Snapshot Title
- Click the Rename icon at the top of a message.
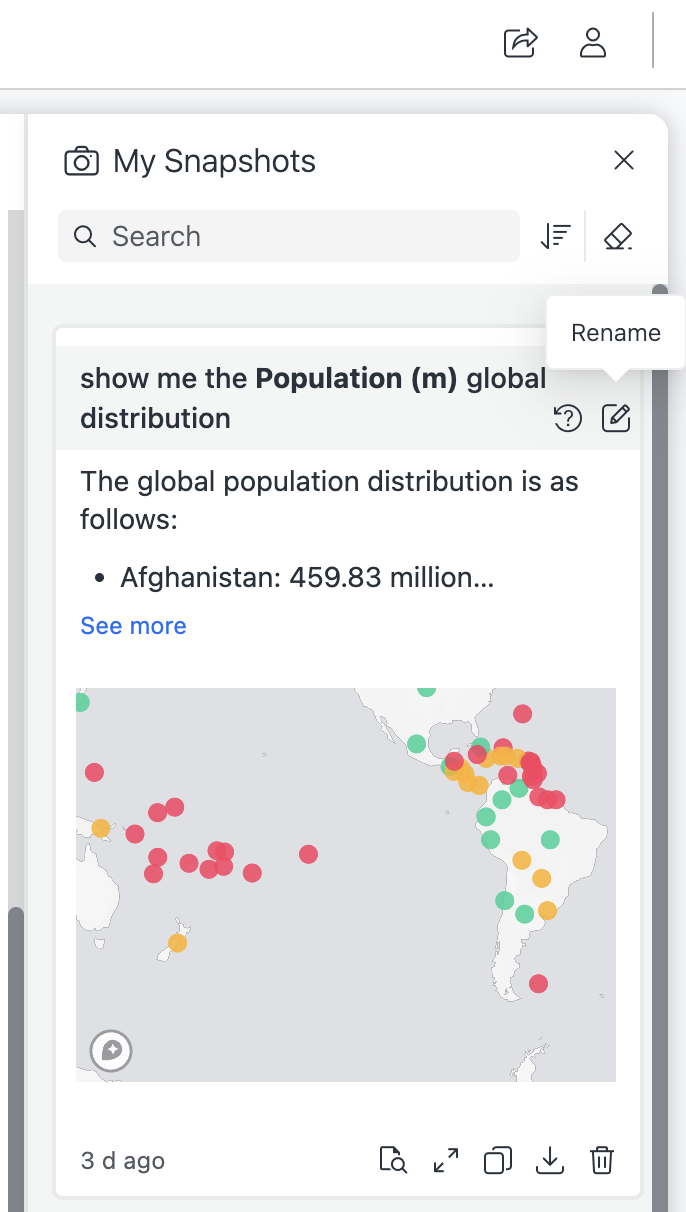
- Type a new name and press Enter.
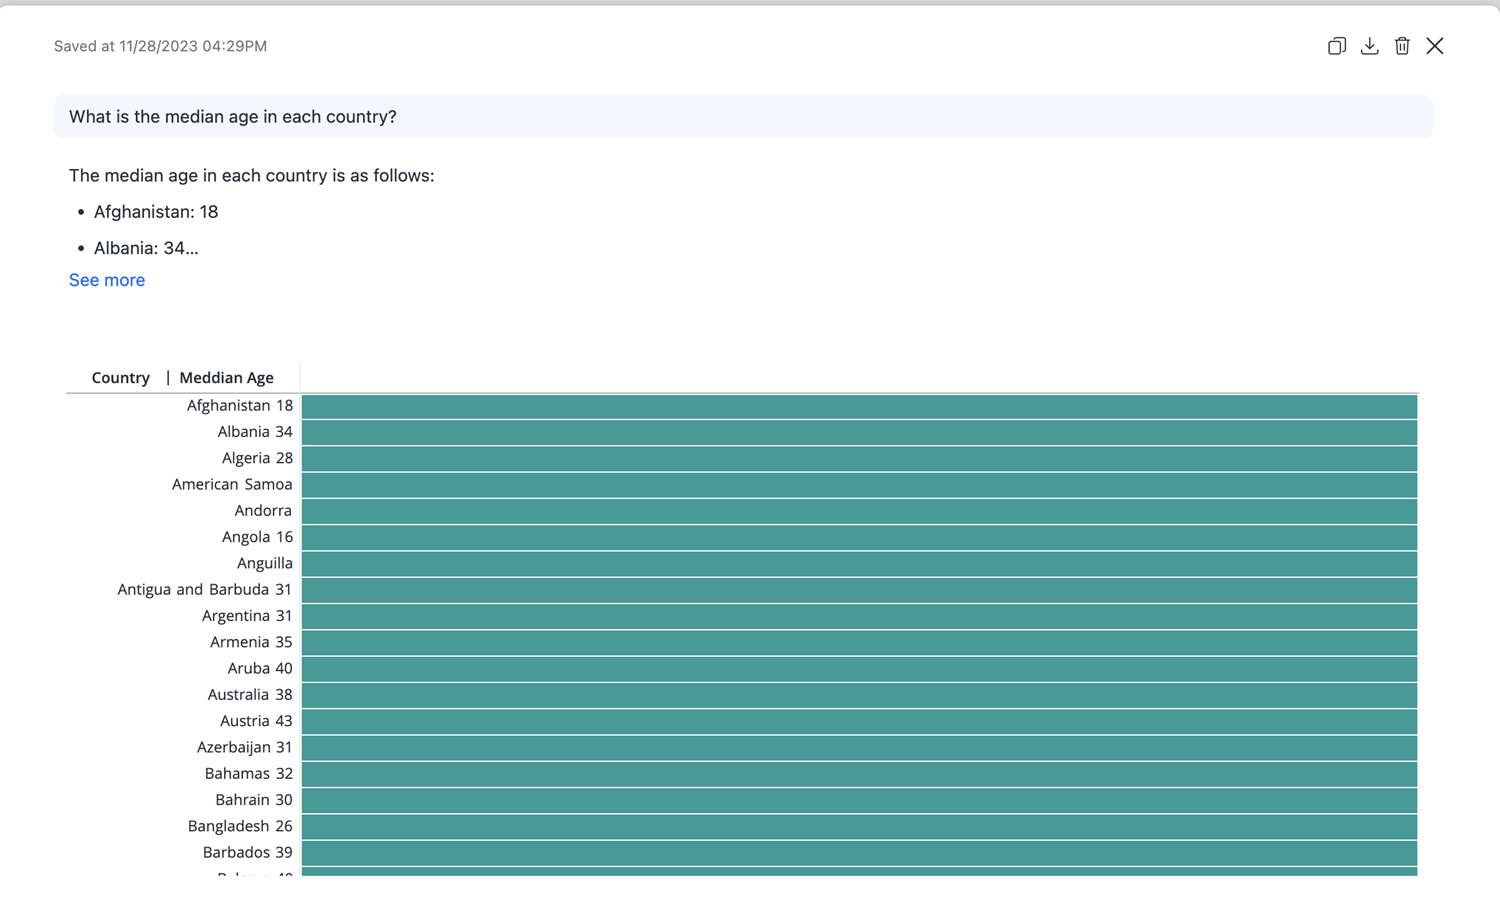
View the Snapshot Panel in Focus Mode
- Click the Maximize icon on the bottom of a message.
- The message appears in focus mode where you can view the content and copy, download, or delete the snapshot.
Troubleshoot Snapshots
Why is there no Snapshot panel or Take a Snapshot icon?
Allow saving answer to 'My Snapshots' may be disabled. To enable the setting, see General Settings for more information.
Why is the Copy icon disabled?
The copy function is blocked for security on http websites. If the copy icon is disabled, switch to a https website to use the copy icon.
Why is a snapshot labeled as Uncategorized then moves to a category?
The Bot automatically categorizes an answer you save as a snapshot. The process sometimes takes some time. Before the Bot returns a category result, the snapshot is categorized as Uncategorized. It will then move to the correct category after the Bot returns a result.
What is the Others category?
Others is a predefined category in MicroStrategy Library. When you create a Bot, it generates five categories to categorize your snapshots. When you take a snapshot, the Bot assigns the snapshot to the most suitable category. If the Bot can't categorize the snapshot into any of the existing categories, the snapshot is moved to Others.
How many snapshots can you add in each Bot?
You can add a maximum of 50 snapshots for each Bot. If you exceed this limit, an error message displays.

Chat History
If a Bot is added to a user's Library, the chat history and snapshots remain and display the next time the Bot opens.
You need to configure the external storage to keep visualization data. For more information on configuring the storage service, see MicroStrategy Storage Service Configuration for AI Bot.
To view the chat history:
- In the chat list, scroll up.
- Click Clear History on the upper right to clear the chat history.
If the chat history contains more than 30 responses, only the past 30 responses will display. To avoid responses clearing automatically, save responses to My Snapshots.
Clear History does not remove saved Snapshots.
![]()
Question Limit
A Bot author can define a question limit for each user. For more information, see General Settings
Once you reach the question limit, you can not ask any new questions until the 30-day rolling period ends. However, you can still open the Bot to view the chat history and Snapshots.

Troubleshooting Errors
When using the Bot, you may encounter the following errors:
-
Copy
"message": "The API requires MicroStrategy Storage Service. Please contact your administrator." -
Copy
Could not open JDBC Connection for transaction; nested exception is java.sql.SQLTransientConnectionException: springHikariCPApplication - Connection is not available, request timed out after 10000ms.
This error indicates a potential issue with the installation or configuration of the MicroStrategy Storage service. If you are using a cloud environment, the Storage service is not installed by default so this error is rare. If the error does occur, examine the Library log for error details. The log path is /mstr/MicroStrategy/logs and the log name is MicrostrategyLibrary-MicrostrategyLibrary.log.
This error indicates a potential connection issue with the database. Examine the Library log for error details. The log path is /mstr/MicroStrategy/logs and the log name is MicrostrategyLibrary-MicrostrategyLibrary.log.