Strategy One
Configure OAuth Parameters: Authorization Code Workflow
Strategy One (September 2025) adds support for connecting PingOne to Snowflake for single sign-on.
Starting in Strategy One (March 2025), to connect Snowflake to Microsoft Entra ID and Okta for OIDC sign in, you must configure OAuth parameters.
Determine the OAuth Workflow
Strategy supports two different OAuth workflows in which an OAuth Client can get an access token.
-
Authorization Code: The authorization server can grant the OAuth client an access token on behalf of the user. This method should be chosen for interactive end users to manually fill in login information.
-
Client Credential: The authorization server can grant the OAuth client an access token for the OAuth client itself. This method should be chosen for programmatic, machine-to-machine scenarios. For more information on the client credential workflow, see Configure OAuth Parameters: Client Credential OAuth Workflow.
PingOne and Generic identity providers are not supported by the Client Credential workflow.
See the following steps to configure OAuth parameters depending on your identity provider:
Configure OAuth Parameters with Microsoft Entra ID (Formerly Known as Azure AD)
Step 1: Create a Snowflake OAuth Resource
Follow Configure the OAuth resource in Microsoft Entra ID to configure the OAuth resource in Microsoft Entra ID. Strategy recommends that you set the Application ID URI and note this value as it will be used in the future.
For testing purposes, the "session:role-any" role can be set to bypass the role check when it connects to Snowflake using OAuth connections.
Microsoft Entra ID does not allow the same role format for both OAuth workflows. You must use a different role for each method.
For example, you can add two scopes: USER1_ROLE and USER2_ROLE. USER1_ROLE maps to workflow 1 and USER2_ROLE maps to workflow 2.
Step 2: Create an OAuth Client in Microsoft Entra ID
Follow Create an OAuth client in Microsoft Entra ID to create an OAuth client in Microsoft Entra ID.
-
For the Authorization Code workflow, refer to step 13 of Create an OAuth client in Microsoft Entra ID to choose Delegated Permissions.
Redirect URLS
The following steps in this section are only required if you are using the Authorization Code workflow.
In the Authentication Page of the OAuth client in the Azure Portal, add the following required redirect URLs:
To integrate with Strategy using OAuth:
Web
https://<ISERVER_HOST>/MicroStrategyLibrary/auth/DIOAuthRedirect.jsp
To integrate with Strategy Library or Workstation using OIDC:
Web
https://<ISERVER_HOST>/MicroStrategyLibrary/auth/DIOAuthRedirect.jsp
https://<ISERVER_HOST>/MicroStrategyLibrary/static/oidc/success.html
https:// <ISERVER_HOST> /MicroStrategyLibrary/auth/oidc/login
Mobile and desktop applications
http://127.0.0.1
com.microstrategy.hypermobile://auth
com.microstrategy.dossier.mobile://auth
Step 3: Collect Azure AD Information for Snowflake
Follow Collect Azure AD information for Snowflake to collect Azure AD information for Step 4 of this topic. You will need the following information:
-
<AZURE_AD_ISSUER>from the Federation metadata document. -
<AZURE_AD_JWS_KEY_ENDPOINT>from the OpenID Connect metadata
If you used and noted the Application ID URI in Step 1: Create a Snowflake OAuth Resource, collect that value. This will be used as the <SNOWFLAKE_APPLICATION_ID_URI> value in step 4 of this topic.
Step 4: Create a Security Integration in Snowflake
Execute the following SQL to create a security integration. For more information, see Create a Security Integration in Snowflake.
create security integration external_oauth_azure_2
    type = external_oauth
    enabled = true
    external_oauth_type = azure
    external_oauth_issuer = '<AZURE_AD_ISSUER>'
    external_oauth_jws_keys_url = '<AZURE_AD_JWS_KEY_ENDPOINT>'
    external_oauth_audience_list = ('<SNOWFLAKE_APPLICATION_ID_URI>')
    external_oauth_token_user_mapping_claim = 'upn'
    external_oauth_snowflake_user_mapping_attribute = 'login_name';
If you do not use the Application ID URI, create a security integration with audiences using the Snowflake Account URL (for example, <account_identifier>.snowflakecomputing.com).
Considerations
If you use session:role-any, external_oauth_any_role_mode should be enabled. Using Authorization Code workflow as an example:
create security integration external_oauth_azure_2
    type = external_oauth
    enabled = true
    external_oauth_type = azure
    external_oauth_issuer = '<AZURE_AD_ISSUER>'
    external_oauth_jws_keys_url = '<AZURE_AD_JWS_KEY_ENDPOINT>'
    external_oauth_audience_list = ('<SNOWFLAKE_APPLICATION_ID_URI>')
           external_oauth_token_user_mapping_claim = 'upn'
           external_oauth_any_role_mode= 'ENABLE'
    external_oauth_snowflake_user_mapping_attribute = 'login_name';
Only one security integration can be created with the same Azure AD Issuer. If you want to use both the workflows, update the security integration using the following snippet:
Alter security intergration external_oauth_azure set EXTERNAL_OAUTH_TOKEN_USER_MAPPING_CLAIM = ('upn','sub');Step 5: Create/Alter a User for Snowflake OAuth Login
Create a user for the OAuth login to Snowflake. For example, you can use the following snippet:
CREATE USER Taylor PASSWORD = 'password' LOGIN_NAME = 'taylor@strategy.com' DISPLAY_NAME = 'Taylor' FIRST_NAME = 'Taylor' LAST_NAME = 'Taylor' EMAIL = 'taylor@strategy.com' DEFAULT_ROLE = "PUBLIC" DEFAULT_WAREHOUSE = 'TEST_WH' DEFAULT_NAMESPACE = 'TEST' MUST_CHANGE_PASSWORD = FALSE;The login_name should match the actual Azure AD upn for user authentication.
Step 6 (Optional): Request the OAuth Access Token and Validate
Prepare the cURL command to request the Access Token using the CC grant. For example, credentials of the client.
curl -X POST -H "Content-Type: application/x-www-form-urlencoded;charset=UTF-8" \
  --data-urlencode "client_id=<Client_ID>" \
  --data-urlencode "client_secret=<Client_Secret>" \
  --data-urlencode "grant_type=client_credentials" \
  --data-urlencode "scope=<Scope>" \
'<Token_Endpoint>'
Copy the token from the response and validate it in Snowflake using the following command:
SELECT SYSTEM$VERIFY_EXTERNAL_OAUTH_TOKEN('<Access_Token>');After successful execution, the following response displays:
Token Validation finished.
{
"Validation Result":"Passed",
"Issuer":"https://sts.windows.net/91ccae45-xxxx-xxxx-xxxx-xxxxxxxxxxxx/",
"Extracted User claim(s) from token":"4c99a1d6-50ce-4e7d-9cc2-429c26d613df"
}
Step 7: Collect Azure AD Information for Strategy
You need the following information:
-
<CLIENT_ID>and<CLIENT_SECRET>noted in step 3 when creating an OAuth client. -
<TENANT_ID>from the Overview page of the OAuth Client App from the Azure Portal. -
Find the value of Scopes in the OAuth Resource App's Expose an API page in the Azure Portal and click Copy to clipboard.

The
<SCOPE>values should be in the following formats:-
<SNOWFLAKE_APPLICATION_ID_URI>/session:role:<role_name> -
<SNOWFLAKE_APPLICATION_ID_URI>/session:role-any
-
-
Download the manifest file from the Snowflake OAuth client app in the Azure portal. In the left navigation, click Manifest under Manage and click Download.

Configure OAuth Parameters with Okta
Step 1: Create an Okta Application
-
Log in to Okta.
-
In the Navigation pane, under Applications, click Applications.
-
Click Create App Integration.

-
Choose the OIDC - OpenID Connect sign-in method and choose Native Application.
-
Click Next.
-
Type a name for the integration and choose the Refresh Token and Token Exchange grant types.
-
Add your sign-in redirect URIs.
-
Choose the Allow everyone in your organization to access controlled access.
-
Click Save.
Step 2: Edit the OpenID Connect ID Token
-
Go to Sign On in your newly created application.
-
In OpenID Connect ID Token, click Edit.
-
In the Issuer drop-down list, choose your Okta URL.

-
Click Save.
Step 3: Grant API Scopes
-
Go to Okta API Scopes in your newly created application.

-
Click Grant next to the following scopes:
-
okta.apps.read
-
okta.groups.read
-
okta.user.read
-
Step 4: Create an API (Authentication Server)
-
In the Navigation pane, under Security, click API.
-
Click Add Authorization Server.
-
Type a Name and Audience. For example, the Audience can be a Snowflake account URL.
-
Click Save.
Step 5: Update the API Issuer
-
Go to Settings in your newly created API.
-
Click Edit.
-
In the Issuer drop-down list, choose your Okta URL.
-
Click Save.
Step 6: Add a session:role-any Scope
-
Go to Scopes in your newly created API.
-
Click Add Scope.
-
In Name, Display phrase, and Descriptions, type
session:role-any.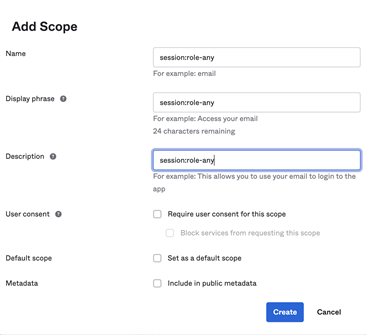
-
Click Create.
Step 7: Create an Access Policy and Rule
-
Go to Access Policies in your newly created API.
-
Click Add Policy.
-
Type a name and description. Optionally edit Assign to.
-
Click Create Policy.
-
Click Add rule.
-
Type your preferred rule options and ensure Authorization Code and Token Exchange are selected.
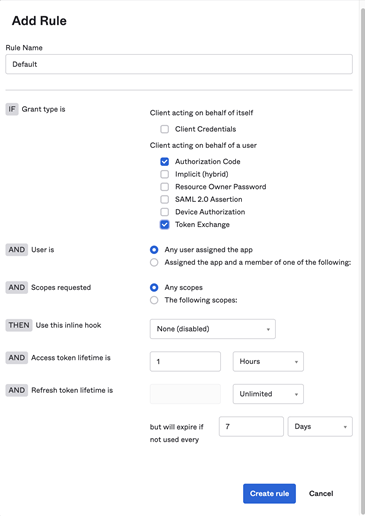
-
Click Create rule.
Step 8: Enable the Okta Integration in Snowflake
-
Open the Authentication server page and locate the
<AUDIENCE>value and Metadata Document URL (for example,https://dev-XXXXXXXX.okta.com/oauth2/XXXXXXXXXXXXXXXXX/.well-known/oauth-authorization-server).
-
Open the Authentication server Metadata Document and locate the
issuerandjwks_urivalues. -
Run the following SQL query in Snowflake:
CopyCREATE OR REPLACE SECURITY INTEGRATION external_oauth_demo
type = external_oauth
enabled = true
external_oauth_type = 'okta'
external_oauth_any_role_mode = 'ENABLE'
external_oauth_issuer = '<ISSUER>'
external_oauth_jws_keys_url = '<JWKS_URI>'
external_oauth_audience_list = ('<AUDIENCE>')
external_oauth_token_user_mapping_claim = 'sub'
external_oauth_snowflake_user_mapping_attribute = 'login_name';Replace
<ISSUER>with the issuer value and<JWKS_URI>with the jwks_uri value you located in the Metadata page.
Step 9: Create/Alter a User for Snowflake OAuth Login
Create a user for the OAuth login to Snowflake such as:
CREATE USER Taylor PASSWORD = 'password'
    LOGIN_NAME = 'taylor@microstrategy.com' DISPLAY_NAME = 'Taylor' FIRST_NAME = 'Taylor' LAST_NAME = 'Taylor'
    EMAIL = 'taylor@microstrategy.com'
    DEFAULT_ROLE = "PUBLIC" DEFAULT_WAREHOUSE = 'TEST_WH' DEFAULT_NAMESPACE = 'TEST' MUST_CHANGE_PASSWORD = FALSE;
LOGIN_NAME must match the Okta sub for user authentication.
Step 10: Collect Okta Information for Strategy
Note the following Okta information to use in Strategy:
-
Authentication Server Metadata URI from Step 8.
-
<CLIENT_ID>from Step 1. -
<OAUTH_URL>is theauthorization_endpointvalue in the Authentication Server Metadata Document. -
<TOKEN_URL>is thetoken_endpointvalue in the Authentication Server Metadata Document. -
<ISSUER>is thetoken_endpointvalue in the Authentication Server Metadata Document. -
<SCOPE>should be in a format similar to the following:offline_access openid email profile session:role-any
Configure OAuth Parameters with PingOne
Step 1: Create a Native App in PingOne
-
In PingOne, click Applications under Applications in the left navigation.
-
Click the plus icon.
-
Type an Application Name.
-
In Application Type, choose Native.
-
In OIDC Setting, under Grant Type, ensure Refresh Token is selected.

-
Add your sign-in redirect URIs.
-
In Custom Attributes, add the following attribute mappings that will be presented in the tokens:

The
nameattribute mapping is required.Attributes PingOne Mappings Scopes sub User ID
openid name
Username
openid
- Click Save.
Step 2: Create an Application Resource
-
In PingOne, click Resources under Applications in the left navigation.
-
Click the plus icon.
-
Type a Resource name and define an Access token time to live in seconds.
-
Click Next.
-
In Attributes, add the following attribute mappings:

Attributes PingOne Mappings sub User ID
name
Username
-
Click Next.
-
Click Add Scope.
-
In Scope name, type
session:role-any.
-
Click the Overview tab and note the Audience value. This value will be used as
<AUDIENCE>in the following steps.
If you did not enter a value in this field, PingOne uses the resource name.
-
Click Save.
Step 3: Select Allowed Scope for Your Native App
-
In PingOne, click Applications under Applications in the left navigation.
-
Find and click the application you created above.
-
In the Resources tab, click the pencil icon.
-
Ensure the check box next to
email,offline_access,openid, andprofileare selected.
-
Select the check box next to the scope you created above,
session:role-any.
-
Note the scope value. This value will be used as
<SCOPE>in the following steps. -
Click Save.
Step 4: Collect PingOne OAuth information for Snowflake and Strategy
-
In PingOne, click Applications under Applications in the left navigation.
-
Find and click the application you created above.
-
In the Overview tab, note the following values:

-
Environment ID. This value is used as
<ENVIRONMENT_ID>below. -
Client ID. This value is used as
<CLIENT_ID>below. -
Issuer ID. This value is used as
<ISSUER>below. -
JWKS Endpoint. This value is used as
<JWKS_URI>below.
-
Step 5: Create the Integration and User in Snowflake
-
Run the following SQL query in Snowflake:
Copycreate security integration snow_pingone
type = external_oauth
enabled = true
external_oauth_type = custom
external_oauth_any_role_mode = 'ENABLE'
external_oauth_issuer = '<ISSUER>'
external_oauth_jws_keys_url = '<JWKS_URI> '
external_oauth_audience_list = ('<AUDIENCE>')
external_oauth_token_user_mapping_claim = 'username' external_oauth_scope_mapping_attribute = 'scope'
external_oauth_scope_delimiter = ' ' external_oauth_snowflake_user_mapping_attribute = 'login_name'; -
Run the following SQL query in Snowflake to create a Snowflake user that maps to a PingOne user. The PingOne user name is its email address.
CopyCREATE USER SNOW_PINGONE LOGIN_NAME = '<PINGONE_USERNAME>'
DISPLAY_NAME = 'OAuth User for PingOne';