Strategy One
Import Data from Microsoft Analysis Services
Starting in Strategy One (February 2026), enhanced Microsoft Analysis Services (MSAS) security is enabled out-of-the-box.
Strategy One (January 2026) adds a preview feature for enhanced security for Microsoft Analysis Services (MSAS) integrations. You can validate OIDC tokens on the Internet Information Services (IIS) and MDX cube provider after you have been validated in Entra ID.
Enable the Preview Feature
You should only perform the following steps if you are using Strategy One (January 2026).
-
Open the Workstation window.
-
Log in to your environment.
-
Click Help and enable Preview Features.
Configure the MDX Cube Provider
-
Install and configure the MDX cube provider using the steps in Install and Configure Analysis Services and the MDX Cube Provider.
-
Disable Anonymous Authentication for the application. For more information on disabling anonymous authentication, see Anonymous Authentication.
-
Add the following additional fields to the
datasources.xmlfile in the application folder:Copy<ValidationInterval>30</ValidationInterval>
<ValidationType>OIDC</ValidationType>
<OIDCIssuer><https://login.microsoftonline.com/${tenant_ID}/v2.0</OIDCIssuer>>
<OIDCUserInfo><https://graph.microsoft.com/oidc/userinfo</OIDCUserInfo>>
Configure the MDX Cube Provider
-
Set up the MDX cube provider using the steps in Install and Configure Analysis Services and the MDX Cube Provider.
-
Disable the Anonymous Authentication for this application.
-
Add any additional fields in the
datasources.xmlfile in the folder of the application:-
ValidationType: Specifies the additional validation mechanism used by the MDX cube provider. The following values are supported:-
OIDC-
The MDX Cube Provider calls the OIDC provider's UserInfo endpoint to retrieve the user's claims.
-
The effective user name is replaced by a specific property taken from the UserInfo claims.
-
You must configure
OIDCIssuerorOIDCUserInfoHigh level workflow: Intelligence sever > MDX Cube Provider > OIDC UserInfo endpoint > Claims returned > Effective user name updated
-
-
OIDC_OFFLINE-
The MDX Cube Provider does not call the UserInfo endpoint.
-
Instead, it validates the provided OIDC ID token locally, according to standard JWT rules (signature, expiration, issuer, etc.)
-
The effective user name is replaced by a specific property extracted from the ID token claims.
-
When this type is set, OIDCIssuer is mandatory.
-
It is used to validate the
iss(issuer) claim of the ID token and to obtain the issuer's metadata (for example, JWKS).This mode does not depend on online access to the UserInfo endpoint.
-
-
-
ValidationInterval-
Meaning: Timeout for requests between Intelligence Server and the MDX Cube Provider.
-
Unit: seconds.
-
Default:
30seconds. -
This setting is only effective when
ValidationTypeis set to a valid value (for example,OIDCorOIDC_OFFLINE).
-
-
OIDCIssuer-
Meaning: The issuer URL of the OIDC provider (corresponds to the
issuerfield in the OIDC configuration). -
Usage: Typically used to obtain the OIDC discovery document (usually located in
/.well-known/openid-configuration) and JWKS, authorization endpoints, and more. -
Requirement: This field is required when
ValidationType = "OIDC_OFFLINE".
-
-
OIDCUserInfo
-
Meaning: The
UserInfoendpoint URL of the OIDC provider. -
Usage: When
ValidationType = "OIDC", the MDX Cube Provider sends requests to this endpoint to retrieve user claims. -
How to obtain: Usually from the issuer's OIDC discovery document, for example, the JSON at
https://<issuer>/.well-known/openid-configuration, the fielduserinfo_endpoint:Copy<ValidationInterval>30</ValidationInterval>
<ValidationType>OIDC</ValidationType>
<OIDCIssuer><https://login.microsoftonline.com/${tenant_ID}/v2.0</OIDCIssuer>>
<OIDCUserInfo><https://graph.microsoft.com/oidc/userinfo</OIDCUserInfo>>
-
-
Configure the Intelligence Server and Workstation
-
Configure OIDC with Entra ID using the steps in Integrate OIDC support with Microsoft Entra ID.
-
Create an identity and access management object using the steps in Manage OAuth Enterprise Security with Identity and Access Management (IAM) Objects.
-
Create a database instance using the following steps:
- Open the Workstation window.
- In the Navigation pane, click
 , next to Data Sources.
 -
Click Microsoft Analysis Services.
-
Type a Name.
-
Expand the Default Database Connection drop-down list and click Add New Database Connection.
-
Type a Name.
-
Expand the Driver drop-down list and choose a Driver.
-
Enter your URL, Data Source Information, and Catalog.
-
Expand the Default Database Login.
-
Choose an existing login or click New Database Login.
Ensure the login you select or create is a user that can access the MDX cube provider you configured above.
-
Select the check box next to Enable OIDC validation on effective user name.
-
Expand the Authentication Service drop-down list and choose the IAM object you created in step 2.
-
Select the check box next to Enable SSAS database authentication.
-
Enter the User and Password for the SSAS power user.
If a user wants to use
effectiveUserName, add the additional parameters to the connection string.EffectUserName=email. -
Click Save.
-
Click Save.
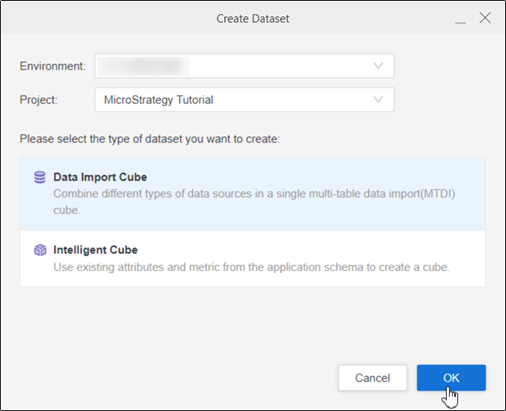
Import Data
- Open the Workstation window.
-
In the Navigation pane, click
, next to Datasets. -
Select your environment and project, Data Import Cube, and click OK.
-
In Data Catalog, expand the OLAP section.
-
Expand your MSAS data source and double-click cubes or drag them into the right pane.
-
View the cubes to import in the right pane.
-
Click Save.
-
In Browse Catalog, expand the cube and drag the tables you want to add into the right pane.
-
If you want to use hierarchy reporting, select the check box next to Import hierarchy as hierarchical attribute.
For more information on hierarchical attributes, see Import Hierarchical Attributes.
-
Click Finish.