MicroStrategy ONE
Reports: Adding attributes to a report
Attributes are MicroStrategy objects that represent the business concepts reflected in your stored business data in your data source. Attributes provide a context in which to report on and analyze business facts or calculations. While knowing your company's total sales is useful, knowing where and when the sales took place is much more helpful for analysts. For details on attributes, see Providing business context to a report: Attributes.
Selecting the right attributes
When you choose attributes to place on a report, select attributes that make sense together. For example, Product Supplier and Customer Income Bracket do not make much sense when their related data is displayed side-by-side on a report. It is difficult to imagine a metric that can be included on a report with these attributes, which would calculate useful report results which would be meaningful for both these attributes.
However, the Customer Income Bracket attribute makes sense when it is combined with the Product attribute on a report, where they might allow an analyst to consider a list of products preferred by higher and lower income bracket customers. The Product Supplier attribute makes more sense when combined with any or all of the attributes Ship Date, Rush Orders, Weeks to Ship, or some other attribute related to the supply chain.
To add an attribute to a report
If you are using one of your organization's projects, this procedure assumes attributes have been created. Attributes are usually created by your project's designer. If attributes need to be created, see the Project Design Help.
- In MicroStrategy Web, create a new report in Design Mode. See Creating a report with the Report Editor.
-
In the All Objects pane on the left, navigate to your project's attributes folder and open it.
- If you are using the Tutorial project, open the Schema Objects folder, then open the Attributes folder. Select any attribute to use for the next step. In this procedure, Category attribute from the Products folder is used.
- To search for an attribute in your project, type the name of the attribute in the Find text field and press Enter or click the Find icon.
- To add an attribute to the report, do one of the following:
- Drag and drop the attribute to the desired location on the report's grid.
- Double-click the attribute to add it to the report.
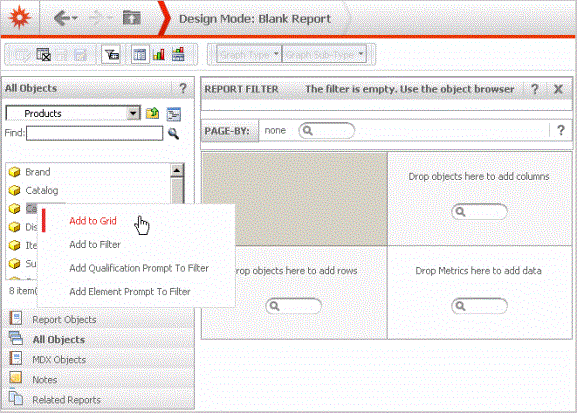
- Right-click the attribute and select Add to Grid as shown in the image below, then move it to the desired location on the report's grid.

Attributes are commonly displayed in a report's rows, although you can add attributes to a report's column, if you want. To add an attribute to a column, do one of the following:
-
Drag and drop the attribute to the Drop objects here to add columns area of the grid.
-
Right-click the attribute name, select Move and select To Columns.
- The attribute appears in the row or the column section of your report's template depending upon where it is added, as shown in the image below:

- Repeat the steps above to add additional attributes to your report, if you wish.
- Almost all reports have one or more attributes, one or more metrics, and one filter. If you need to, use the following sections of this manual to add additional objects to your new report:
- Metrics: See Reports: Adding metrics to a report.
- Filters: See Reports: Adding a filter to a report.
- Prompts: See Reports: Adding prompts to a report, metric, or filter.
- Save the report.
