Strategy One
Secure Communication in Strategy
SSL (secure socket layer) and TLS (transport layer security) are encryption technologies that encode communication over the Internet or local network so that only the recipient can read it. Strategy Intelligence Server opens two ports for SSL communication. The default port 39321 uses SSL without client certificate verification. The second port 39320 provides extra security by enforcing client certificate verification.
Strategy administrators should refer to the information security policy of your particular organization or IT department before choosing an encryption configuration for your Strategy environment.
A certificate signing request (CSR) must be generated to obtain an SSL certificate from a third party certification authority(CA). Refer to the requirements of your CA for the necessary steps to generate a CSR, your private key, and obtain your SSL certificate. If you are using a self-signed certificate, the key algorithm, key size, and signature algorithm should be set according to your IT administrator's requirements. For steps to generate your certificate, see Self-Signed Certificates: Creating a Certificate Authority for development.
Configuring SSL for Intelligence Server
You must have the SSL certificate you created for Intelligence Server.
You must have the private key file that you created while requesting a certificate for Intelligence Server.
To Configure SSL for Intelligence Server
- From the Start menu, choose All Programs > MicroStrategy Tools > Configuration Wizard.
- On the Welcome screen, select Configure Intelligence Server, and click Next.
- If you have previously configured Intelligence Server, click Next until you reach the SSL Configuration page. If this is the first time you are configuring Intelligence Server, click Help for instructions to configure Intelligence Server.
- In the SSL Configuration page, enable the Configure SSL check box.
- Click the button next to the Certificate field and browse to the certificate you created for Intelligence Server.
- Click the button next to the Key field and browse to the private key file you created while requesting the certificate for Intelligence Server.
- In the Password field, type the password that you used while creating the private key for the certificate.
- In the SSL Port field, type the port number to use for SSL access. By default, the port is
39321.
Configuring Web and Mobile Server Truststore
Strategy currently supports three certificate types for setting up SSL communication between Strategy components. The table below lists the supported certificate types the necessary actions to complete setup.
| Certificate Type | Signing Authority | Strategy Web or Mobile Server Truststore Location | Configuration Actions |
|---|---|---|---|
| CA Signed Public | Public certification authority such as Verisign or Thawte | <JRE>/lib/security/cacerts
<JRE> location depends on the Application Server being used. |
|
| CA Signed Enterprise | Self-signed by Enterprise root CA | /WEB-INF/trusted.jks
|
|
| Self-Signed Certificate |
Self-signed by certificate creator |
/WEB-INF/trusted.jks
|
|
Steps to Add Certificates to Web or Mobile Server Truststore
Once you have populated the Keystore on Intelligence Server with your SSL certificate and private key, follow the steps below to add the necessary certificate to the client Truststore.
- Locate your Strategy Web or Mobile deployment and locate its
WEB-INFdirectory.- IIS ASP Web:
C:\Program Files (x86)\MicroStrategy\Web ASPx\WEB-INF\ - IIS ASP Mobile:
C:\Program Files (x86)\MicroStrategy\Mobile ASPx\WEB-INF\ - JSP Web or Mobile: The location depends on your .war file deployment
- IIS ASP Web:
- Open a Command Line terminal and navigate to the
WEB-INFdirectory. - Execute the following keytool command found under
MICROSTRATEGY_JRE.<MICROSTRATEGY_JRE>/bin/keytool -importcert -trustcacerts -alias "<certificate_common_name>" -keystore trusted.jks -storepass mstr123 -file cert.pem- If the file
trusted.jksdoes not exist it will be created. - The
storepassvalue refers to your Truststore password. This value is set to mstr123 by default. Use your unique Truststore password if it was changed.If the truststore password was changed, the
sslTruststorePasswordvalue in themicrostrategy.xmlshould be modified accordingly. - The
cert.pemfile refers to the certificate(s) previously obtained. - Any
aliasvalue may be used, but the certificate common name is recommended, as long as the alias is unique in the Truststore.
- If the file
SSL with Client Certificate Verification
Client certificate verification, also referred to as mutual authentication, is an optional step in the SSL protocol. Through this second certificate verification, Intelligence Server verifies the identity of Strategy Web or Mobile server (client). Client certificate verification requires that a Keystore and Truststore are set up on Intelligence Server as well as on the client to complete the trusted connection. The following sections describe how to set up your client Keystore and Intelligence Server Truststore by generating self-signed certificates for your Web and Mobile Server clients.

Steps to Setup the Client Keystore
- Open a Command Line terminal and navigate to the WEB-INF directory
- Execute the following keytool command found under
MICROSTRATEGY_JRE:<MICROSTRATEGY_JRE>/bin/keytool -genkeypair -keyalg RSA -keysize 2048 -sigalg sha256withrsa -validity 365 -alias <client_certificate_common_name> -dname "CN=YOUR_FULLY_QUALIFIED_DOMAIN_SERVER_NAME" -keystore clientKey.jks -storepass mstr123If prompted to set a key password, press Enter to default the key password to match the store password. If your password was changed from the default of mstr123 update the parameter in your
WEB-INF/microstrategy.xmlfile. Optionally, you can change the location or name of the Keystore fileclientKey.jksat this time via the sslClientKeystore parameter in themicrostrategy.xmlfile.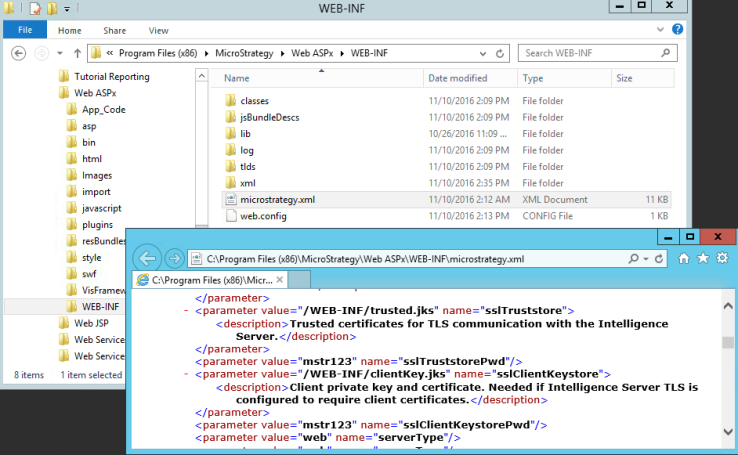
- Restart Strategy Web and Mobile Server.
- Extract the certificate information with the following command, replacing the default password with your own if necessary. The file created will be needed to set up the Truststore for Intelligence Server.
keytool -exportcert -rfc -keystore clientKey.jks -alias <client_certificate_common_name> -file cert.txt -storepass mstr123 - Repeat this process for each Web and Mobile deployment.
Steps to Set Up Intelligence Server Truststore
- Create a simple text file, for example
truststore.txt, and add the certificate information for each certificate created during client Keystore creation. - Save this file to the
certsfolder in Intelligence Server directory. - Launch Configuration Wizard and navigate to SSL Configuration in the Configure Intelligence Server section.
- Check the Configuring port requires Client Certificate check box, as shown below:
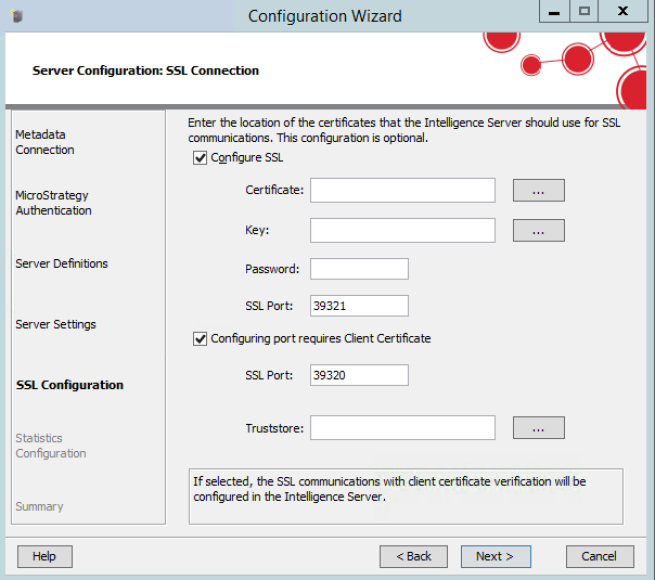
- Click the Browse button next to the Truststore field and select the
truststore.txtfile containing your client certificate information. - Click Next and follow the Configuration Wizard prompts to restart Intelligence Server.