MicroStrategy ONE
Specifying attribute roles
To see both roles on the same report, you must treat them as different attributes. That is, they must have different attribute names. To create unique attributes, you have the following options:
-
Automatic attribute role recognition, where you create multiple attributes that have the same lookup table and allow MicroStrategy to automatically detect the multiple roles. Automatic recognition is enabled by the VLDB property Engine Attribute Role Options at the database instance level. For more information on VLDB properties, refer to the Supplemental Reference for System Administration.
-
Explicit table aliasing, where you create multiple logical tables pointing to the same physical table and define those two logical tables as the lookup tables for the two attributes.
In a MicroStrategy project in which automatic attribute role recognition is enabled (meaning that the database instance-level VLDB property, Engine Attribute Role Options, is enabled), you can have a maximum of 99 attributes defined on the same column of the same lookup table. If you create more than this number of attributes, you encounter an error, and are unable to update the project schema or restart Intelligence Server.
Table aliasing provides advanced users with more control. If you are upgrading or have a very complex schema, it may be the better alternative. If you are new to MicroStrategy, however, it is easier to use automatic attribute role recognition. MicroStrategy recommends that you take advantage of automatic role recognition if you do not know the details of the modeling logic or the database.
Automatic recognition does not work if the attributes are in the same hierarchy, meaning that a child attribute is shared. For example, in the State example provided above, the two State attributes do not have a common child attribute.
In summary, if you identify that any one of your attributes needs to play multiple roles, an attribute must be created in the logical model for each of the roles. Remember this rule to help you identify attribute roles: If you want to see the same attribute multiple times on one report, as Ship Month and Order Month, for example, the attribute has multiple roles. In this example, Month is the attribute that has multiple roles. You can use either automatic attribute role recognition or explicit table aliasing to create the attribute roles.
Using automatic attribute role recognition
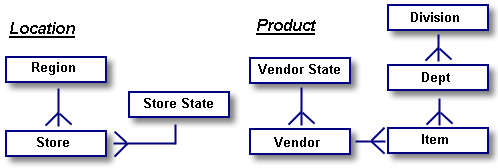
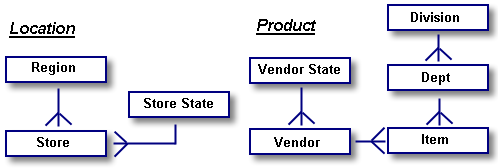
In the data warehouse, a query involving both Vendor State and Store State needs to use the State table twice in the same query to get correct results. You can set up two attributes, Store State and Vendor State, both of which use the same lookup table. The resulting SQL code contains a self-join with the LU_State table. The logical model would look like the following:

Note that both roles for the State attribute are included in the logical model so that "State" can be considered from two different perspectives. Since the state in which a vendor resides and the state in which one of the stores is located are two different things, the logical model must reflect that. Automatic recognition allows these two attributes, Vendor State and Store State, to access the same lookup table, using different attribute names for the same expression.
Automatic role recognition works only when the attributes use exactly the same expression, which in most cases simply represents a column or columns in a lookup table.
Consider the following sample desired report:

In this case, the request is, "Show me total sales by Store State for all my vendors in Arkansas (Store State ID = 15)." The same lookup table, LU_State, can be used for both attributes, Store State and Vendor State, if attribute roles are used. The two attributes refer to the same columns of that table.
To use automatic attribute role recognition, you must select the Engine Attribute Role Options, found in the database instance-level VLDB Properties under Query Optimization. See the MicroStrategy Developer Help (formerly the MicroStrategy Desktop Help) or the System Administration Help for steps to set this VLDB property.
Explicitly aliasing tables to specify attribute roles
Explicit table aliasing provides more robust functionality than automatic recognition, so advanced users are encouraged to take advantage of this solution.
An attribute such as State can play more than one role in the data warehouse; it can represent the Vendor State or the Store State. In this case, the State attribute is said to play two roles: it refers to both the location of a vendor as well as the location of a store.
When you use explicit table aliasing to designate attributes that have multiple roles, both roles for the State attribute are included in the logical model so that State can be considered from two different perspectives. The logical model would look like the following, just as it would if you used automatic recognition:

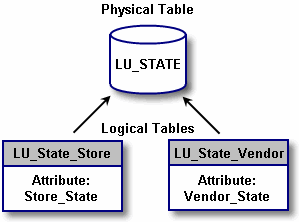
The difference between automatic recognition and explicit table aliasing is that when you use explicit table aliasing, you create separate lookup tables in the schema, but point them each to the same physical table.
If you use explicit table aliasing for the Store attribute, one table (LU_STATE_STORE) contains the attribute Store State while the other (LU_STATE_VENDOR) contains Vendor State, as shown in the following diagram.

Consider the following sample desired report that should provide data about the total sales by Store State for all vendors in Arkansas (Store State ID = 15):

When explicit table aliasing is used, the two lookup tables LU_STATE_STORE and LU_STATE_VENDOR are used. Since they are just different names for the same physical table, the report accesses the same physical table, LU_STATE, for both state names, as shown by this sample SQL:
SELECT a12.State_Desc as State_Desc
SELECT a13.State_Desc as State_Desc
FROM LU_STATE a12
LU_STATE a13
When you create a table alias, the selected table is copied, allowing you to rename a copy of the same table. When you are ready to create new attributes—as in the example discussed above—you can map the appropriate table to each attribute. In the case above, you would select the LU_STATE_STORE table for the Store State attribute and LU_STATE_VENDOR for Vendor State.
Table aliases are one kind of logical table. For information about logical tables, refer to Logical Tables.
You can also use Architect to create attribute roles with explicit table aliasing, as described in Creating and modifying multiple attributes.
To create attribute roles with explicit table aliasing
This procedure provides steps to re-create the example of explicit table aliasing described in this section. The LU_STATE table is not included in the MicroStrategy Tutorial project. However, you can use the same high-level procedure and concepts as guidelines to create attribute roles in your project setup.
-
In MicroStrategy Developer, log in to the project to create attribute roles with explicit table aliasing.
-
Navigate to the Schema Objects folder, and then select the Tables folder.
-
Right-click the LU_STATE table and select Create Table Alias. An LU_STATE(1) table is created.
-
Right-click LU_STATE(1), select Rename, and rename the table as LU_STATE_STORE.
-
Right-click the LU_STATE table and select Create Table Alias. An LU_STATE(1) table is created.
-
Right-click LU_STATE(1), select Rename, and rename the table as LU_STATE_VENDOR.
Create the attributes
-
Select the Attributes folder.
-
From the File menu, select New, and then Attribute. The Create New Form Expression dialog box opens.
-
From the Source table drop-down list, select
LU_STATE_STORE. -
In the Available columns pane, double-click STATE_ID, which identifies the attribute role.
-
Select Manual mapping and click OK. The Create New Attribute Form dialog box opens.
-
From the Source table drop-down list, select the same
LU_STATE_STOREtable. -
Click OK. The Attribute Editor opens.
-
Click New to create any other required attribute forms for the State Store attribute, such as a description attribute form. You must make sure to map any State Store attribute forms to columns from the
LU_STATE_STOREtable. -
Save the State Store attribute once you are finished mapping attribute forms to columns of the
LU_STATE_STOREtable. -
Create a Vendor State attribute with the same sub-procedure (Create the attributes) used to create State Store above, except you must use the
LU_STATE_VENDORtable instead of theLU_STATE_STOREtable.
