MicroStrategy ONE
Hierarchy browsing
Once you choose which attributes to place in a hierarchy, you can define the relationships between them. These relationships determine how users can browse the attributes from the Hierarchies folder.
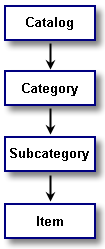
For example, if Catalog, Category, Subcategory, and Item are the attributes that comprise the user hierarchy Catalog Items, the hierarchy resembles the example below, showing the parent/child relationships between the attributes. For example, in the hierarchy below, Catalog is a parent attribute of Category and Category is the child attribute of Catalog.

A user hierarchy does not need to have these direct relationships defined. It can simply be a collection of attributes.
Attributes in a hierarchy can have both browsing and drilling relationships between them. Browse attributes are attributes you specify a user can directly browse to from a given attribute in the user hierarchy. When you apply browse attributes to attributes in a hierarchy, you are specifying what levels of detail are visible when browsing the Data Explorer. Including hierarchies in the Data Explorer makes the hierarchies available for reports and to users in the project. For more information on including hierarchies in the Data Explorer, see Enabling hierarchy browsing in reports: Data Explorer.
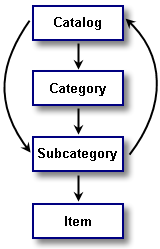
For each attribute in a hierarchy, you can assign one or more browse attributes to it. Using the example above, some of these attributes have been assigned a browse attribute. Specifically:
|
Hierarchy Attribute |
Browse Attribute(s) |
|
Catalog |
Category, Subcategory |
|
Category |
Subcategory |
|
Subcategory |
Catalog, Item |
|
Item |
|
The addition of these browse attributes allows users to see the Subcategory elements directly from the Catalog attribute, without having to first browse down through the Category attributes to get to Subcategory. The ability to browse more directly through the hierarchy can be represented as shown below.

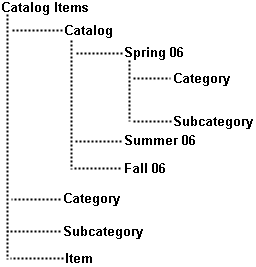
In the Data Explorer, the hierarchy described above resembles the example below.

Users can now view the subcategories in the catalog without first having to browse through the categories.
Enabling hierarchy browsing in reports: Data Explorer
You can make hierarchies available for browsing and including in reports by storing the hierarchies in the Data Explorer. Moving hierarchies to and from this folder also allows you to keep some hierarchies visible to users while hiding others. The Data Explorer is a tool in the Object Browser that holds the system hierarchy and the user hierarchies. When you create a new project, the system hierarchy for that project is automatically placed in the Data Explorer.
You can save user hierarchies in any folder. However, to make a user hierarchy available for browsing in the Data Explorer you must place it in the Data Explorer folder—a subfolder of the Hierarchies folder, which is located in the Schema Objects folder.
Drilling using hierarchies
Drilling is a function in MicroStrategy reports that allows users to browse different levels of attributes along specified paths. Depending on the level of the attributes included in the drilling specification, reports can allow users to drill down, up, and across to different levels of detail.
When a user selects a drilling path in a report, the report refreshes to display the selected level of detail. For example, on a report with the Year attribute and Revenue metric, the user can drill down on the Year attribute to a lower level attribute such as the Month attribute. A new report is automatically executed; on the new report, Revenue data is reported at the Month level.
You can make user hierarchies available for drilling. This option enables you to determine, at a project level, the attributes to which users can drill from other attributes. In the example of the Year and Month attributes, drilling is enabled in the Time hierarchy, which contains the two attributes. This allows a user to drill down from Year to Month and, if they need to, drill back up from Month to Year.
To enable a user hierarchy as a drill path, you must enable the user hierarchy to be used as a drill hierarchy in the Hierarchy Editor. If a user hierarchy is not enabled, the default drill path is defined by the System Hierarchy.
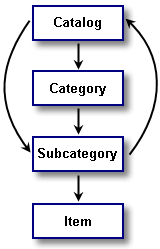
Therefore, you can think of browsing paths in a user hierarchy as potential drilling paths. For example, in the following hierarchy, Subcategory is a browse attribute of Catalog, which means that you can access the elements of Subcategory without having to necessarily access the elements of Catalog in Data Explorer. If you enable drilling in this hierarchy, you can drill from Catalog down to Subcategory—and any other browse attributes of Catalog—on a report.

A drill hierarchy can be used for browsing as well as drilling. However, the way in which you browse attributes may not be the same way in which you drill on attributes in reports. If your drilling and browsing paths between attributes are different, you should create separate drilling and browsing hierarchies.
Prerequisite
A hierarchy has been created.
To define a user hierarchy as a drill hierarchy
-
In MicroStrategy Developer, open a hierarchy using either the Hierarchy Editor or Architect, as described below.
-
Locate a hierarchy in the Folder List, right-click the hierarchy, and select Edit. The Hierarchy Editor opens.
-
From the Schema menu, select Architect. MicroStrategy Architect opens.
From the Hierarchy View, in the Hierarchies drop-down list, select a hierarchy.
If a message is displayed asking if you want to use read only mode or edit mode, select Edit and click OK to open the schema editor in edit mode so that you can make changes to the hierarchy.
-
If you are only given the option of using read only mode, this means another user is modifying the project's schema. You cannot use edit mode until the other user is finished with their changes and the schema is unlocked.
-
For information on how you can use read only mode and edit mode for various schema editors, see Using read only or edit mode for schema editors.
-
-
To define a user hierarchy as a drill hierarchy:
-
With the Hierarchy Editor, select the Use as a drill hierarchy check box located at the bottom of the Hierarchy Editor.
-
With Architect, right-click within the Hierarchy View and select Use As a drill hierarchy.
-
-
In the Hierarchy Editor or Architect, click Save and Close to save your changes and return to Developer.
-
From the Schema menu, select Update Schema.
After a user hierarchy is enabled for drilling, the hierarchy contributes to the drilling path of any attributes in it. Additional information on drilling is available in the Advanced Reporting Help.
